How To Get an IP Address From Another Country in 2026

- Using a VPN To Get an IP Address From Anywhere — Step-by-Step Guide
- Best VPNs to Change Your IP to Another Country in 2026
- Can I Use a Free VPN To Change My IP to a Different Country?
- Using a Proxy Server To Change Your IP Address
- Changing Your IP Address With the Tor Browser
- Reset Your Router To Change Your IP Address
- Why Is My IP Address Not Changing to a Specific Country — Troubleshooting Tips
- FAQs
- Conclusion
There are several ways to change your IP address, depending on your needs. Each option changes the way your device connects to the internet, making it appear as if your traffic is coming from somewhere else. However, not all methods are reliable, fast, or enable you to choose a specific country.
Popular methods include using a VPN, connecting through a proxy server, browsing with Tor, or resetting your router. Do you need a VPN to change IP addresses? No, but if you want to get a specific country's IP address, like Egypt, Georgia, South Korea, Hungary, or the US, a VPN is usually the most effective and user-friendly solution. It's estimated that upwards of 1.75 billion people in the world use VPNs (Demand Sage, 2025)1.
We detail every method below and provide its pros and cons so you can decide which option is best for you. In short, a VPN lets you select a server in your desired country, giving you an IP address from that region. You can also use a free VPN, but it has fewer server locations and other restrictions. Proxies and Tor can change your IP, but not to a precise country selection, and they might be slower and less secure. Resetting your router only provides a new IP from your current internet provider, which won’t help if you need one from another country.
Short on Time? Here Are the Best Ways To Change Your IP Address in 2026
| Pros | Cons | |
| Premium VPN | ✅ Widest selection of locations, including Colombia, Ukraine, and Kazakhstan ✅ Military-grade encryption for privacy and security ✅ Fast, stable connections for uninterrupted streaming ✅ Works with all major operating systems ✅ Easy-to-use with native apps ✅ Reliable customer support |
❌ Require payment and registration with an email address |
| Free VPN | ✅ Free ✅ Let's you pick servers in a few countries ✅ Safe and privacy-friendly (especially if they’re freemium VPNs) ✅ Many are user-friendly |
❌ Limited server selection (sometimes only 1 location) ❌ Can’t always choose a location ❌ Slower speeds due to overcrowding ❌ Many cap data ❌ Some free VPNs are unsafe and steal customer data |
| Proxy Server | ✅ Often free ✅ Some have a large selection of locations to change your IP |
❌ Unsafe since they provide no encryption ❌ Can leak your real IP ❌ Often blocked by streaming services ❌ Premium proxies typically ask for personal information during registration ❌ Can be slow and unreliable |
| Tor Browser | ✅ Free ✅ Strong security since it reroutes traffic multiple times ✅ Offers access to .onion sites |
❌ Usually doesn’t let you choose a country (exit nodes are random) ❌ Extremely slow speeds from all the rerouting ❌ Not suitable for streaming, gaming, or torrenting ❌ Some websites block Tor traffic |
| Reset Your Router | ✅ Free and quick ✅ No extra software needed |
❌ Changes your IP number, but not your location ❌ Doesn't guarantee a new IP after every reset ❌ Resetting often can damage your router ❌ No added security or privacy ❌ Can't bypass geo-restrictions |
Using a VPN To Get an IP Address From Anywhere — Step-by-Step Guide
You can get another country's IP address with a VPN in a few minutes. A premium VPN is our top choice because it allows you to pinpoint your new IP location with greater precision and encrypts your connection without compromising speeds. 24% of people use VPNs to access content from other countries (Forbes, 2025)2, so you're not alone.
Can you use a VPN on any device? VPNs can be used on both mobile and desktop devices, and it’s estimated that 42% of mobile owners use VPNs compared to only 35% on desktop (VPN Alert, 2024)3.
While VPNs don’t have native applications for every device, like Xbox or Roku, connecting a VPN to your router changes the IP address and encrypts the connection of every device on the network. So, it’s not a bad idea. Our guide details how to change IPs on a desktop, but the process is nearly identical to that of any native VPN app.
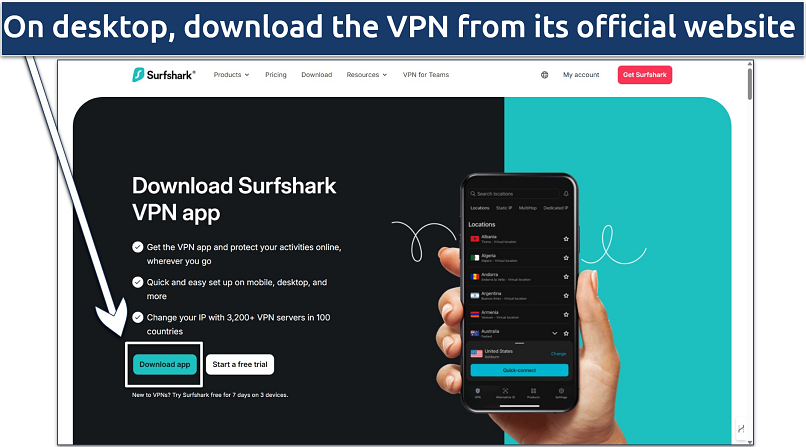
1. Choose and Install a VPN
You’ll want to pick a VPN that offers servers in the location (or locations) you’re interested in. For example, Surfshark has servers in Romania, allowing it to provide a Romanian IP address. This makes it possible to securely access Atena Play or Digi24 from anywhere. Similarly, if you’re trying to get a Saudi Arabia IP address, you’ll want to find a VPN with many servers in the country.
Most VPNs will require you to register before downloading by providing an email address and a payment method. We don’t recommend using VPNs that ask for more personal information — top VPNs let you pay with cryptocurrency for more privacy. After you’ve downloaded the installation file, you only have to follow a few instructions before booting it up.
 Mobile users can find the VPN in their device's app store
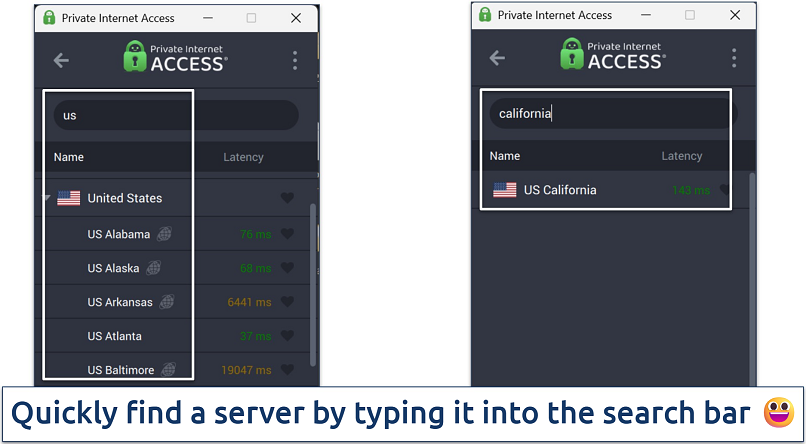
2. Search for the Country You Want
Once the VPN is installed, you need to find the server you’re looking for. The best VPNs have intuitive interfaces with a large map or server list you see right after you log in. Selecting the right country is crucial for accessing the necessary services safely. For example, Paramount+ is primarily available in the US, so an American IP is needed to access it securely.
 Many VPNs let you add servers to favorites
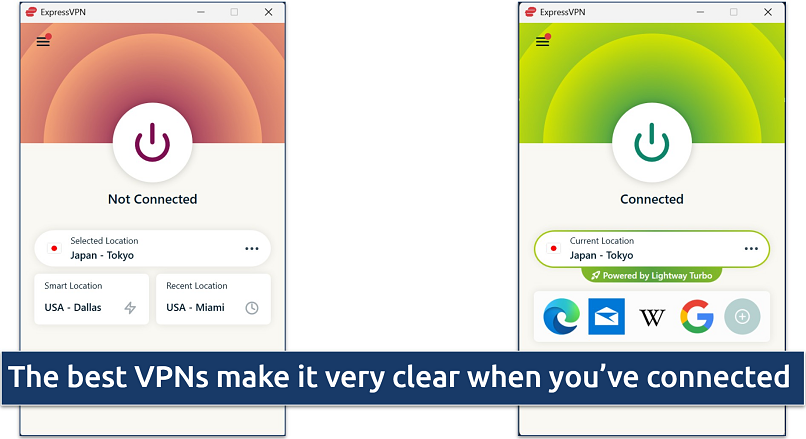
3. Connect to a Server
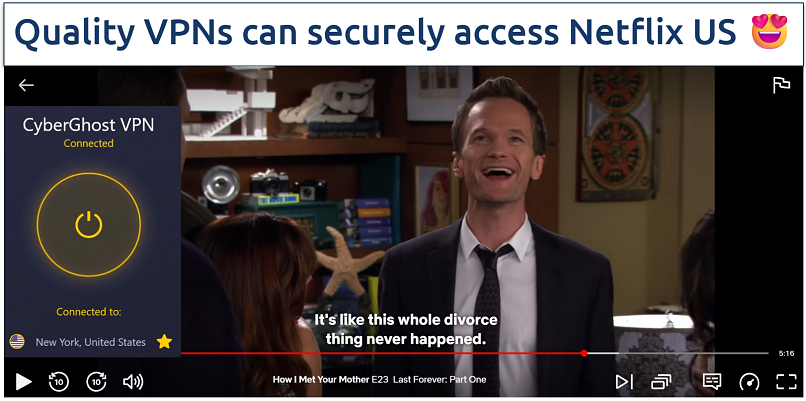
You can now connect to the server to change your IP address and conceal your real one. A good VPN will come properly configured for top security right out of the box. But you might want to take a peek at the settings before connecting. VPNs often let you connect with different protocols, or offer things like a kill switch that you can toggle on and off; this feature disconnects you from the internet if the VPN unexpectedly drops. Once that’s set, you can connect. For example, with a Japanese IP address via a VPN, you can safely access the Rakuten banking app from anywhere.
 There's usually a big connect button, or you can double-click a server
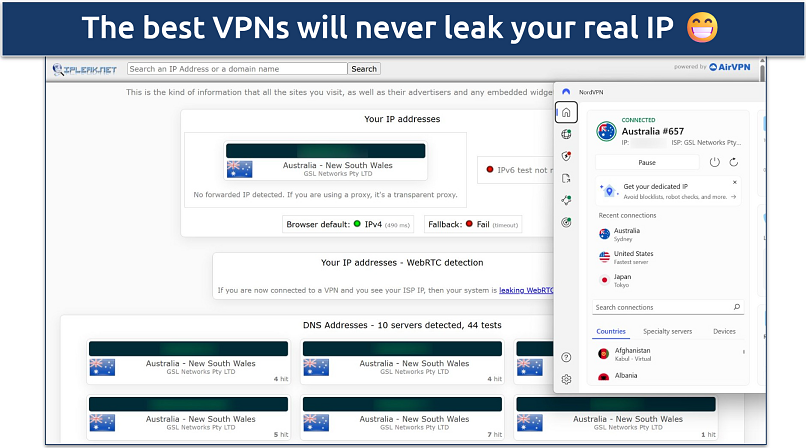
4. Test Your New IP Address
We recommend using a leak testing tool to verify your IP has successfully changed. All you have to do is visit one of the many IP checker websites available. They will automatically detect which IP address your device is currently displaying. If the VPN has done its job, your real location will be hidden, and the websites you visit will only see the VPN’s server IP. If an IP address is leaking, streaming services like BBC iPlayer and ITVX will know that you're not using a UK IP address and block access, even if you're using a VPN for security purposes.
 Some less reputable VPNs can also connect you to a different country than the one listed
5. Browse Content From Another Country
Now you can start browsing, torrenting, gaming, and using the internet as you usually would. Region-specific websites, e-commerce sites, and banking apps are often geoblocked. With a new IP address, you can access specific country services safely from anywhere.
 You won't experience significant load times with the right VPN
Best VPNs to Change Your IP to Another Country in 2026
Whether you want an IP address from the US, the UK, Cuba, the UAE, India, Algeria, or elsewhere, not every VPN offers coverage in those regions. Some VPNs rely on physical servers located in the country, while others use virtual servers that route traffic through nearby regions but still assign you the desired IP.
Physical servers aren't always a possibility, for example, in countries that don't allow VPNs or have strict surveillance and data collection practices, like India. In this case, a VPN provider might run a virtual server hosted elsewhere (say, Singapore) that assigns you an Indian IP address. To the outside world, it looks like you're browsing from India, even though the hardware isn't located there.
The table below highlights the VPNs we found that provide the most servers (physical or virtual) in various countries.
 Albania
 Algeria
 Andorra
 Argentina
 Armenia
 Australia
 Austria
 Azerbaijan
 Bahamas
 Bangladesh
 Belgium
 Bermuda
 Bhutan
 Bolivia
 Bosnia & Herzegovina
 Brazil
 Brunei
 Bulgaria
 Cambodia
 Canada
 Cayman Islands
 Chile
Chile
 Colombia
 Costa Rica
 Croatia

 Cyprus
 Czechia
 Denmark
 Dominican Republic
 Ecuador
 Estonia
 Finland
 France
 Georgia
 Germany
 Ghana
Ghana
 Greece
 Guam
Guam
 Guatemala
 Honduras
 Hungary
 Iceland
 India
India
 Indonesia
 Ireland
 Isle of Man
 Israel
 Italy
Italy
 Jamaica
 Japan
Japan
 Jersey
 Kazakhstan
 Kenya
Kenya
 Laos
Laos
 Latvia
 Lebanon
 Liechtenstein
 Lithuania
 Luxembourg
 Malaysia
 Malta
Malta
 Mexico
 Moldova
 Monaco
 Mongolia
 Montenegro
 Morocco
 Myanmar
 Nepal
Nepal
 Netherlands
 New Zealand
 North Macedonia
 Norway
 Pakistan
 Panama
 Peru
Peru
 Philippines
 Poland
 Portugal
 Puerto Rico
 Romania
 Serbia
 Singapore
 Slovakia
 Slovenia
 South Africa
 South Korea
 Spain
Spain
 Sri Lanka
 Sweden
 Switzerland
 Taiwan
 Thailand
 Trinidad and Tobago
 Ukraine
 United Kingdom
 United States
 Uruguay
 Uzbekistan
 Venezuela
 Vietnam
 Greenland
 Nigeria
 Belize
 El Salvador
 Paraguay
 Papua New Guinea
 Angola
 Bahrain
 Comoros
 Libya
Libya
 Mauritania
 Mozambique
 Rwanda
 Senegal
 Somalia
 Haiti
Haiti
 Nicaragua
 Chad
Chad
 Ivory Coast
 Eritrea
 Mauritius
 Tajikistan
 Tanzania
 Togo
Togo
 Yemen
Yemen


 Hong Kong
 Macao
Macao
 Afghanistan
 Iran
Iran
 Syria
Syria
 Turkey
 UAE
UAE
 Turkmenistan
 Belarus
 Egypt
Egypt
 Ethiopia
 Sudan
Sudan
 South Sudan
 Iraq
Iraq
 Jordan
 Kuwait
 Qatar
Qatar
 Oman
Oman
 Tunisia
No countries found
Try adjusting your search terms
Why Can't I Get an IP From Some Countries?
Some countries may not have VPN servers due to laws, censorship, or a lack of demand. While the VPNs in our table have servers from South Korea to Colombia to Uzbekistan, and even Ukraine, every country isn’t always accommodated. This may happen because a country has banned VPNs or tried seizing physical servers in its jurisdiction.
Many VPNs offer virtual servers that route traffic through nearby regions, but still assign you the desired IP. However, this isn't always possible. If your VPN doesn't cover a specific country, it’s likely there’s a nearby one available with similar regional content.
Getting an IP Address From Countries With Internet Censorship
It’s possible and legal to change your IP to a country with strict censorship. This is necessary to access services from regions like Russia, China, and Saudi Arabia safely. Many people also choose to switch to an international IP from a country like Russia to see sites that its government blocks, for example, Facebook and X.
However, be aware that it’s usually illegal to access banned content within a country with strict internet censorship. We encourage you to familiarize yourself with the laws of your current country to ensure there aren’t restrictions on VPNs.
Can I Use a Free VPN To Change My IP to a Different Country?
This is possible, but the countries offered are severely limited, along with other issues. The best free VPNs are really just introductory versions of premium (paid) VPNs. Since the VPN is meant to let you test out the service, they generally only offer a few countries. Their servers tend to be slower due to overcrowding and are less successful in providing secure streaming access.
Check out this list to find the best freemium VPNs. Some of our favorites include Proton VPN, hide.me, and Avira Phantom VPN. While they have limitations, they’re safe to use and can provide IPs from a few key countries, like the US and the UK.
We don’t recommend VPNs that are purely free without a paid version since they often make their money in shady ways. Sometimes it’s by harvesting your data and selling it to third parties. Others have been known to add malware or trackers to their users’ devices, so we suggest you avoid them.
Using a Proxy Server To Change Your IP Address
Proxies work similarly to VPNs, but they're far less versatile and offer virtually no security benefits. Your internet connection goes through a middleman server so that websites and other online resources see the proxy server's IP address, not your own. Worse of all, the paid proxies often ask for a lot more personal information upon sign up (like a phone number or your real IP).
However, a proxy can offer a ton of locations, especially paid ones. For example, Decodo and NetNut claim to have locations in 190+ countries. These are often split between residential IPs and data center IPs. Residential IPs are typically associated with a specific residence, whereas data center IPs are hosted in servers by businesses. The former is better for secure access to services, while data center IPs are generally faster. While some claim proxies are faster than VPNs, we’ve had mixed results during our tests.
| Advantages | Disadvantages |
| ✅ Often available for free | ❌ Unreliable connection quality |
| ✅ No software installation required for web proxies | ❌ Limited to specific applications |
| ✅ Quick setup process | ❌ Whoever owns the proxy server can see all of the traffic that passes through it, which is a huge privacy concern |
| ✅ Suitable for basic website access | ❌ No encryption protection |
Changing Your IP Address With the Tor Browser
The Tor browser is a free online browser that encrypts your internet traffic and routes it through multiple relays before it reaches the end destination. The Tor network typically hides your location by picking a random IP address. However, it may be possible to request that it use an IP address of a country you choose in certain situations.
| Advantages | Disadvantages |
| ✅ Maximum anonymity protection | ❌ Because of its multiple relays, it significantly slows down your internet connection |
| ✅ Completely free to use | ❌ Complex setup for specific countries |
| ✅ Can access .onion websites | ❌ Too slow for streaming or torrenting |
| ✅ Strong encryption through multiple relay points |
Reset Your Router To Change Your IP Address
It’s possible to change your IP address through your router’s settings, but this won’t change your location. This will just change the number that represents your current position. It can also be a bit of a dangerous task since it’s possible to damage the router, or at least run into a situation where you have to conduct a factory reset. Overall, we don’t recommend it. There are a few situations where changing your IP address without changing your location would even be helpful.
| Advantages | Disadvantages |
| ✅ Free | ❌ Will not change your location |
| ❌ Could damage your router | |
| ❌ No added security or privacy benefits |
Why Is My IP Address Not Changing to a Specific Country — Troubleshooting Tips
This often happens if you’re using an inferior service. A poor VPN may not be able to hide your IP address, or it may give you an IP in the wrong country. The same is true of proxies, especially if they’re free.
If you’re unable to connect to a specific server, it may be temporarily down. Some VPNs provide information like this next to their servers. For example, Proton VPN displays a wrench symbol next to unavailable servers. The best VPNs also offer 24/7 live chat services, so you can quickly connect with an agent to ask what’s going on with your server.
You can try switching protocols and connecting again. Protocols are rules VPNs use when connecting to a server. If your VPN offers several of these, trying out a new one may allow you to connect.
It may be necessary to reinstall the VPN. While this is rarely necessary with a top VPN, it's worth a shot if none of the servers in your chosen country work. I suggest quitting the VPN app and starting it again, or restarting your device before moving to this step if you need to save time.
FAQs
Is getting an IP address from another country legal?
Yes, it’s legal to change your IP address. In most countries, laws don’t prohibit citizens from changing IPs, but it may be illegal to access certain services or sites. Please read up on the local laws in your jurisdiction before choosing to use a VPN.
Can I change my IP address for free?
Yes, you can change your IP address for free with a proxy service, but they don’t offer any encryption to protect your device. You can also use the Tor browser or reset your router to get a new IP. However, these methods don’t let you choose an IP. A free VPN can also change your IP, but there are limitations. This usually means only 1-10 locations are available, along with data restrictions and slower speeds due to server overcrowding.
How can I check that my IP address has changed to another country?
Simply visit an IP checker website. These are also known as leak test tools. They show you which IP address is being displayed to the websites you visit. You’ll want to make sure it matches the IP on your chosen method.
Will changing my IP address slow down my speed?
It almost invariably will, but the extent to which it does depends on the IP changing method you use. For example, the best VPNs' speed drop is generally so little that it’s hardly noticeable. Resetting your router can change your IP without significantly affecting your speed, but you won’t be able to access IPs from different locations. A proxy might slow you down more than a VPN or a little less, but it doesn’t provide encryption. The Tor browser will drop your speeds the most because your traffic gets routed through multiple relays.
Does my IP change when I use a different WiFi?
Yes, it will change if you’re on a new network. Every WiFi network is given a unique IP address, but your actual location won’t change if you get a new router or switch internet companies.
Conclusion
The best way to change IP addresses is by using a VPN since it provides worldwide servers, high-level security, and excellent streaming performance. While there are other methods, like proxies and the Tor browser, none of them combine the convenience, accuracy, and reliability of a VPN. We prefer to use reputable VPNs with premium accounts that have been tested for years. But there are a few free VPNs that offer limited locations. If you must use one, we suggest you stick with freemium options to make sure your data isn’t compromised.
References
- https://www.demandsage.com/vpn-statistics/
- https://www.forbes.com/uk/advisor/business/vpn-statistics/
- https://vpnalert.com/resources/vpn-statistics/
Your online activity may be visible to the sites you visit
Your IP Address:
216.73.217.74
Your Location:
US, Ohio, Columbus
Your Internet Provider:
Some sites might use these details for advertising, analytics, or tracking your online preferences.
To protect your data from the websites you visit, one of the most effective steps is to hide your IP address, which can reveal your location, identity, and browsing habits. Using a virtual private network (VPN) masks your real IP by routing your internet traffic through a secure server, making it appear as though you're browsing from a different location. A VPN also encrypts your connection, keeping your data safe from surveillance and unauthorized access.
About the Author
Matthew is a former writer and editor for vpnMentor with a track record of providing in-depth analysis of the most highly regarded VPNs, including ExpressVPN and CyberGhost. His expertise has enabled him to deliver valuable insights on the most sought-after (and newest) VPN services.


Please, comment on how to improve this article. Your feedback matters!