Quick Overview: NordVPN is safe and worth considering in 2026, especially if you want fast NordLynx speeds, smooth streaming, strong security tools, and a verified no-logs policy. Its main drawbacks are higher renewal prices, occasional long connection times on faraway servers, no port forwarding, and unreliable access in restrictive countries like China.
NordVPN is everywhere these days — from YouTube ads to sports sponsorships. Its massive marketing claims it's the most trusted VPN service worldwide. To find out how it holds up beyond the marketing, the team and I spent several weeks evaluating its core features, privacy practices, customer support, and everyday usability. We also stress-tested various use cases to see where it works best and where the trade-offs appear.
Overall, our results confirm that NordVPN deserves its spot among the top VPNs. It delivers reliable performance in every key area, with only minor issues that won’t impact most users. We recommend the longest subscription, starting at $3.49/month, as it offers the strongest value and is backed by a 30-day money-back guarantee. I tested the refund process personally and received my money back within 5 days.
Try NordVPN Risk-Free >>
NordVPN Pros, Cons, and Needed Improvements
-
Fast local and faraway servers
NordVPN was fast in most locations we tested. Nearby servers were best for gaming, while some long-distance servers caused higher ping.
-
Strong security and privacy
NordVPN includes AES 256-bit encryption, a kill switch, and a strict no-logs policy, giving it a solid foundation for everyday privacy.
-
Optimized P2P servers
While I’ve tested other VPNs that make torrenting easier or support P2P on every server, I didn’t have issues using uTorrent, BitTorrent, Popcorn Time, and other platforms.
-
Easy to install and configure
Its apps are simple to navigate, even for beginners.
-
A 30-day money-back guarantee
While it’s not the cheapest VPN, NordVPN’s refund policy makes it easier to compare its features before keeping a subscription.
-
Great for streaming
Its global server network worked well for HD streaming without interruptions.
75% Off
Get 75% off your NordVPN plan today!
Pay less for your subscription plan!
NordVPN Features — 2026 Update
9.4
|
💸
Price
|
3.49 USD/month
|
|
📆
Money Back Guarantee
|
30 Days |
|
📝
Does VPN keep logs?
|
No |
|
🖥
Number of servers
|
9532+ |
|
💻
Number of devices per license
|
10 |
|
🛡
Kill switch
|
Yes |
|
🗺
Based in country
|
Panama |
|
🛠
Support
|
24/7 live chat |
|
📥
Supports torrenting
|
Yes |
NordVPN Streaming — HD and UHD Playback
9.8
NordVPN is a good VPN for streaming because it worked with every major streaming platform we tested. Most importantly, we rarely needed to switch servers, as sites loaded smoothly on our first attempt. Its results are nearly on par with ExpressVPN, our top-recommended VPN for streaming.
Be advised: The VPNs we recommend have a strict no-logs policy, meaning they don't monitor your traffic and data. You are responsible for ensuring your VPN usage complies with your local rules and regulations. We at vpnMentor don’t condone or encourage copyright infringement or other unlawful activities.
Which Streaming Platforms Worked With NordVPN?
| Streaming Service |
Status |
| Netflix |
✅ |
| Hulu |
✅ |
| Disney+ |
✅ |
| BBC iPlayer |
✅ |
| Amazon Prime Video |
✅ |
| Max |
✅ |
| ESPN+ |
✅ |
| DAZN |
✅ |
| Sling TV |
✅ |
During our tests, NordVPN worked with over 15 Netflix libraries. This includes popular ones like the US, UK, Japan, and Canada, as well as less common options like Argentina, Malaysia, and Thailand. Each library loaded on the first server we connected to.
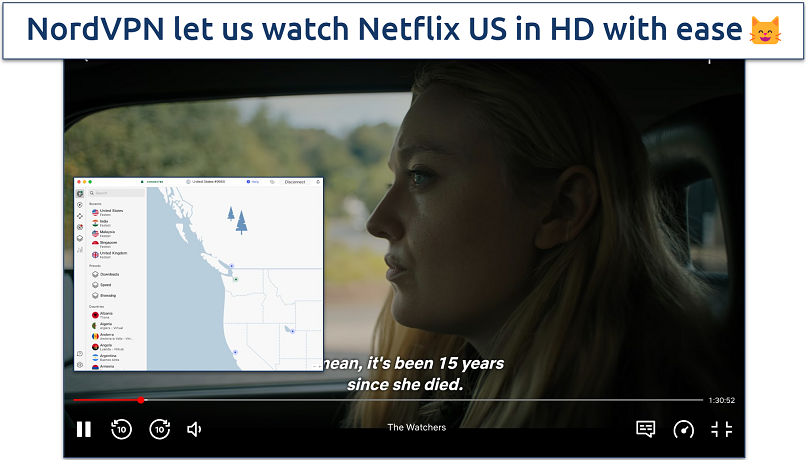 We tested 4 different US servers, and they all worked with Netflix
The VPN performed just as well with other streaming services. We streamed content smoothly from BBC iPlayer, Disney+, Max, Amazon Prime Video, and DAZN.
NordVPN Speed — Nearby and Long-Distance Results
9.7
NordVPN was fast in most speed tests, especially on nearby US and European servers. A VPN’s speeds depend heavily on its protocol, and NordVPN’s custom NordLynx delivered strong results. Based on WireGuard technology, NordLynx is designed to reduce speed loss while maintaining security. When testing this protocol from Austin, Texas, we got speeds that put NordVPN among top providers like ExpressVPN.
The main takeaways were:
- Nearby US servers: Local connections had minimal impact. We could stream in 4K, download large files, and browse without noticing we were using a VPN.
- European servers: These worked well for HD streaming and gaming.
- Asian and Australian servers: Long-distance connections showed expected higher speed losses, but still maintained enough speed for HD streaming and torrenting.
NordVPN includes Quick Connect, which picks a fast, uncrowded server near your location. Since all servers support up to 10Gbps connections, the VPN won’t limit even the fastest internet plans.
How NordVPN Compares With Its Competitors
 USA (Dallas)
Download Speed
Upload Speed
Ping
USA (Miami)
Download Speed
Upload Speed
Ping
USA (Los Angeles)
Download Speed
Upload Speed
Ping
USA (New York)
Download Speed
Upload Speed
Ping
 Canada
Download Speed
Upload Speed
Ping
 Brazil
Download Speed
Upload Speed
Ping
 UK
UK
Download Speed
Upload Speed
Ping
 France
Download Speed
Upload Speed
Ping
 Japan
Japan
Download Speed
Upload Speed
Ping
 Australia
Download Speed
Upload Speed
Ping
 Singapore
Download Speed
Upload Speed
Ping
169.74 Mbps
66.65 Mbps
8 ms
176.10 Mbps
123.43 Mbps
11 ms
134.02 Mbps
49.01 Mbps
52 ms
144.13 Mbps
52.34 Mbps
41 ms
189.65 Mbps
39.42 Mbps
42 ms
129.27 Mbps
15.31 Mbps
186 ms
121.61 Mbps
20.03 Mbps
110 ms
161.50 Mbps
57.07 Mbps
151 ms
107.20 Mbps
11.52 Mbps
207 ms
136.80 Mbps
10.02 Mbps
217 ms
203.60 Mbps
46.40 Mbps
5 ms
150.32 Mbps
55.06 Mbps
8 ms
166.89 Mbps
111.88 Mbps
53 ms
169.57 Mbps
66.42 Mbps
42 ms
175.09 Mbps
46.30 Mbps
45 ms
158 Mbps
80.81 Mbps
50 ms
139.03 Mbps
68.73 Mbps
228 ms
133.12 Mbps
89.52 Mbps
115 ms
158.51 Mbps
62.77 Mbps
118 ms
134.14 Mbps
42.65 Mbps
152 ms
142 Mbps
115.86 Mbps
173 ms
150.43 Mbps
85.31 Mbps
211 ms
218.73 Mbps
50.42 Mbps
6 ms
169.58 Mbps
83.50 Mbps
9 ms
143.62 Mbps
77.82 Mbps
54 ms
161.10 Mbps
103.06 Mbps
42 ms
8.23 Mbps
8.39 Mbps
64 ms
186.87 Mbps
63.28 Mbps
150 ms
70.57 Mbps
102.14 Mbps
114 ms
111.83 Mbps
95.40 Mbps
120 ms
87.54 Mbps
11.23 Mbps
193 ms
128.44 Mbps
10.25 Mbps
208 ms
These tests are conducted from the USA
*N/A indicates that we do not currently have speed test data for this location
Note: A VPN can sometimes increase your speeds if your internet service provider (ISP) is throttling traffic, has poor routing to certain locations, or is experiencing network congestion. Your actual speeds will vary depending on your location, base connection speed, and chosen server.
NordVPN Gaming — Low Ping Near Your Location
9.4
NordVPN performs best for gaming on nearby servers. Ping measures how quickly your actions register in-game, so lower numbers are better for competitive titles.
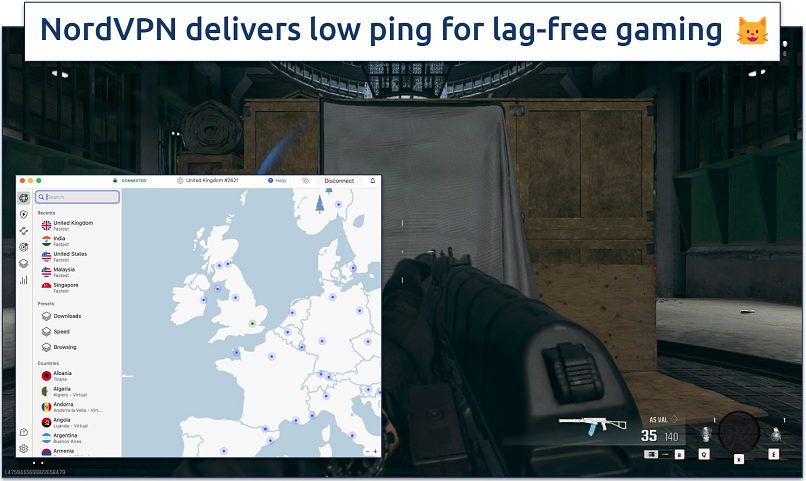 We could play Warzone with minimal lag even on distant servers
Distance had a bigger impact:
- Nearby servers: Our base ping of 10ms only increased to around 13ms on local connections — a minimal jump that kept games smooth and responsive. We played several matches of Valorant and CS2 without lag spikes or input delays that could cost us rounds.
- European servers: Ping rose to 89ms. We could still play Warzone, but occasional lag spikes made close-combat situations tricky. ExpressVPN did slightly better with 78ms on similar servers.
- Asian servers: Ping went past 200ms on Japanese and Hong Kong servers, making fast-paced games essentially unplayable.
NordVPN Server Network — Global Coverage and Specialty Options
9.5
NordVPN has 9,532 servers across 149 countries. It covers Europe and North America extensively and maintains a strong presence in Asia-Pacific, Africa, and the Middle East. You’ll even find servers in smaller markets like Nigeria and Andorra, though not in restricted regions like China and Russia. This gives NordVPN broader country coverage than Surfshark, CyberGhost, PIA, and ExpressVPN.
The network was reliable during our tests, and we never experienced slowdowns or connection drops. Since it’s large, you’re also less likely to run into overcrowded servers.
Security is built into the network’s foundation. NordVPN owns and maintains almost all its servers instead of renting them, only using third-party servers in a few remote locations. Each server uses RAM-only technology, which automatically wipes your data when servers restart. Some locations use virtual servers to expand coverage, but these are clearly marked and match physical server performance.
The network includes several specialty options for different needs:
- P2P-optimized servers: Built for torrenting.
- Obfuscated servers: Help hide VPN use on restrictive networks.
- Double VPN servers: Route your connection through two locations for extra privacy.
- Onion over VPN servers: Add protection when using the Tor network.
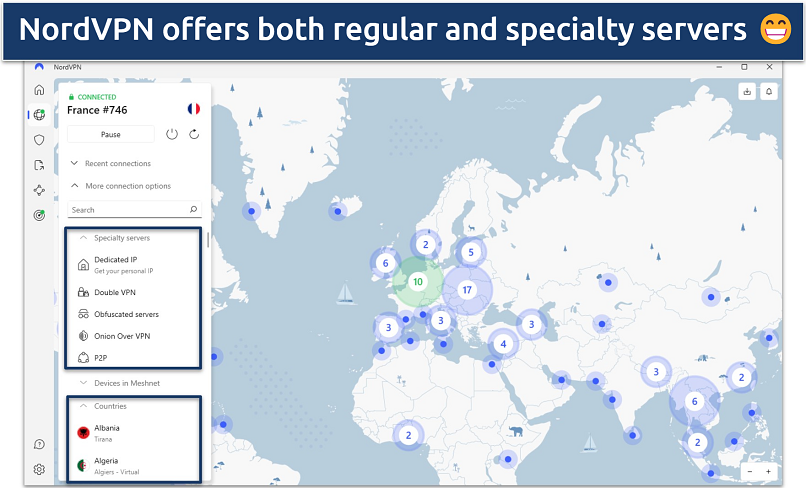 You can also connect to the fastest server for your location with “Quick connect”
For an extra fee, you can get your own dedicated IP address. Choose from 6 US cities (Los Angeles, Dallas, New York, Chicago, Seattle, Miami) or several international locations. A dedicated IP helps avoid CAPTCHAs and keeps access to various services more consistent.
NordVPN in China — Possible, but Not Reliable
NordVPN might work in China, but our findings suggest that users regularly face connectivity issues and significant downtime. While the VPN offers obfuscated servers and manual IKEv2 configuration options designed for restricted networks, maintaining stable access in China remains a challenge.
The support team confirmed these limitations and noted that connectivity isn’t guaranteed. To use NordVPN in China, you’ll need to prepare in advance:
- Download and configure the app before entering the country, since NordVPN’s website and app stores are blocked there.
- Use the support team’s recommended servers and setup guides.
- Expect downtime, even after setup.
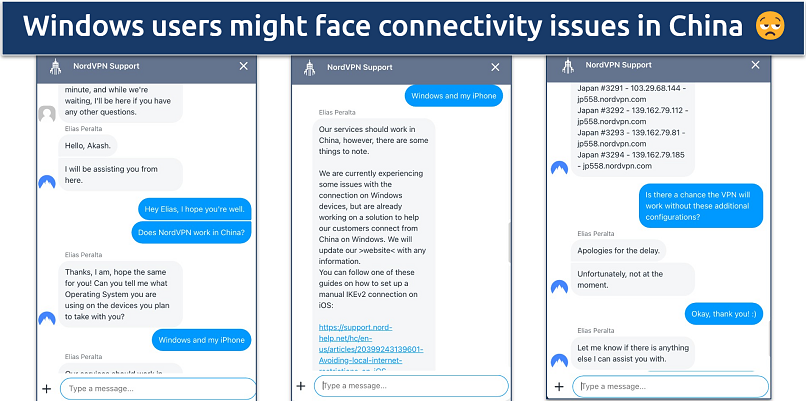 The support agent sent a list of recommended servers in the US, UK, and Japan
The VPN faces similar challenges in other countries with strict internet controls, including Iran, Russia, and the UAE. Obfuscated servers may help, but they don’t ensure access. If China access is a priority, check our roundup of the best VPNs for China.
Editor’s note: Non-government-approved VPNs are banned in China, though there have been no publicly reported cases of authorities targeting and punishing tourists for using one. We don’t condone breaking local laws or regulations. Before using any VPN, check your country’s current laws regarding VPN usage to ensure compliance.
NordVPN Security — Advanced Features and Flexible Controls
9.8
NordVPN combines standard protections like encryption and a kill switch with extra tools. This makes it a solid choice for users who want more than basic VPN protection, while still keeping the app manageable. NordVPN also has a broader security feature set than CyberGhost or PIA, with Meshnet, Dark Web Monitor, Double VPN, Onion over VPN, and obfuscated servers.
Encryption and Protocols
NordVPN uses AES-256 encryption paired with the SHA-512 hash function, which is stronger than the SHA-256 hash function most VPNs use. You also get perfect forward secrecy, which regularly changes encryption keys, so even if someone managed to grab one key, they couldn’t access much of your data.
The protocol options give you plenty of flexibility:
- NordLynx: NordVPN’s custom protocol built on WireGuard. It uses a double NAT setup to protect privacy while keeping connections quick.
- OpenVPN: Best when you want a more traditional protocol with a long security track record.
- IKEv2: Also available for mobile users.
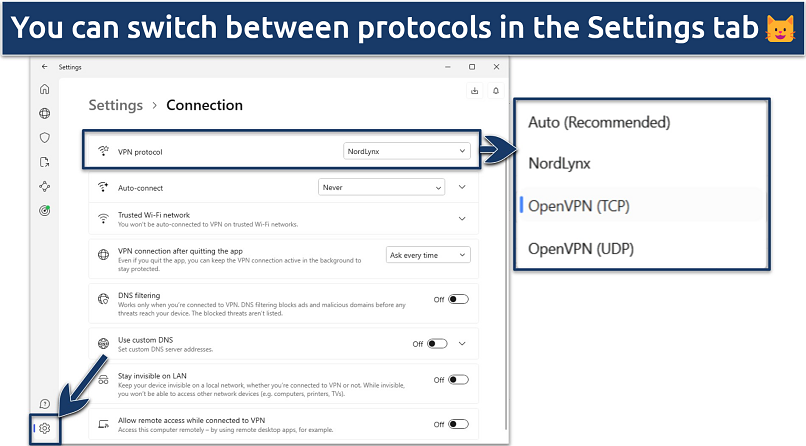 The NordLynx protocol was consistently the fastest protocol in our tests
Kill Switch and Leak Protection
NordVPN’s kill switch and leak protection worked as intended in our tests. The Internet Kill Switch stops all internet if your VPN drops, while the App Kill Switch lets you choose specific programs to protect. During forced disconnections, both prevented data exposure.
Leak tests on ipleak.net across multiple servers showed no DNS, WebRTC, or IP leaks. NordVPN also runs its own DNS servers, so your browsing requests stay private.
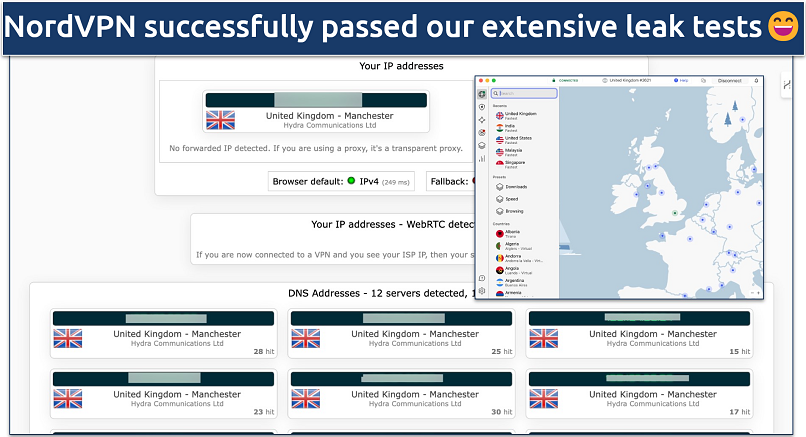 We ran tests on 12 different servers and never found any leaks
Split Tunneling — Windows and Android Only
Split tunneling lets you choose specific programs to route through NordVPN while others use your regular connection. It’s particularly useful when you need the VPN for certain activities but want faster speeds for local apps. The main limitation is that it’s only available on Windows and Android.
Extra Security Tools
NordVPN’s extra tools add privacy and convenience features beyond the core VPN.
- Threat Protection: Blocks ads, trackers, malware, and suspicious websites. When we tested it on ad-heavy news sites like Forbes and Daily Mail, it removed nearly all advertisements, making browsing much cleaner. This matters because around 16% of mobile malware comes from malicious advertising.1
- Meshnet: Lets you create your own secure network with up to 50 external devices. It’s useful for accessing your home computer remotely or sharing files safely with friends.
- Dark Web Monitor: Checks the dark web for your email address and notifies you if it appears in leaked databases. It’s simple to set up and runs efficiently in the background.
- Onion over VPN: Sends your traffic through NordVPN’s encryption first, then through the Tor network without needing the Tor browser. This means your ISP can’t see you’re using Tor, and you can use Tor’s privacy benefits in a regular browser.
NordVPN Privacy — Audited No-Logs Policy and Panama Jurisdiction
9.5
NordVPN backs its privacy claims with multiple independent audits, transparent logging practices, and a privacy-friendly jurisdiction in Panama. This gives its no-logs promise more support than a VPN that makes the same statement without external proof.
In 2018, NordVPN had a security incident when one of its rented servers in Finland was breached.2 Someone exploited a vulnerable remote management system left by the data center provider, potentially exposing some user data. Afterward, NordVPN made several practical changes:
- RAM-only servers: Store server data only temporarily, so it’s cleared during each reboot.
- Colocated network: Gives NordVPN more direct control over its server hardware.
- More frequent audits: Adds regular third-party checks of its logging and infrastructure practices.
No-Logs Policy — What NordVPN Does and Doesn’t Store
NordVPN sticks to a strict no-logs policy. It doesn’t track your IP address, browsing activity, or connection timestamps. It does collect some basic account information, such as your email and payment details, but you can use a throwaway email and pay with cryptocurrency for extra privacy.
Certain policy changes raised concerns in the VPN community. The updated wording suggests NordVPN would comply with law enforcement requests that align with Panama’s regulations. Since it doesn’t store identifying activity data, there’s not much it could share, even if required to do so.
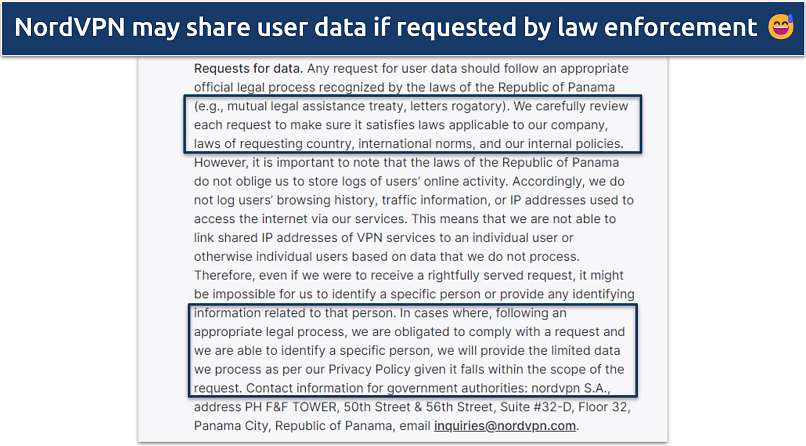 Thankfully, it’s based in Panama, so it’s not obliged to store logs of user data, so it won’t have anything to share
Audits — Deloitte No-Logs and Cure53 Security Reviews
NordVPN has passed six separate no-logs audits, with the latest Deloitte assessment reported in February 2026. Deloitte reviewed NordVPN’s systems between November 10 and December 12, 2025, and confirmed that its setup aligned with its no-logs statement.
Its wider security setup has also been independently checked. In 2025, Cure53 examined NordVPN’s applications and infrastructure, with testing carried out in May, June, and October. Cure53 found no critical vulnerabilities, and NordVPN fixed the identified issues and had the changes verified.
Headquarters and Transparency Reports
NordVPN is based in Panama, outside the 5/9/14 Eyes intelligence-sharing alliances that include countries like the US, UK, and Canada. Its privacy policy states that it only responds to court orders from Panama, which limits how foreign data requests can apply.
NordVPN also publishes quarterly transparency reports showing how many government inquiries and DMCA requests it receives. In October 2024, it received a binding warrant from Panama authorities and could only provide basic information because it doesn’t log browsing activity or connection data.3
NordVPN Torrenting — P2P Servers and No Port Forwarding
9.4
NordVPN is suitable for torrenting if you use its dedicated P2P servers. Not all servers support torrenting, but its P2P-optimized servers are spread across 100+ countries and are easy to find in the Specialty Servers menu. NordVPN can also switch you to a P2P server automatically if it detects torrenting activity on a regular one.
Our P2P speed tests showed strong results. We downloaded a copyright-free 1.16GB movie, Carnival of Souls, in under 3 minutes, which is about the same time it took us without the VPN connected.
NordVPN’s protection setup, with its advanced kill switch, IP/DNS leak protection, and privacy-friendly jurisdiction, adds useful safeguards during P2P downloads. However, it doesn’t include port forwarding. This feature can help a torrenting client connect directly to more peers and may improve speeds, but it can also create security risks, so it’s not offered by many VPNs. If it’s important to you, see our guide to the best VPNs with port forwarding support.
My team and I don’t condone illegal activities. Most P2P content is protected by copyright, so downloading it without permission may be illegal. Always check the laws and regulations of your country before using NordVPN for torrenting, and make sure the content you download is in the public domain.
Installation & Apps
9.5
Setup and Interface — Clear Layout, Some Connection Delays
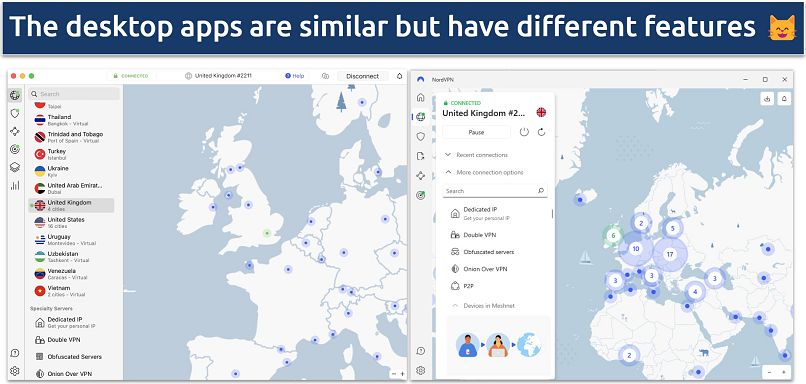
NordVPN’s apps are simple to set up and navigate, with essential features easy to find. The interface works well for beginners, while still giving experienced users quick access to servers, security settings, and additional tools.
 Finding your preferred server is easy with the map interface
The main screen offers several ways to connect:
- Interactive map: Lets you choose locations directly.
- Search bar: Helps you find specific servers.
- Quick Connect: Selects a server automatically.
- Specialty Servers menu: Shows P2P, obfuscated, and other optimized servers, with a Quick Connect option for each group.
The sidebar menu includes Threat Protection, Meshnet, and Dark Web Monitor, while security settings like the kill switch and protocols are organized in the settings menu.
My only complaint about NordVPN’s app is that it sometimes takes too long to connect to servers, especially at longer distances. For instance, I had to wait up to 45 seconds to connect to the Australian server. Occasionally, I even had to force quit the app and try again before I was able to establish a connection.
Installation Time — Varies by Device
NordVPN is quick to install on desktop and mobile devices, though setup time depends on the platform.
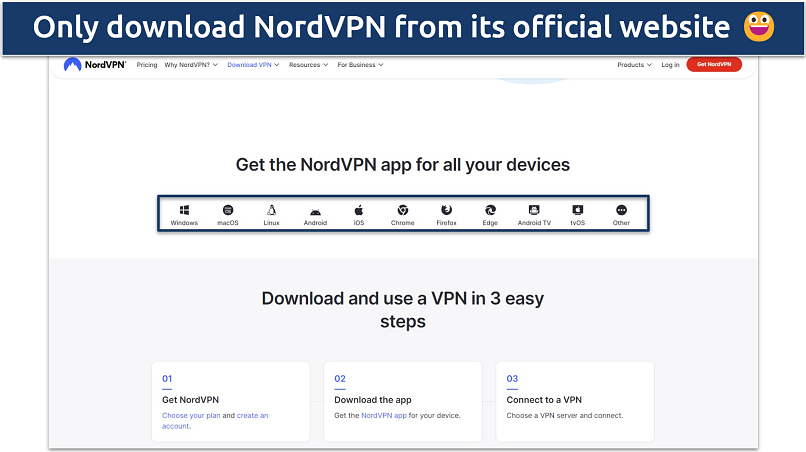 NordVPN has apps for a ton of popular devices
The process stays simple across most devices:
- Windows: Took less than 2 minutes to download and install in our test. After installation, I logged in through the web browser, and the app opened automatically.
- Mobile: Apps install directly from the app store.
- macOS: Available from the NordVPN website or the App Store.
- Linux: Requires command lines, but NordVPN provides detailed setup guides.
- Smart TVs and routers: Take more time, around 10–15 minutes, and require step-by-step configuration instructions.
Device Compatibility — Apps, Smart DNS, and Routers
NordVPN works on most major devices, including computers, phones, tablets, browser extensions, smart TVs, routers, and gaming consoles.
Popular Devices We Tested
| Devices |
Compatibility |
| Windows |
Windows 7 or newer |
| Mac |
Native apps for Apple Silicon Mac devices |
| Linux |
✅ Command-based Linux app (Debian, Ubuntu, Elementary OS, Linux Mint systems, RPM-based distributions) |
| Android |
✅ |
| iOS |
✅ |
| Browser extensions |
Chrome, Firefox, and Edge |
| Smart TVs |
Native apps for Android TV, Apple TV, and Fire TV |
| Gaming consoles |
Its smart DNS works with Xbox, PlayStation, Nintendo, and more |
| Router support |
Yes |
Desktop apps offer the most complete experience, but features vary by platform. Windows users get Threat Protection, split tunneling, custom DNS options, and all specialty servers. The Mac app comes in two versions: the App Store version with Threat Protection Lite and a sideload version with full Threat Protection. Linux users get a command-line app for supported Linux distributions.
 Split tunneling is only available on the NordVPN Windows app
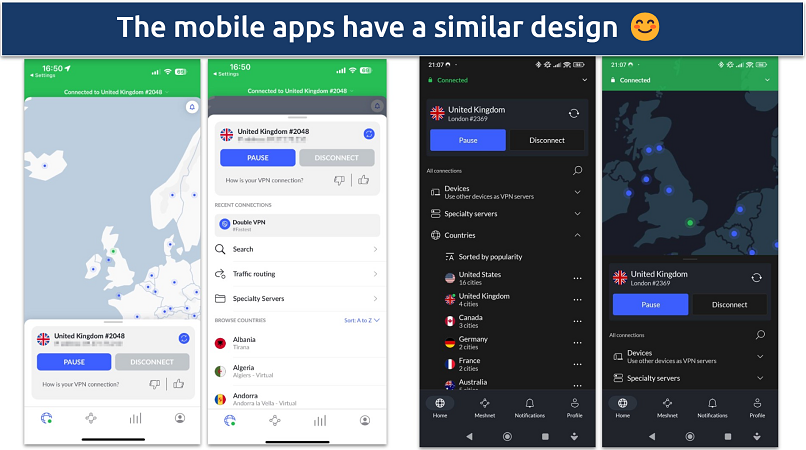
Mobile apps balance simplicity with security. Android includes split tunneling and auto-connect for different Wi-Fi networks, while iOS has auto-connect but no split tunneling. Both apps are ioXt-certified and come with essential tools like the kill switch, though it’s not as customizable as on desktop.
 You can download the Android app from Google Play to try NordVPN for free with its 7-day free trial
Streaming devices are well covered. Android TV, Fire TV, and Apple TV have dedicated apps. The Apple TV app uses full encryption and NordLynx, which is more private than typical Smart DNS setups.
Gaming consoles can use Smart DNS on PlayStation, Xbox, Nintendo, and more, but Smart DNS doesn’t encrypt traffic. For full-device protection on consoles and other unsupported devices, NordVPN needs to be set up on a router. It works with popular options like Asus, TP-Link, DD-WRT, Tomato, and Mikrotik routers running stock firmware, with installation taking around 10 minutes using NordVPN’s instructions.
Simultaneous Connections — Router Setup Extends Coverage
NordVPN lets you use one subscription on up to 10 devices at the same time, matching what many top competitors offer. That should cover most households, including a computer, phone, tablet, and TV. It also gives more individual device slots than CyberGhost, which allows 7 simultaneous connections.
We tested this limit on a MacBook Pro, Windows laptop, iPhone, iPad, and Android phone simultaneously. Speeds stayed stable while streaming, browsing, and downloading, with no connection issues.
For larger households, installing NordVPN on a router counts as one device and protects everything on the home network. This leaves 9 individual slots for phones, laptops, tablets, and devices used outside the house.


