IPVanish offers high-speed connections and an impressive list of advanced security features at a budget-friendly price. Over the years I’ve been working with this VPN, it’s continued to stand out as a reliable option for several different use cases.
My team and I carefully studied its privacy policy and tested its speeds, security features, and streaming capabilities. We also looked into its network coverage and ease of use before putting its customer service team to the test.
Overall, IPVanish is a safe and reliable option with fast speeds and a decent server network. Although it’s had a couple of issues surrounding its privacy standards, it’s taken several steps to mitigate these issues. If you decide to give IPVanish a try, you can take advantage of its 30-day money-back guarantee. If you’re not happy with it, getting a refund is easy.
Try IPVanish for Free >>
IPVanish VPN Pros, Cons, and Needed Improvements
IPVanish VPN Features — 2026 Update
9.2
|
💸
Price
|
2.19 USD/month
|
|
📆
Money Back Guarantee
|
30 Days |
|
📝
Does VPN keep logs?
|
No |
|
🖥
Number of servers
|
3200+ |
|
🛡
Kill switch
|
Yes |
|
🗺
Based in country
|
United States |
|
🛠
Support
|
24/7 Live Chat Support |
|
📥
Supports torrenting
|
Yes |
Streaming — Great Picture Quality and Short Load Times
8.8
IPVanish has greatly improved the number of platforms it works with, supporting HD access from anywhere. During our tests, it worked with nearly every popular streaming service. We were impressed with how it performed, especially when it came to streaming quality.
In fact, it compared favorably with streaming heavyweights such as ExpressVPN and NordVPN.
After extensive testing, we found it compatible with the following platforms:
| Netflix |
Hulu |
Disney+ |
BBC iPlayer |
Max |
Crunchyroll |
| Channel 4 |
My5 |
ESPN+ |
Paramount+ |
Rai Play |
Pluto TV |
| Crave |
Zatto |
Kodi |
fuboTV |
CBC Gem |
Vudu |
| Globoplay |
Discovery+ |
Locast |
Rakuten |
Apple TV |
DAZN |
| beIN Sports |
ITV |
|
Crackle |
ProSieben |
Peacock |
Be advised: The VPNs we recommend have a strict no-logging policy, so they won’t track your online activities. Because of this, you’ll be responsible for how you use the VPN. We urge you to never break the terms of service agreements for any app, site, or service you utilize. The vpnMentor team does not condone any form of copyright infringement.
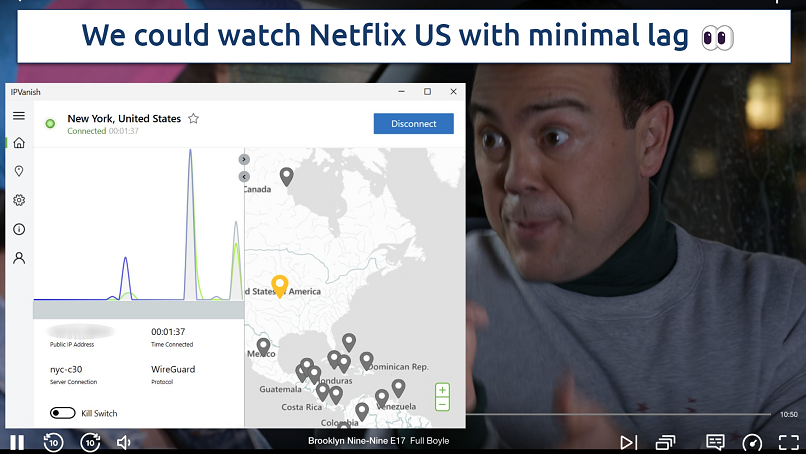
Works With: Netflix US, UK, Germany, India, and Japan
IPVanish’s servers in New York, Los Angeles, Chicago, and Houston worked great with Netflix US. Loading times were minimal, and there were no drops in quality for the duration of our testing. We could also safely watch Netflix Germany, Japan, the UK, and India in HD with IPVanish connected.
 The load time was 3-5 seconds, which is similar to our non-VPN connection
In all the regions we tested, we were able to watch the full Netflix library, and weren’t restricted to Netflix Originals. That also included France, the Netherlands, and Canada.
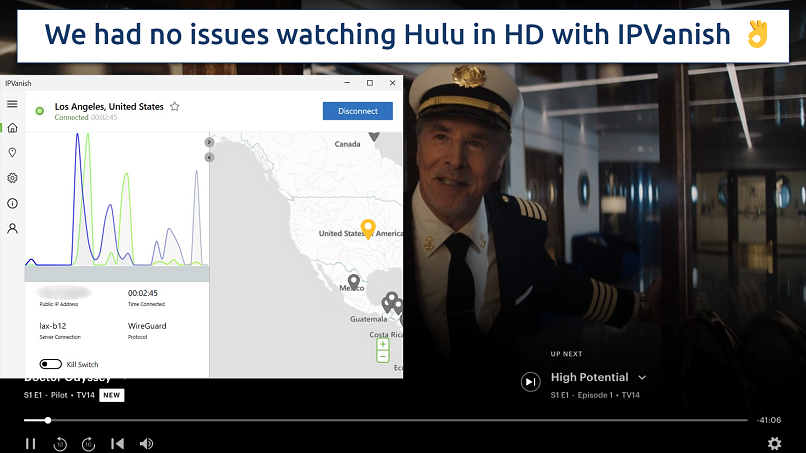
Works With: Hulu
We could safely stream Hulu in HD on all the servers we tested, including Las Angeles, Phoenix, and Seattle. We could stream uninterrupted without encountering any buffering, so there are no complaints about watching this platform.
 It never took longer than 10 seconds to load movies and shows on Hulu
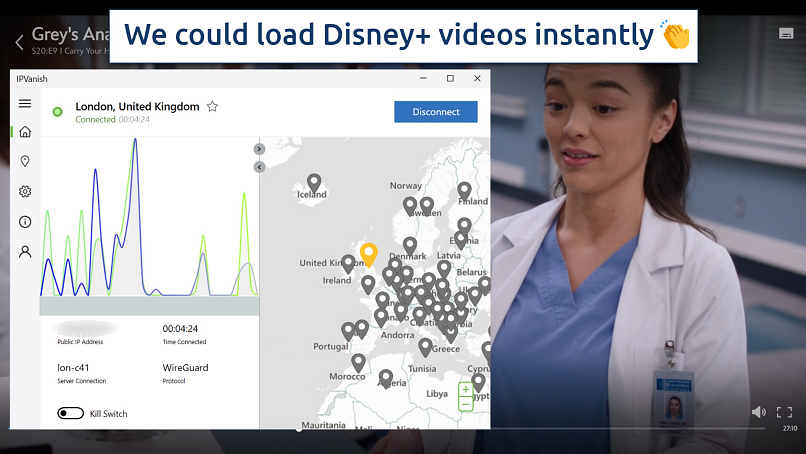
Works With: Disney+
We could safely access the different Disney+ regions. We streamed a full episode of Grey’s Anatomy in HD with zero lag on Disney+ UK while connected to one of IPVanish’s London servers. We could also watch Agatha All Along from the US library while connected to Atlanta.
 Our picture quality was crystal clear and there were no instances of buffering
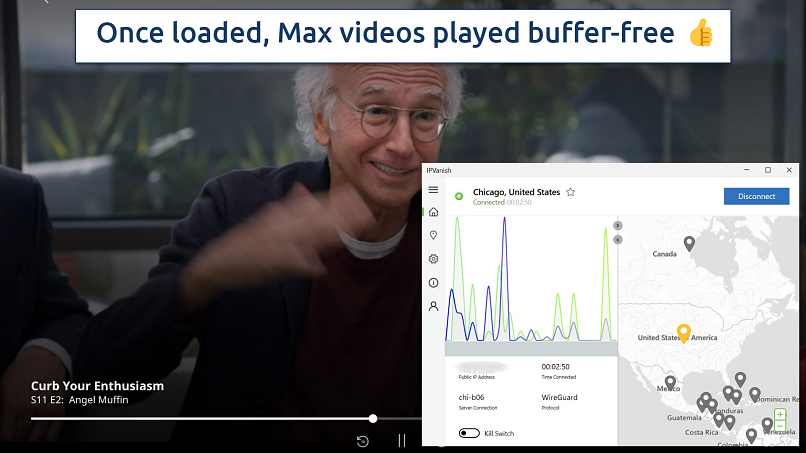
Works With: Max
Max streamed securely through IPVanish’s New York server. We did have to refresh our browser to get some videos to load, but once running, they played without a hitch. Even with the connection encrypted, Curb Your Enthusiasm still played perfectly.
 We could also stream Max on servers in Chicago and Denver
Also Works With: BBC iPlayer, ESPN+, and DAZN
UK platforms proved to be no problem, and BBC iPlayer content streamed smoothly. We just had to confirm that we had a TV license, and videos played without lag. We tested servers in Manchester, London, and Birmingham, and all were successful.
ESPN+ and DAZN content also streamed without any issues when connecting to servers in Miami and San Jose.
Doesn't Work With: Amazon Prime Video
Unfortunately, Amazon Prime Video wouldn’t work with IPVanish. The platform detected the VPN and requested that we disable the connection.
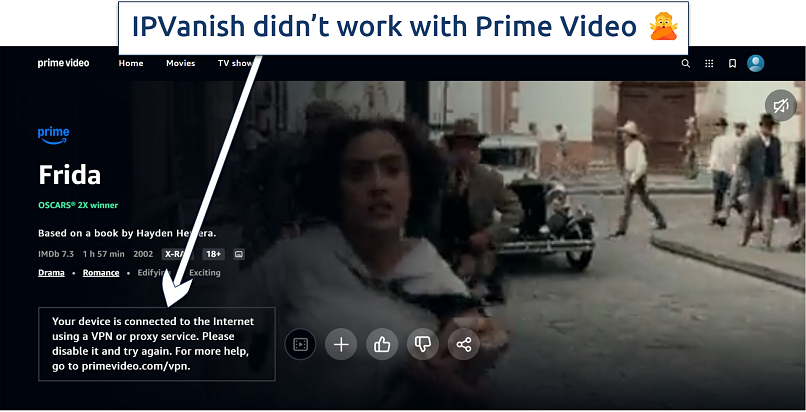 The standalone PrimeVideo domain wouldn't work with IPVanish
However, we were still impressed by IPVanish’s performance overall. It’s good to know that the VPN can keep you safe online while allowing you to stream in HD from anywhere.
Speed — Fast on Most Servers
9.4
IPVanish is very fast, especially on nearby servers, putting it among some of the fastest VPNs available. The slowdowns were minimal on servers in the same continent. The furthest server on the other side of the world was slower, but that's usual for most VPNs.
There’s an Optimal Location button, but we didn’t find it to be especially effective. It always connected to a server that wasn't the fastest, as we found faster ones manually.
 USA (Dallas)
Download Speed
Upload Speed
Ping
USA (Miami)
Download Speed
Upload Speed
Ping
USA (Los Angeles)
Download Speed
Upload Speed
Ping
USA (New York)
Download Speed
Upload Speed
Ping
 Canada
Download Speed
Upload Speed
Ping
 Brazil
Download Speed
Upload Speed
Ping
 UK
UK
Download Speed
Upload Speed
Ping
 France
Download Speed
Upload Speed
Ping
 Japan
Japan
Download Speed
Upload Speed
Ping
 Australia
Download Speed
Upload Speed
Ping
 Singapore
Download Speed
Upload Speed
Ping
251.12 Mbps
288.64 Mbps
5 ms
194.49 Mbps
187.21 Mbps
9 ms
133.14 Mbps
205.04 Mbps
56 ms
223.01 Mbps
286.92 Mbps
42 ms
178.97 Mbps
322.65 Mbps
42 ms
140.81 Mbps
287.89 Mbps
48 ms
68.36 Mbps
187.13 Mbps
142 ms
58.92 Mbps
308.75 Mbps
118 ms
195.89 Mbps
230.93 Mbps
116 ms
169.20 Mbps
86.80 Mbps
144 ms
173.46 Mbps
207.30 Mbps
172 ms
60.05 Mbps
76.47 Mbps
201 ms
203.60 Mbps
46.40 Mbps
5 ms
150.32 Mbps
55.06 Mbps
8 ms
166.89 Mbps
111.88 Mbps
53 ms
169.57 Mbps
66.42 Mbps
42 ms
175.09 Mbps
46.30 Mbps
45 ms
158 Mbps
80.81 Mbps
50 ms
139.03 Mbps
68.73 Mbps
228 ms
133.12 Mbps
89.52 Mbps
115 ms
158.51 Mbps
62.77 Mbps
118 ms
134.14 Mbps
42.65 Mbps
152 ms
142 Mbps
115.86 Mbps
173 ms
150.43 Mbps
85.31 Mbps
211 ms
218.73 Mbps
50.42 Mbps
6 ms
169.58 Mbps
83.50 Mbps
9 ms
143.62 Mbps
77.82 Mbps
54 ms
161.10 Mbps
103.06 Mbps
42 ms
8.23 Mbps
8.39 Mbps
64 ms
186.87 Mbps
63.28 Mbps
150 ms
70.57 Mbps
102.14 Mbps
114 ms
111.83 Mbps
95.40 Mbps
120 ms
87.54 Mbps
11.23 Mbps
193 ms
128.44 Mbps
10.25 Mbps
208 ms
These tests are conducted from the USA
*N/A indicates that we do not currently have speed test data for this location
Gaming — Fast Enough Across the Continent
9.5
Ping is the all-important metric when it comes to gaming. It measures the latency from your commands to the on-screen action. Under 100 ms is considered optimal for responsive gameplay. With IPVanish, we could get a game-friendly ping from anywhere in Europe. The UK ping of 31 ms was ideal for fast interaction.
Even the New York server, 3,200 miles away from our gaming testing base, was responsive enough at 96 ms. We could easily keep up with all the action on Brawlhalla on a macOS desktop machine.
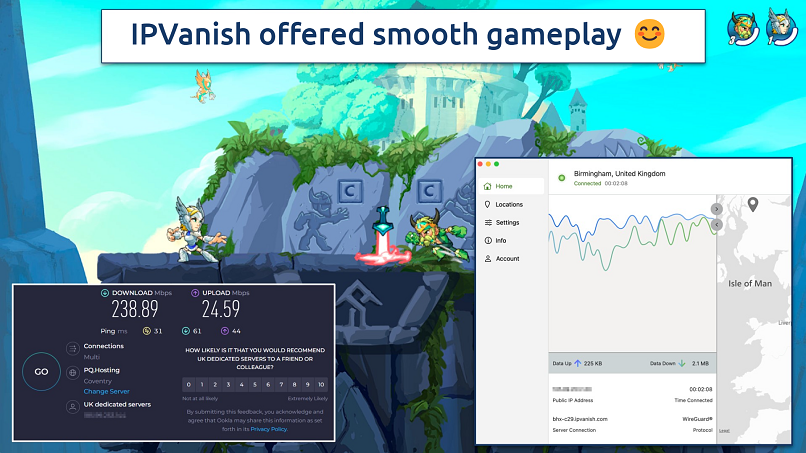 The nearby ping of 31 ms was the fastest we got with IPVanish
Server Network — Large Network of Private Servers
9.2
IPVanish has an extensive network of 3,200+ servers in 112 countries, with the US, the UK, Canada, France, and Australia having the most connection options. You can choose city-level servers in many countries too, and there are 142 locations to pick from. It even offers 6 countries in Africa and 11 in South America, which is very rare. Most VPNs neglect these regions, so it’s great to see IPVanish step up in that regard.
You can search for a location or sort servers by country, city, or load to manually select one. Additionally, you can use its interactive map to find a server on the Home tab. Being able to zoom in and out of the map makes it easy to navigate.
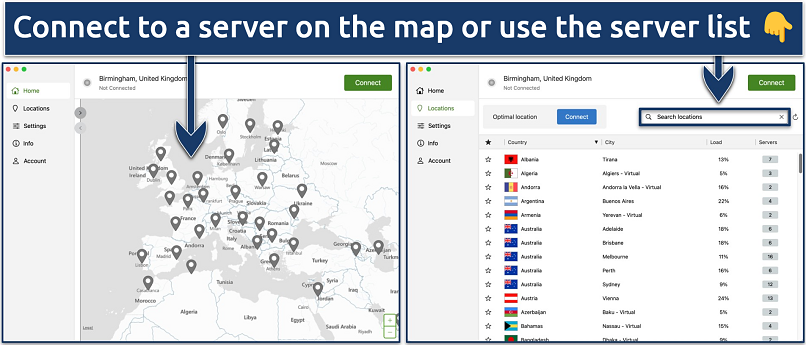 You can also toggle servers via city, load, or number of servers
Many VPNs now have RAM-only servers that automatically wipe all user data on reboot, but IPVanish uses hard drive servers. It also doesn’t offer dedicated IP addresses — which are unique to one subscriber. If you need a private IP address, there are a few options available. Still, IPVanish makes up for the lack of these server options with a self-owned network.
Collocated Server Network
IPVanish operates a robust, self-owned (collocated) server network that spans multiple countries worldwide. Most VPNs rent servers from third parties, so this is impressive.
A self-owned server network provides significant privacy advantages compared to VPNs that rely on rented servers. For instance, it allows IPVanish to implement stringent security measures, ensure no third-party access to its hardware, and maintain complete oversight of data handling practices.
Virtual Locations
IPVanish currently has 39 virtual server locations. These can give you the IP address of a location without the server actually being physically located there. Sometimes this is for security reasons. For example, the government of India demands that all commercial servers be monitored. IPVanish, therefore, has a virtual location for India so its users’ privacy isn’t compromised.
Security — Robust Features With Limited Customization
8.8
IPVanish is a safe VPN, and one of the main reasons for that is its world-class security features. These features include military-grade encryption, a kill switch, DNS/IP leak protection, split tunneling, and advanced protocols. There’s even a Scramble feature for the OpenVPN protocol, making it look like you’re not using a VPN by obfuscating your traffic. Its main function is to help bypass tough firewalls.
I like that it has its own malware and ad blocker called Threat Protection. It also has a split tunneling feature, which lets you redirect some of your internet traffic through the VPN while the rest uses your regular unencrypted connection.
Military-Grade Encryption
Military-grade encryption, also known as AES 256-bit encryption, is the highest level of encryption available and is very secure. 256 refers to how long the character key is, which protects your data like a password. The longer the character key, the better, as it takes more time to crack it. In fact, 256 bits is so long that it would take several lifetimes for the world’s most powerful supercomputers to break it.
It also uses the SHA512 algorithm for authentication and the DHE-RSA 2048 key exchange that supports perfect forward secrecy. These encryption standards ensure that none of your data can be read even if a hacker gets hold of the decryption key (which is very unlikely, anyway).
Security Protocols — Several Advanced Options
IPVanish provides strong security through several protocols: OpenVPN (TCP and UDP), WireGuard, IKEv2, and IPSec. These protocols allow you to customize your connection for whatever you’re doing online, mainly through speed and security. IPVanish also has an Automatic protocol setting. When you have this enabled, it will choose the best protocol for you based on what you’re doing, so you don’t need to manually select one.
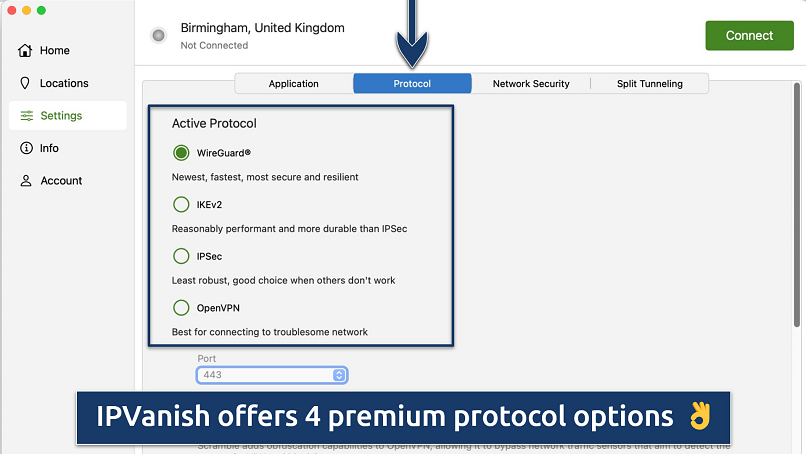 You can also toggle ports on the OpenVPN protocol
- OpenVPN. A highly secure open-source protocol. This means that its code is always visible, which allows people to examine and improve it. It offers 2 options: TCP and UDP. TCP provides reliable data delivery but can reduce speeds, while UDP offers faster transmission but may be less reliable.
- WireGuard. A newer protocol that has quickly become the default for many VPNs. It provides a good balance between speed and security. It gave us faster speeds for long-distance connections than any other protocol the VPN offers. It’s also open source, so you can be confident it’s secure. This protocol also has a unique generator in your account portal that makes it easier to do manual configurations for Linux devices and routers.
- IKEv2. A fast protocol that works well on mobile devices. This is because of its ability to auto-connect, which protects you while you switch between a mobile and WiFi network. However, it’s not as fast as OpenVPN or WireGuard.
- IPSec. A safe protocol that provides a framework for secure transport by encrypting IP packets. While it’s predominantly used for security, it still produced decent speeds in our speed tests, coming in as the 3rd fastest.
Overall, the protocol I’d recommend is WireGuard since it offers strong security without compromising your speeds, as was evident in our speed test results.
Kill Switch
IPVanish has a reliable kill switch, and it performed well during my tests. This is a standard feature with VPNs, so I expect to see it. The kill switch cuts off your internet connection if your VPN disconnects temporarily. It is available on most devices, including macOS, Windows, Android, and iOS. It's kill switch is now offered on Android and Amazon Fire TVs. You rarely see a kill switch developed for televisions, so this makes IPVanish stand out when it comes to smart TV security.
The benefit is that it prevents any accidental exposure of your data. This makes it a handy feature to use on public WiFi networks because hackers can easily intercept your connection if it’s unprotected, even for a minute.
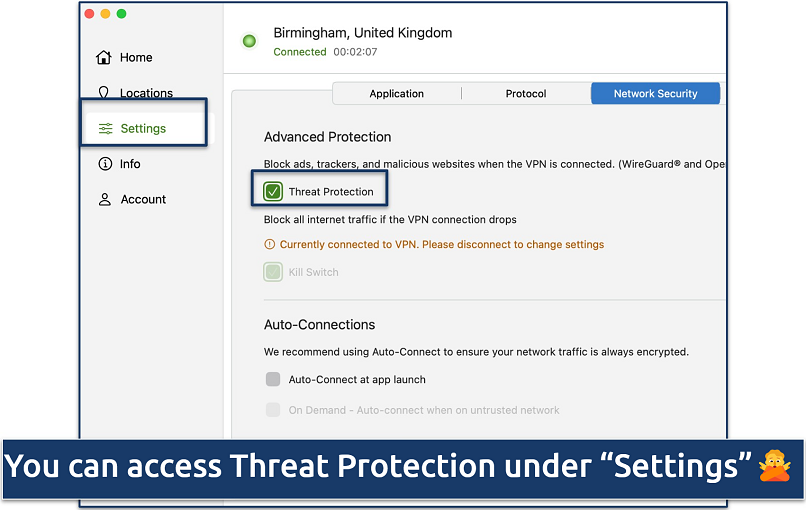
Enabling or disabling the kill switch is very easy on desktops. On Windows, there’s a kill switch check box in the main window, you don’t need to open your settings at all. On macOS, it can be toggled on or off by going to Network Security.
 You can access the kill switch under the Settings panel
Threat Protection Ad & Malware Blocker
IPVanish also offers a Threat Protection feature that blocks ads, trackers, and malicious content, so you can browse the web with peace of mind. To test this, I visited various sites known to have pop-ups, such as Forbes and Daily Mail, and IPVanish blocked all pop-up ads. This also made the pages load noticeably quicker.
 Threat Protection blocked banner ads on Forbes
Leak Test Results — No Leaks Detected
IPVanish provides both DNS and IP leak protection on all of its apps and worked well during my tests. This ensures that your DNS requests and actual IP address remain hidden, so no one can uncover your browsing activity, location, and identity. These features are already in place, so you don’t have to enable them manually.
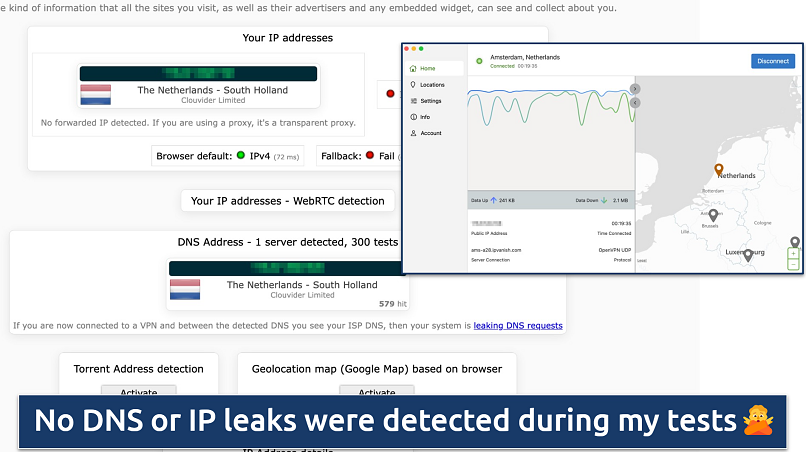 IPVanish proved reliable in concealing my IP and DNS when I tested multiple servers
I conducted tests on 6 different servers located in the US, France, Australia, Germany, Japan, and the Netherlands using ipleak.net to check for DNS/IP leaks. The results showed no leaks.
Double Hop VPN
IPVanish now lets you reroute your traffic through 2 servers on Windows, Android, Mac, and iOS apps. This gives you twice the encryption, and IPVanish actually lets you choose any 2 of its servers to accomplish this. Most VPNs only offer a limited number of locations for their equivalent feature. Just be warned, you’ll sacrifice significant speed with double hop, so it’s not recommended for things like streaming.
Privacy — Independently Audited No-Logs Policy
9.4
IPVanish has a transparent privacy policy that is outlined on its website. The policy states it only collects payment details and email addresses from customers, which are used to make payments and contact customers when required.
While the company was involved in a dubious privacy scandal in 2016, it has changed ownership and come a long way since then. In March 2022, Leviathan Security Group conducted IPVanish’s first security audit.
Does IPVanish Keep Logs? No
IPVanish follows a no-logs policy. This means it won’t collect or record your data, such as the websites you visit, DNS queries, and connection timestamps. However, it collects random bits of data to help improve its product performance. But since this is anonymously collected, it can’t be traced back to you.
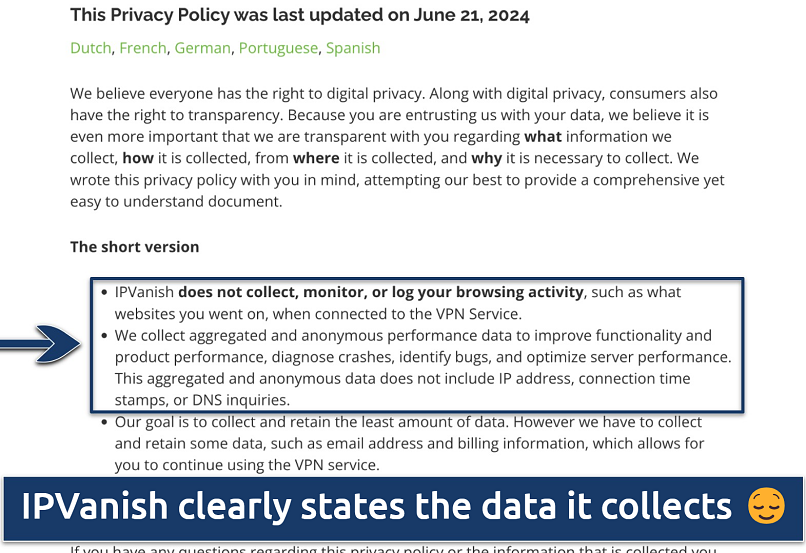 The privacy policy is available in a couple of different languages
The collected information includes user language preference, device model, UI interactions, country, and session lengths. Also, you need to provide your email address, name, and payment information when signing up. And since you can’t pay with cryptocurrencies, there’s no way to pay anonymously.
Was IPVanish Audited? Yes
IPVanish has only had 1 third-party audit in its history, which was undertaken by Leviathan Security Group in March 2022. The audit confirmed that IPVanish doesn’t collect user logs or violate any part of its privacy policy, making it trustworthy.
Based in the US
A bigger concern is that IPVanish’s home base is in the US, at the heart of the 14 Eyes Alliance. This is a global surveillance network where member nations share data about their citizens. Plus, they have the power to make third parties hand over this data by law.
In fact, this occurred in 2016 when the FBI requested user data from IPVanish, revealing that the company was retaining user logs. IPVanish complied with the FBI following two requests as part of a criminal investigation. However, IPVanish has updated its privacy policy numerous times since the scandal.
Does IPVanish Work in China? No
IPVanish is unlikely to work in China. The country has blocked all of its servers and IP addresses and access to the IPVanish website. Its obfuscation tool, called Scramble, doesn’t help the VPN work in China and other restrictive nations. The customer service AI confirmed this when I contacted it.
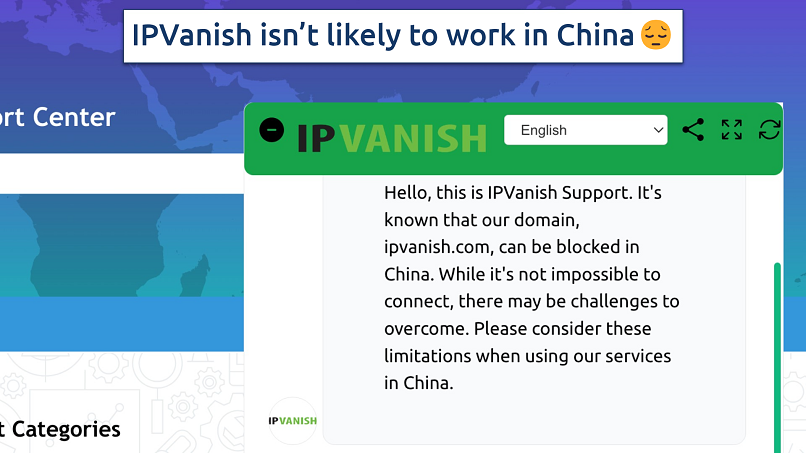 You may have some success using IPVanish in China but there are no guarantees
They also could not confirm that it works in other restrictive countries like Russia, Iran, or Saudi Arabia. While the Chinese government has banned many VPNs, it rarely goes after tourists, as there aren’t any public records of them getting fined. My team and I don’t condone any illegal activities and recommend you read up on the rules and regulations of the country you’re in before choosing to use a VPN.
If you need a VPN for your travels, here are several options that work reliably in China.
Torrenting — Allows P2P Sharing on All Servers
9.6
IPVanish is a great option for torrenting since its entire network works for P2P file-sharing. It also has unlimited bandwidth and no data caps, so you can torrent as much as you want for as long as you want.
It is advisable to use a VPN for torrenting as it shields your online identity and location while also encrypting your data. This adds an extra layer of protection against malicious entities. However, it is critical to activate your kill switch in the event of a VPN disconnection.
During our tests, we connected to its US, UK, and New Zealand servers to download a movie on uTorrent. We downloaded Night of the Living Dead on its London server, which took less than a minute to complete. It was a 700MB file, so this was really fast. However, IPVanish lacks port forwarding, which can help you find a larger number of seeders.
IPVanish also offers SOCKS5 proxies in more than 20 locations. You can manually configure this in your BitTorrent client to hide your IP address. Since it doesn’t encrypt your traffic, you’ll get slightly faster speeds for downloading. Our speeds were 5% faster using the proxy address in London as they were using the regular VPN server.
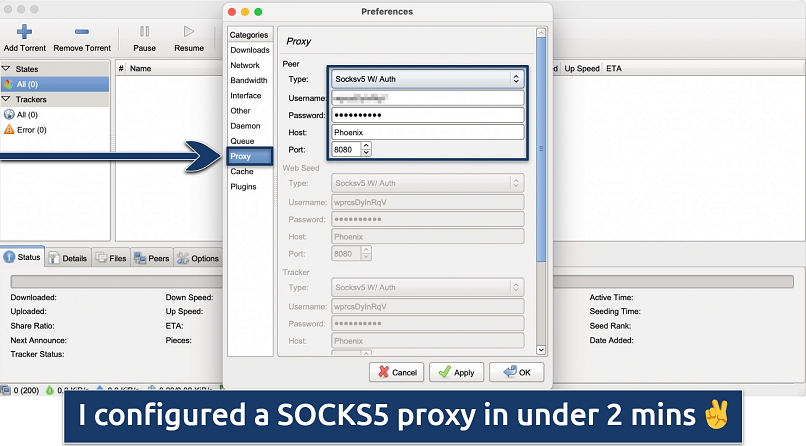 You can find proxy details under your account dashboard on the IPVanish website
Even though the proxy offers good speeds, keep in mind that it is less secure since it doesn’t encrypt your data. You can access the full list of SOCKS5 proxy addresses in your IPVanish dashboard and there are guides on its website to help you set it up.
Be aware that many torrents are subject to copyright laws, and we do not endorse any unlawful actions. Before engaging in torrenting, always consult the legal regulations in your jurisdiction and refrain from downloading copyrighted content. Additionally, IPVanish specifies in its Terms of Service that it will deactivate the accounts of users found to be downloading materials protected by copyright.
Installation & Apps
9.0
Easy to Install and Use
IPVanish’s apps are easy to install and beginner-friendly. I found the individual apps and their settings easy to navigate, whether you’re a beginner or an experienced user.
The interface is modern, straightforward, and easy to understand. On the home screen, you can toggle between views with a few clicks. You can select the map view, app stats, or 50/50, which is the default.
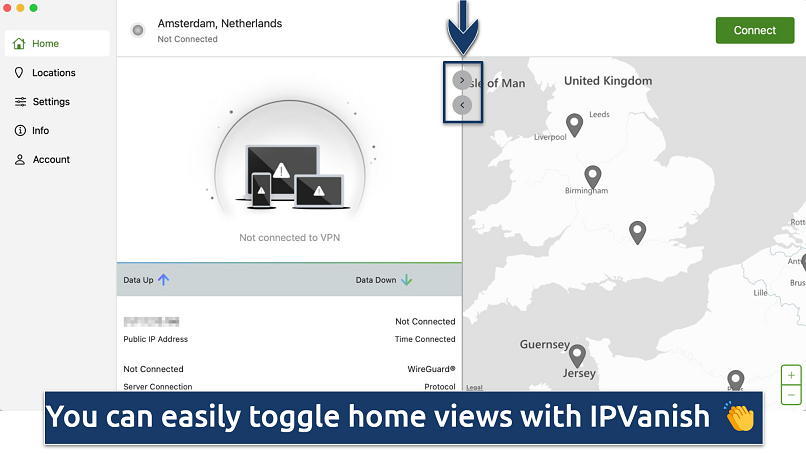 You can zoom in and out of the map view to make navigation easier
There are several ways to choose a server location; you can use the map on the home screen or scroll through the server list in the Locations tab. Here, you’ll find several further options. There’s a search bar, or you can arrange the servers via country, city, server load, or number of servers.
I find the map view a little cumbersome since you have to scroll for a long time to find distant servers. Still, you can zoom out to make it easier, but I prefer to use the location list.
The settings are grouped into 4 submenus. For beginners, there’s a simple explanation of each setting alongside a simple checkbox or button. Similarly, the Info section is grouped into 4 easy categories.
Setup & Installation
Downloading and installing the IPVanish app is very easy and requires no technical knowledge. It only took me a few minutes to install the app on each of my devices.
 You can download and set up IPVanish in under 2 minutes
Quick Guide: How to Install IPVanish in 3 Easy Steps
- Select a plan.
Go to the IPVanish website and choose one of the pricing plans that are listed. Create your account through the website — this way you won’t have to deal with third-party app stores if you want to claim a refund using the money-back guarantee.
- Install the app.
Choose the app for your device, download it, and follow the installation prompts. Log in using the credentials you created when you signed up.
- Enjoy safe browsing.
Connect to a server and use the internet with peace of mind.
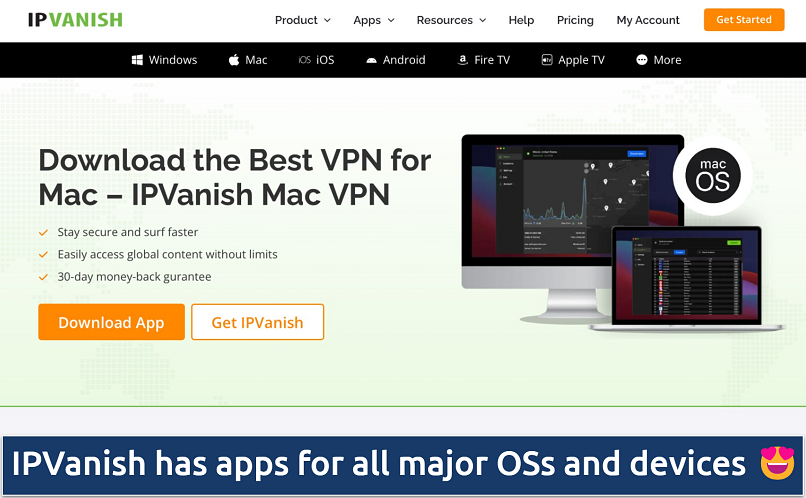
Device Compatibility
IPVanish has native apps for Windows, macOS, iOS, Android, Apple TVs, Amazon Fire TVs & TV Sticks, and Android TVs. There is also a native app for Chrome OS, but it can only be installed if your Chrome OS device can run Android apps through its Play Store. It offers browser extensions for Chrome, Firefox, and Microsoft Edge, too.
Furthermore, you can use IPVanish on Roku, gaming consoles, and Raspberry Pi if you install it on a router. The router option is great because it will secure all your home devices at once.
Unfortunately, IPVanish doesn't have a smart DNS service, which could let you use it on devices that don't support native apps.
Desktop — Apps for Windows, Mac, and Compatible With Linux
IPVanish’s desktop apps are easy to install and use. I tested it on both macOS and Windows and each time, I was able to download and install the VPN in less than 2 minutes.
While there’s no Linux desktop app, you can manually configure the VPN on your device through OpenVPN or WireGuard (with the help of the step-by-step guides on IPVanish’s website if you need them). IPVanish’s WireGuard Configuration Generator makes it a little easier to get started with this protocol. It’s a tab within your account settings that lets you select a location and generate configurations you can enter into the terminal quickly. You can set IPVanish up on Ubuntu, Fedora, Kali Linux, Linux Mint, Lubuntu, and Pop! OS. It also lets you adjust your encryption level between AES 128 and 256.
In addition, there’s an updated version of the IPVanish app for Microsoft Copilot laptops with ARM chips. Several VPNs have had issues with their native apps on these devices, so I’m glad that IPVanish addressed this issue so quickly. It states these applications offer all the same features as previous versions.
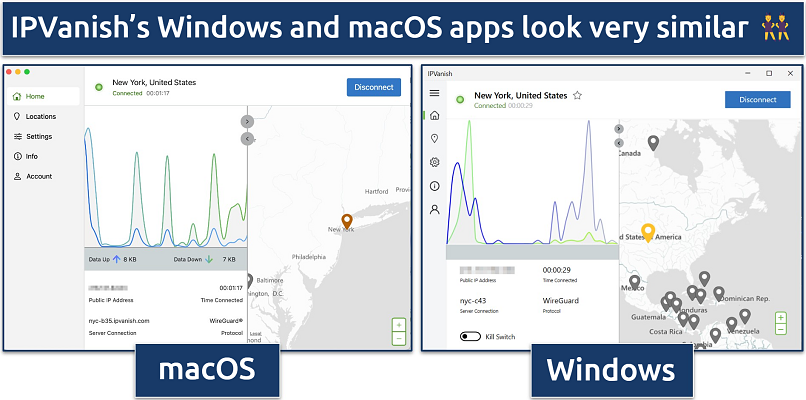 IPVanish's apps have cross-platform functionality
Android and iPhone (iOS)
Downloading IPVanish on my mobile app was just as easy as the desktop apps. I simply downloaded them from the App Store and Google Play and signed in with my credentials. The Android and iOS apps are slightly different, but they have pretty similar features.
Both mobile apps offer the WireGuard and IKEv2 protocols and Threat Protection ad/malware/tracker blocker. They also come with features that some VPNs don’t offer on their mobile apps (especially iOS), like a kill switch, double VPN, and split tunneling.
Plus, Android and iOS devices can now use its Link Checker directly in the app, a feature that lets you paste in a URL to see if it’s been flagged for malicious content. It’s a nice update; previously it was challenging trying to use this feature on IPVanish’s website via a phone.
The Android app has the OpenVPN protocol and the Scramble feature for obfuscation, which is lacking on iOS. But the iOS app has a unique Connect On Demand feature, which connects the VPN automatically when the app detects you’re using an untrusted WiFi network.
You can get the IPVanish app on mobile devices using iOS 14 or higher and Android 5.1 and above.
Apps for Amazon Fire TVs, Apple TVs, Android TVs, & Fire Sticks
IPVanish also has a native app for the Gen2 Fire TV Stick or newer. It comes with the OpenVPN Scramble feature, split tunneling, and AES 256-bit encryption. This app only offers the OpenVPN, WireGuard, and IKEv2 protocols.
It’s easy to install, too. The app can be downloaded directly from the Amazon Appstore to a device running Android 5 or higher. The same is true for its television apps for Fire and Android TVs. All the apps are quite similar, except that the Apple TV VPN only connects through the IKEv2 protocol. It’s supported on devices running tvOS 17+.
There’s also an additional kill switch app you can download for Fire and Android TVs. It’s tough to think of another VPN that offers this important security feature for TVs, so it doesn’t really bother me that you have to install another app. The process is just as easy as setting up the VPN.
Router Compatibility
You can set up IPVanish on your router and protect all the WiFi-enabled devices in your household. It offers pre-configured FlashRouters that you can purchase from its website. You can also configure the VPN on the one that you already have at home if it’s compatible. The WireGuard Configuration Generator I mentioned above can be useful here. Unfortunately, though, IPVanish is only compatible with Asus, DD-WRT, OpenWRT, and Merlin routers.
Most other VPNs I’ve tested let you manually set up the VPN on a lot more router models (ExpressVPN even has its own firmware that doesn’t require manual configuration). It’s also important to bear in mind that manually setting up a VPN on your router can be tricky, and doing so incorrectly can damage it. However, IPVanish offers detailed guides on its router setup on its website.
Simultaneous Device Connections
What makes IPVanish such great value is that it allows any number of devices to be connected simultaneously. This is great if you live in a larger household where each person owns at least 1 device. Having unlimited device connections means that everyone under the same roof will have their device secured with just a single IPVanish subscription.
We tested this out by connecting a Windows laptop, MacBook Pro, smartphone, and Android tablet to watch Netflix. It didn’t make any difference at all, and we noticed no slowdowns. The streaming quality was HD at all times. Many premium VPNs limit your connections to as few as 5 devices. The fact that IPVanish doesn’t limit you in this way shows its commitment to value.


