
How To Delete Google Search History Permanently

- How Do I Clear All My Searches on Google?
- How a VPN Keeps Your Google Searches Private
- Best Ways To Delete Your Google Search History on Any Device
- More Ways To Keep Your Google Searches and Browsing Activities Private
- How To Delete History from Other Google Services (Maps, Docs, Google Pay)
- FAQs
- Conclusion
Your Google search history will often reappear after being cleared because of Google's data collection and syncing. Data is gold, and Google knows this.
Does Google keep your search history forever? Google's privacy policy states that it keeps your search history for 18 months1, which gives it plenty of time to learn everything about you. According to Technology Magazine, Google has been the leading search engine since the early 2000s2, with about 8.5 billion searches processed daily3 at the time of writing (DemandSage, 2024).
Deleting your activity directly from your Google Account is the best way to erase your Google search history and prevent it from resurfacing. Additionally, you can remove location history from Google Maps and manage autofill data for passwords and forms separately, so you don't disrupt other features.
How Do I Clear All My Searches on Google?
- Log into your Google account.
Open your web browser and sign in to the Google account that has the searches you want to delete. - Access your searches.
Navigate to Manage your Google account > Data & Privacy > My Activity. The process is similar for all devices: iPhone, Android phone, tablet, MacBook, Chromebook, desktop PC, and laptop. - Delete your history.
Above your activity, click Delete > All time > Next > Delete. You can also delete activity from a specific time range: last hour, last day, all time, or a custom range. As most people conduct 3 to 4 Google searches daily (DemandSage, 2024), I suggest clearing your history regularly.
How a VPN Keeps Your Google Searches Private
Some entities can still access your Google search activity even if you delete your search data or browse in incognito mode. For example, your ISPs can track and log the websites you visit through DNS requests, even in incognito mode. At work or school, network administrators can monitor and log internet use at the network level. Additionally, governments in some countries can intercept unencrypted traffic and compel search engines to provide user data, even deleted history.
A VPN keeps your online activities private by encrypting your internet traffic and masking your real IP address when routing your data through its secure network of servers. Connecting to a VPN before using Google can significantly enhance your online privacy. I also suggest disabling tracking in your browser and limiting data sharing.
Best Ways To Delete Your Google Search History on Any Device
Why is Google still showing my previous searches and syncing across multiple devices? Google will show recommendations based on your old Google searches because of Google’s activity tracking and caching from your Google account search logs. This is designed to provide a seamless experience but also means your search history is shared across devices.
Even after deleting your search history, Google may continue to collect and sync data unless you turn off specific tracking settings. This includes web activity, location tracking, and YouTube search history, which are stored separately.
My top recommendation for clearing your search history forever is to delete your activity directly from your Google Account. I also suggest stopping Google from saving your data in the future. Below, you’ll also find other tips, like deleting location history from Google Maps or deleting data without disrupting useful features like autofill for passwords or forms.
Delete Search History From Your Google Account
When you delete history from your Google Account, it clears the history across all devices connected to your account. This also affects all platforms and services tied to it, such as YouTube, Google Maps, and Chrome.
- Access your Google Account settings. Click on your profile picture or initials in the top-right corner of the Google homepage. From the dropdown menu, select Manage your Google Account. This will direct you to the Google Account settings page.
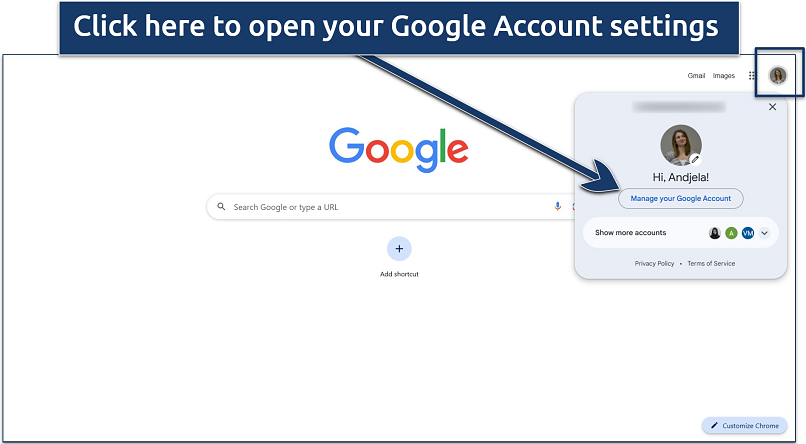 You can also switch to another account from here
 - Navigate to the Data & Privacy section. Once you're on the Google Account settings page, locate the menu on the left-hand side of the screen and click on Data & Privacy. This section provides tools and options for managing how your data is collected, used, and stored, allowing you to control your privacy settings, delete activity, and manage data-sharing preferences across Google services.
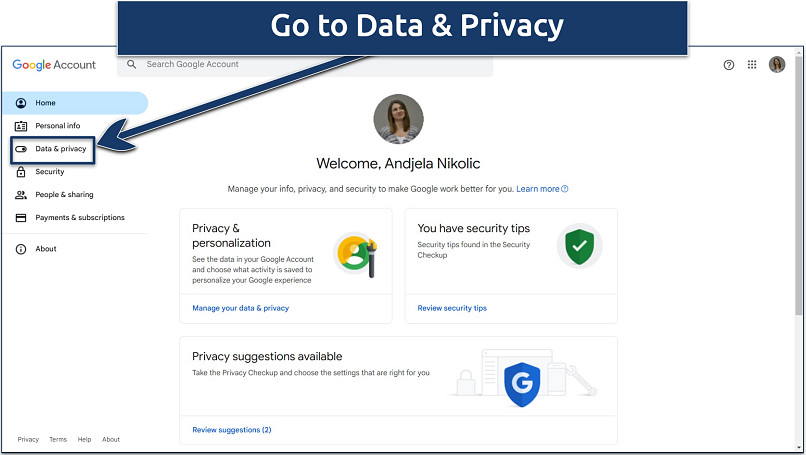 Here you can manage various aspects of your Google Account data
 - Find My Activity. This will take you to a detailed dashboard where you can view, search, and manage your recorded activities across Google services. From here, you can delete individual entries, clear activity for specific time periods, or adjust settings to stop certain types of data from being saved in the future.
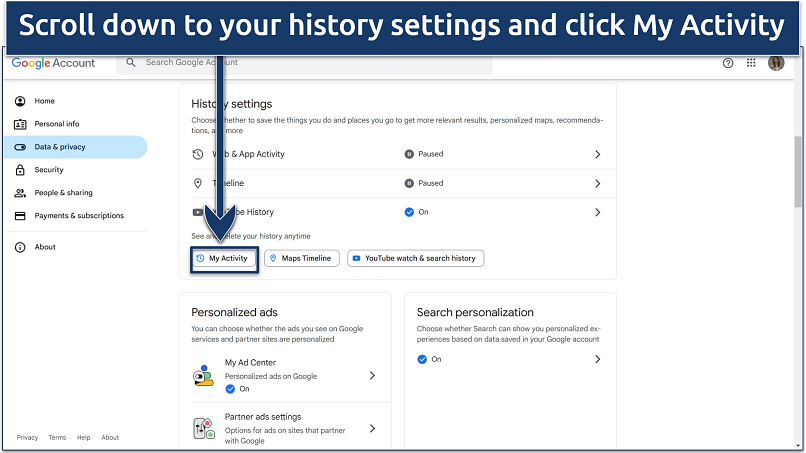 Here you can review, manage, and delete specific activities
 - Choose to delete your data. Either click on Delete or on the 3 vertical dots on the right side of the Search your activity bar, then in the drop-down menu, select Delete activity by.
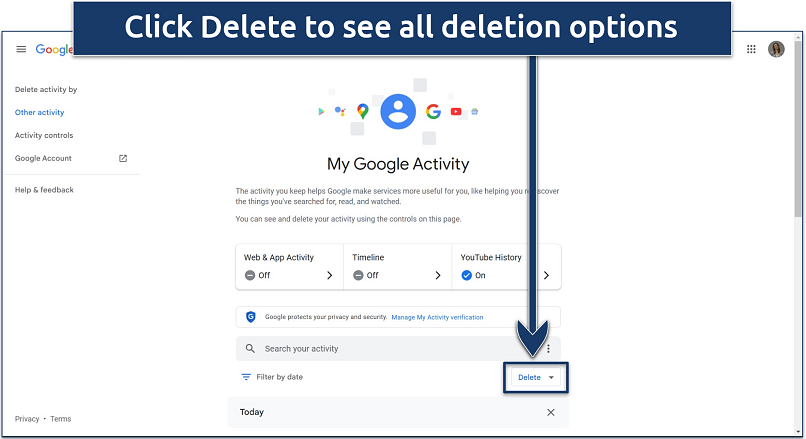 You can also delete specific search items
 - Choose a time range. You can choose to delete your search history for the past hour, day, or all time. You can also create a custom time range.
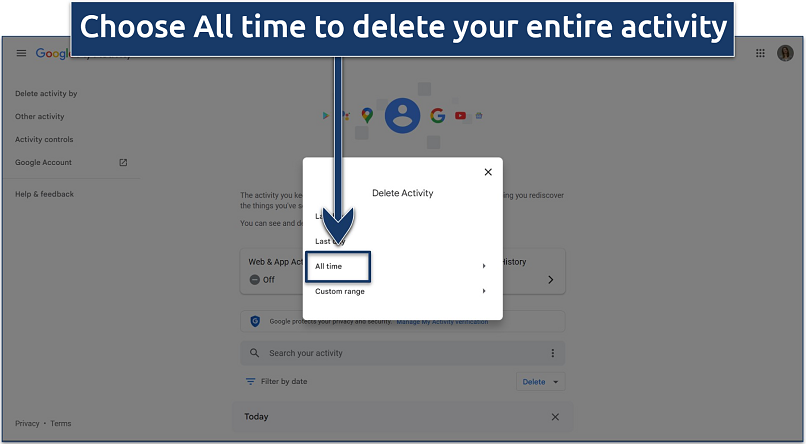 You can also choose different time ranges
 - Confirm and delete. Click Delete to permanently clear all of your saved search history. Google will process your request in a few minutes.
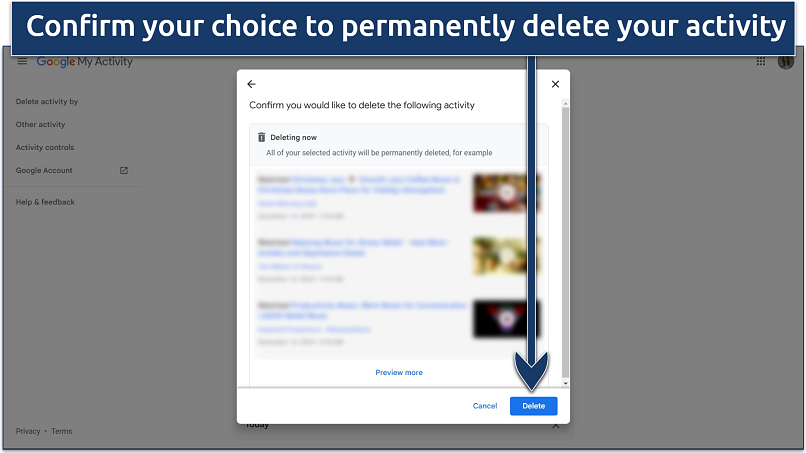 You'll see a confirmation message that your activity has been deleted
Delete Google Search History From Your Browser
If you're not signed into your Google account while browsing, your activity is only stored locally in your browser history. If you're on a shared or public device, deleting your browser history ensures that others who use the same device can't see the websites you visited or access your activity. This is particularly useful in libraries, workplaces, or on friends' computers, where you're not logged into your personal Google account.
Additionally, if you'd like to keep suggestions and personalization in Google services, deleting only your browser history is the way to go. This is quicker and more focused than accessing and managing your Google account activity. Here’s a guide to deleting your search history in Google Chrome, but you can use a similar approach for other browsers.
- Open your browser. On Google Chrome, look for the three vertical dots in the top-right corner of the browser window. Click on these dots to open the Chrome menu.
 The process is similar on Firefox, Edge, Safari, Opera, Brave, etc.
 - Clear Browsing Data. On the left-hand side of the History page, click Clear browsing data. To delete individual items, click on the 3 vertical dots next to each entry and select Remove from history.
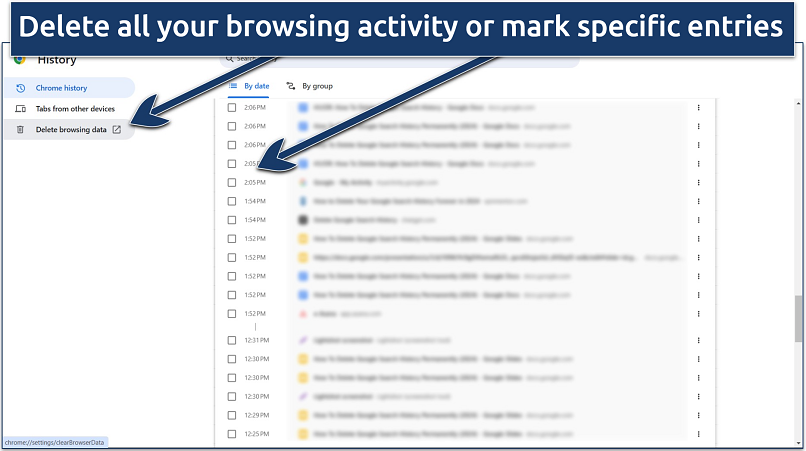 You can also do this under “Privacy and security” in Chrome settings
 - Choose the time range. In the Clear browsing data window that appears, you can choose a time range for the data you want to delete. The options are Last hour, Last 24 hours, Last 7 days, and All time.You can also choose the specific types of data you want to delete under the Basic and Advanced tabs in the Clear browsing data window. The Basic tab focuses on general browsing data like history, cookies, and cached files. For added privacy, I recommend using the Advanced tab to clear more specific data, such as saved passwords, autofill information, and site settings.
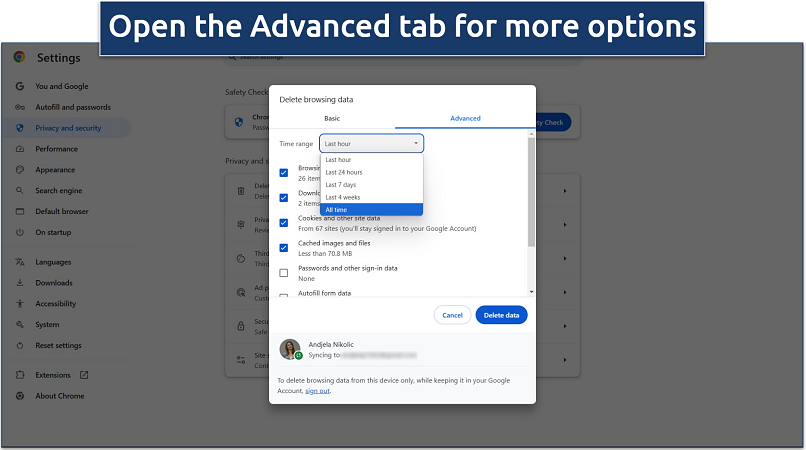 Mark all the data types you want deleted
 - Confirm and clear data. After selecting your preferences, click the Delete data button at the bottom of the window. Once completed, you'll see a confirmation message that your browsing data has been cleared.
Remove Google Search Bar Recommendations
Google search bar suggestions are based on your browsing history, searches, and autofill data. According to Hennessey.com, 46% of all Google searches pertain to people looking for local information4. The keywords you use for searching give businesses great insights into creating targeted ads. For example, 76% of people who searched “near me” visited a related store within 24 hours (Backlinko, 2024)5.
Most of them get deleted together with your browsing history. Still, I also recommend marking Autofill form data under the Advanced tab in the Clear browsing data window to keep your search bar recommendations from reappearing. On mobile devices, clear cached data for the Google app by going to Settings > Apps > Google > Storage > Clear Cache.
To delete specific search bar suggestions, follow these steps:
- Begin typing a search query in the Google search bar.
- Highlight unwanted recommendations using the arrow keys or by tapping on it.
- Click Remove (often shown as a trash bin or X icon) to delete the suggestion.
More Ways To Keep Your Google Searches and Browsing Activities Private
Google collects and stores vast amounts of personal data, but you can control what’s being tracked by adjusting your settings. Here’s how you can protect your privacy and keep your data secure:
- Manage your Google activity settings. Google’s Activity Controls allow you to decide how much data is collected from your account. Access these settings by navigating to Google Account > Data & Personalization > Activity Controls. Here are the key controls to customize:
- Web & App Activity. Disable this to stop Google from saving your search history and app interactions.
- Location History. Turning this off prevents your physical movements from being logged on Google Maps and other location-based services.
- YouTube History. Pause this setting to stop tracking your watch and search activity on YouTube.
- Set up auto-delete. Activate Google’s Auto-Delete feature, which automatically clears your activity after a set period. Go to My Activity > Manage Activity Controls. Select Auto-Delete and choose a time frame: 3, 18, or 36 months.
- Remove your personal information from Google. If you find personal information like your address, phone number, or other sensitive details in Google search results, you can request its removal.
- Use Incognito Mode. For private browsing sessions, switch to Incognito Mode in Chrome or Private Browsing in browsers like Firefox or Safari. This prevents your browser from saving browsing history, cookies, or search queries. However, remember that Incognito Mode doesn’t hide your activity from your ISP or the websites you visit.
- Install a VPN. A VPN makes your internet traffic unreadable to third parties like your ISP. It masks your IP address, preventing websites from tracking your location and activity. VPNs also hide your activities from your school or work network admins.
- Switch to private search engines. Consider using search engines that prioritize privacy. For example, DuckDuckGo doesn’t track your searches or store personal data, and Brave browser blocks trackers and ads by default.
- Adjust Google Account privacy settings. Visit your Google account’s Privacy & Personalization section to pause location history or disable web and app activity tracking.
- Turn off predictive search and autocomplete. Predictive search and autocomplete save your past queries to suggest terms. Disable these features to limit data collection.
- Use a secure DNS service. Set your device to use DNS-over-HTTPS (DoH) to prevent third parties from monitoring your DNS requests.
- Review app permissions. Check permissions for apps on your mobile devices. Limit access to sensitive data like location and browsing history, granting permissions only when necessary.
How To Delete History from Other Google Services (Maps, Docs, Google Pay)
Google Maps
Google Maps stores a significant amount of personal data to provide navigation and personalization services. This includes detailed location history, tracking places visited, travel routes, and time spent at specific locations.
It also records searches and browsing activity, such as addresses, business types, and saved places, along with real-time location data when the app is in use. Additionally, Maps logs contributions like reviews, uploaded photos, and answers to place-related questions. Deleting this data helps reduce the risk of profiling, targeted ads, or misuse of personal information.
To delete your location history on mobile (Android/iOS):
- Open Google Maps. Launch the app and sign in to your Google Account.
- Tap your profile picture or initials in the top-right corner. Then go to Settings and select Maps history from the menu.
- Click on Delete and choose a date range, or pick All time to delete your entire location history.
In the same menu, you can select Automatically delete Location History and choose a timeframe (e.g., 3, 18, or 36 months).
You can also stop location data from being saved:
- Open Google Maps and tap your profile picture.
- Select Your data in Maps > Web & App Activity. You’ll be redirected to your account settings.
- Toggle Web & App Activity off and confirm. For added privacy, I also recommend turning off location permissions for Google Maps in your phone’s settings.
Google Docs, Sheets, and Slides
Unfortunately, Google Docs, Sheets, and Slides don’t provide a direct way to completely delete the entire version history. You can’t delete individual versions directly, or delete all your previous activities, even if you’re the file owner. It’s also not possible to delete your activity from someone else's Google Doc, Sheet, or Slide if you’ve already made changes to the file.
However, if you’re the file owner, you can work around this by creating a new copy of the document or file. The original file’s history will remain intact, but the copy will be free from past changes.
Google Pay
If you don’t clear your payment history, you leave a digital trail that could make you an easy target for malicious actors. If your account were hacked, every transaction you've ever made, including sensitive details about your spending habits, payment methods, and even personal locations, could be exposed to cybercriminals. This treasure trove of data could be used to impersonate you, drain your accounts, or exploit your financial identity.
To delete your Google Pay data:
- Clear transaction history. Open the Google Pay app on your phone and go to the Activity section to view your transaction history. Select a transaction to delete. If available, tap the Delete or Remove option. However, Google Pay does not always allow direct deletion of individual transactions due to regulatory compliance in some regions.
- Delete payment methods. Open Google Pay and tap on Payment Methods or Cards. Select the card or payment method you want to remove and tap Remove to unlink the payment method.
- Delete activity data from Google Account. Go to the Google My Activity page. Filter by Google Pay under Filter by product. Review your activities, then choose Delete to remove all Google Pay-related history.
- Disable or delete your Google Pay account. Open Google Pay and tap on the Settings or your profile picture. Scroll to find the option to Close Account or disable Google Pay entirely. Follow the instructions to delete your data and deactivate the account.
- Request permanent deletion of data. Contact Google Support via their Help Center and request the deletion of all data associated with your Google Pay account, which includes your transaction history, payment details, and account information. According to Google discussion forums, support usually responds within 7 days.6
FAQs
Can I delete my search history without signing into my Google account?
Yes, you can delete your search history without signing in. However, this will only work on a browser-level. The search history synced with your Google account won’t be affected unless you log in and delete it through My Activity. For privacy, use your browser’s Incognito mode to prevent history from being saved in the future.
Why does my search history keep appearing on other devices?
Your search history appears on other devices because of Google account synchronization. Data such as search history, bookmarks, and preferences are shared through the Sync feature. To fully remove traces, delete your search activity via My Activity to erase it across all linked devices. To stop syncing between devices, go to Settings > Sync in your browser or Google account settings, and disable syncing for history.
Can I recover deleted Google search history?
No, once deleted, Google search history cannot be recovered. To avoid accidental loss of useful information, consider exporting your Google data using the Google Takeout tool before deleting. When you clear history in My Activity, it’s permanently erased from Google’s system. However, some history might still be retrievable if stored locally on your device. For example, browser cache, cookies, or third-party recovery tools might retain fragments of your activity.
How to stop Google Search suggestions from reappearing?
Turn off Web & App Activity in your Google Account settings to stop search suggestions. Additionally, clear your browser’s search bar history by accessing its Settings > Clear Browsing Data or manually deleting specific suggestions when they appear. On mobile, clear the Google app’s cache via Settings > Apps > Google > Storage > Clear Cache.
Can I remove my private data from Google search results?
Yes, you can request Google to remove private data through its Remove Content tool. Visit Google’s Removal Request Page, and follow the steps to request the deletion of sensitive data like personal information, outdated links, or content violating privacy laws. Keep in mind that even if removed from Google’s results, the content may still exist on the original website, so contacting the site’s administrator may also be necessary.
Conclusion
Why does Google keep my search history? Google is a tech company focused on online advertising; recording your online activities helps create tailored ads. This targeted advertising is a key part of Google’s business model, generating significant revenue. According to Semrush, Google ads delivered a massive 700% ROI in 20227, so I doubt its data collection principles will change soon. Google also uses your search history to personalize your results, so deleting it might affect your online experience.
The best way to protect your privacy and maintain control over your data is to turn off Google's tracking features entirely. By switching off web and app activity, location history, and other data collection settings, you can significantly reduce the information Google stores about you.
References
- https://safety.google/privacy/data/
- https://technologymagazine.com/digital-transformation/how-google-became-worlds-most-popular-search-engine/
- https://www.demandsage.com/google-search-statistics/
- https://hennessey.com/seo/local/what-percent-of-google-searches-are-local/
- https://backlinko.com/local-seo-stats/
- https://support.google.com/business/thread/227204322/how-long-does-it-take-to-get-a-response-from-the-support-team?hl=en/
- https://www.semrush.com/blog/google-search-statistics/
About the Author
Andjela is a former technology and cybersecurity writer for vpnMentor. She was dedicated to helping readers protect their privacy online with detailed VPN reviews, testing all features, and providing the facts.


Please, comment on how to improve this article. Your feedback matters!