
Download NordVPN on Windows: Easy Setup Guide for 2025

Among the myriad of VPN services available, NordVPN stands out as a reliable and feature-rich option, offering a comprehensive suite of tools to ensure a safe and seamless browsing experience.
If you're a Windows user seeking to harness the benefits of NordVPN, this article is tailored to guide you through the process. I'll provide step-by-step instructions to download, install, and use NordVPN on your Windows computer or laptop.
What’s more, if you're looking for a longer period to try it out, you can take advantage of NordVPN's risk-free 30-day money-back guarantee. You can confidently evaluate whether it is right for you.
How to Download and Install NordVPN on Windows
If you want to enhance your online security and privacy on your Windows computer, NordVPN offers a reliable and user-friendly solution. In this guide, I will walk you through the process of downloading it on your Windows computer.
Whether you're using Windows 7, 8, 10, or 11 (32-bit or 64-bit), NordVPN is compatible with all these versions, catering to a wide range of users. So, let's explore the step-by-step instructions to install NordVPN and unlock a world of secure internet browsing on your Windows device.
- Get NordVPN. Open your preferred internet browser and go to the NordVPN website. Then, navigate to the top menu bar of its home page, and click “Get NordVPN.”
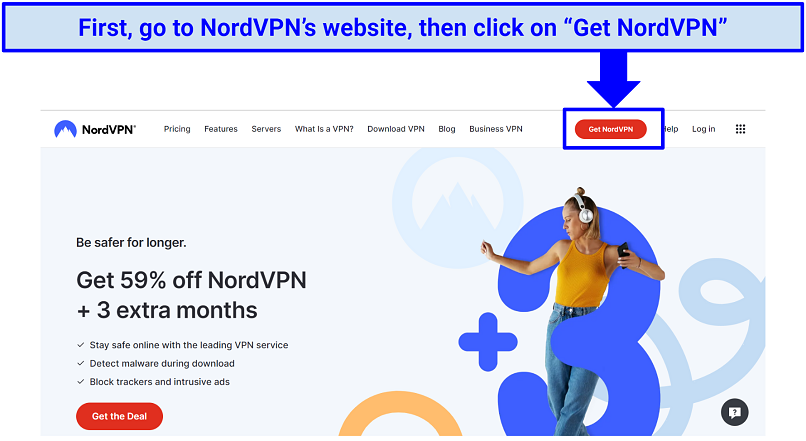 The simplest and easiest way of downloading NordVPN is to head directly to its website.
- Pick your subscription package. NordVPN offers monthly and yearly plans, so you need to select your desired one. It’s worth noting that its 30-day money-back guarantee is available on all plans.
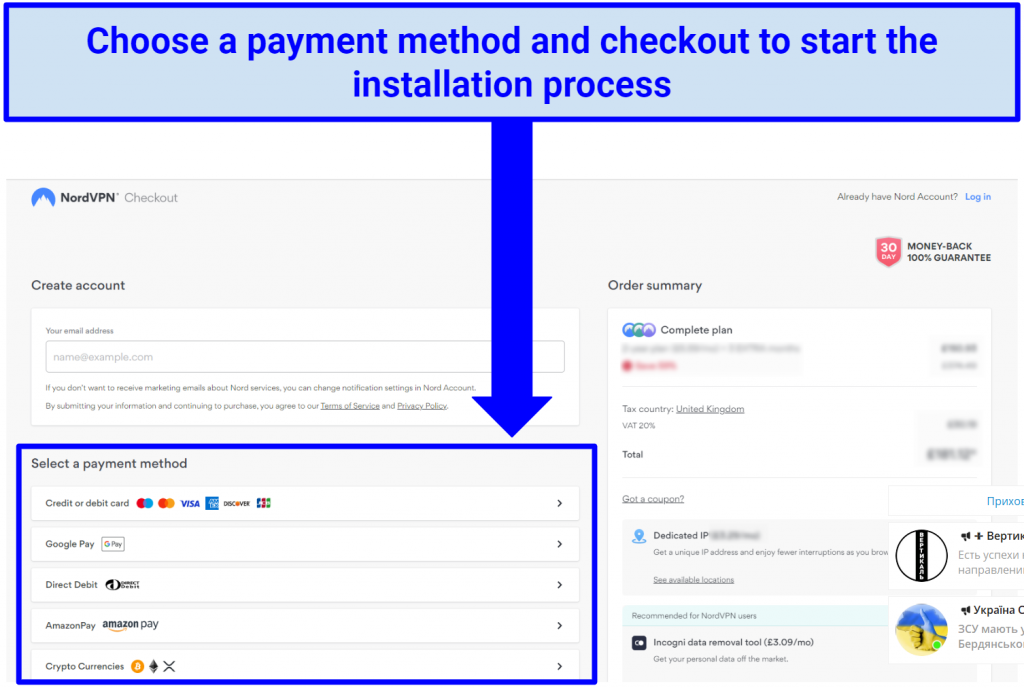
- Create your account and choose a payment method. Enter your email address to create an account. There are multiple ways to pay for NordVPN for your convenience, including debit or credit cards, PayPal, cryptocurrency, and more.
 You will need to enter a valid email to create an account before you can start using NordVPN
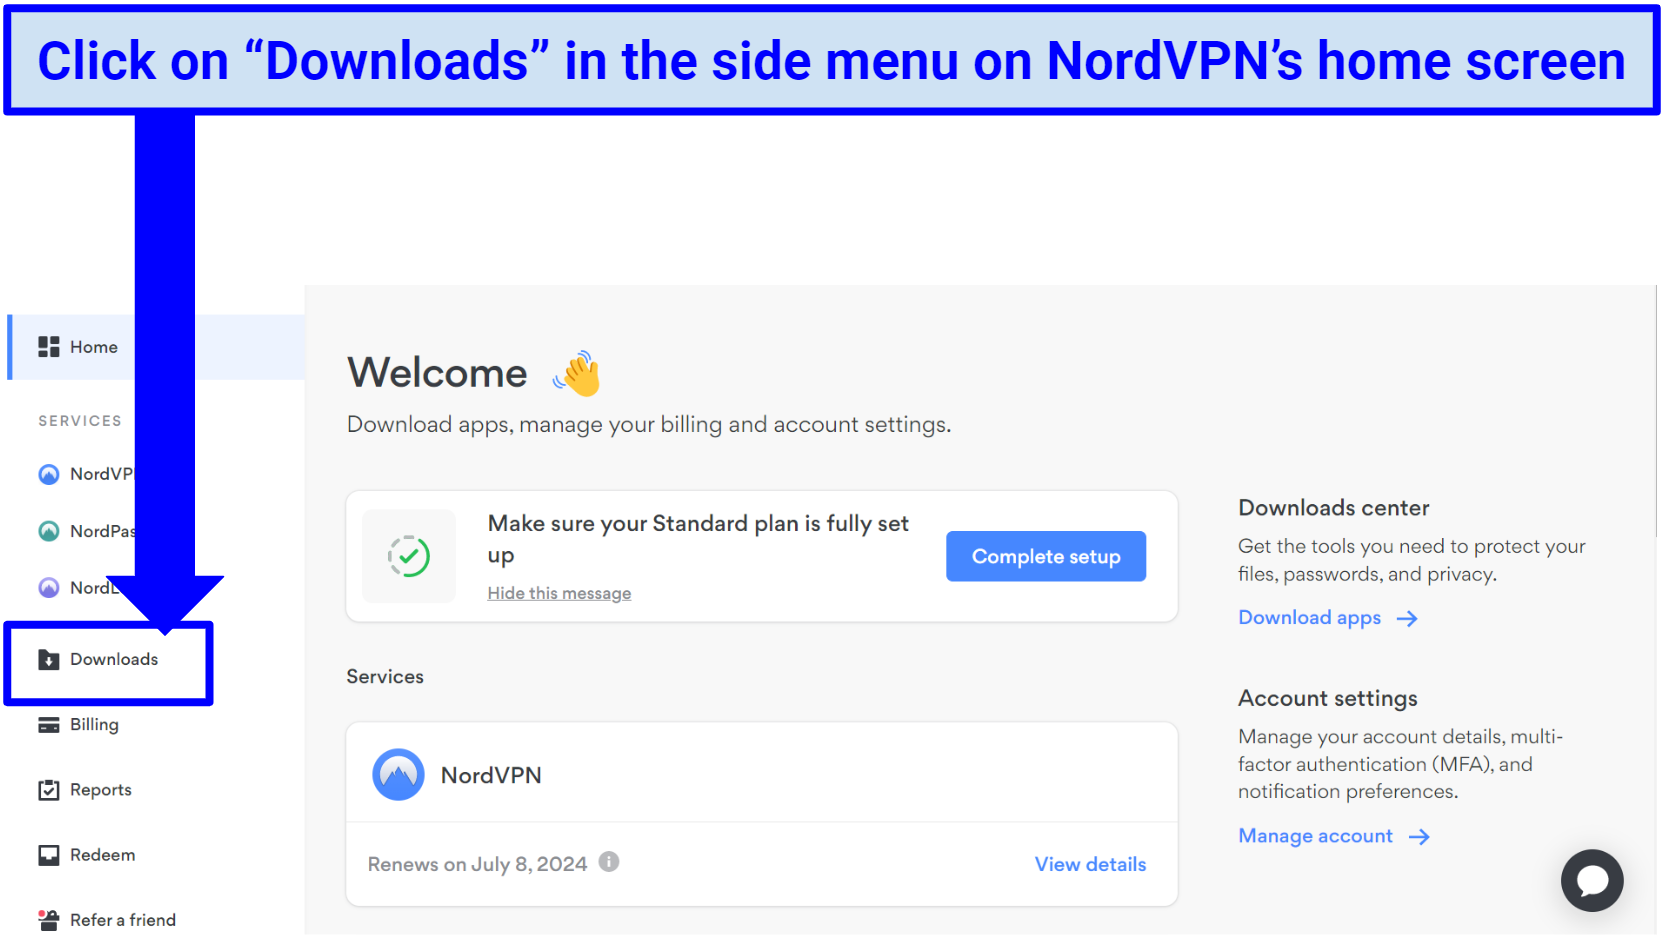
- Download NordVPN’s Windows app. Once your payment has been confirmed, you will automatically be taken to NordVPN’s Welcome page i.e. your dashboard. Navigate to the side menu, and click on “Downloads.”
-
- You will need to enter a valid email to create an account before you can start using NordVPN
-
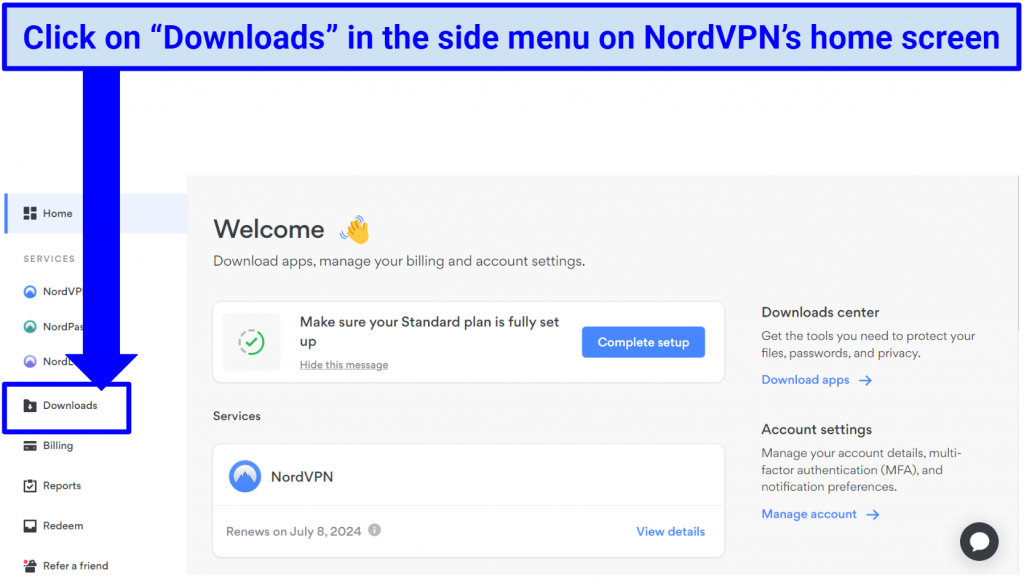
- If the Welcome page doesn’t automatically open, navigate to the NordVPN website and log in with your credentials
Note: NordVPN has the option to download it on different versions of Windows.
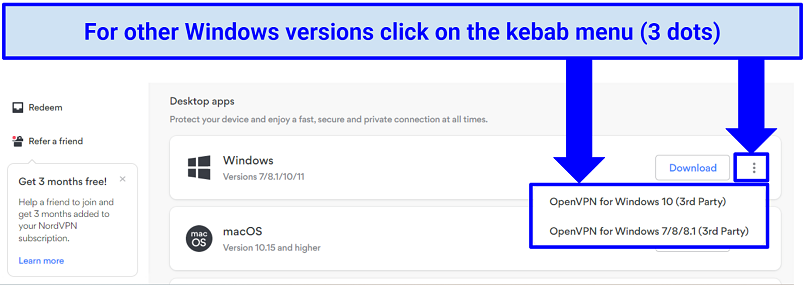 The default download for Windows will be the latest Windows version, i.e. Windows 11
-
- Open the installation file. After the completion of the download for NordVPN's setup file, navigate to the Downloads folder on your Windows device. Locate the downloaded file, NordVPNSetup.exe, and double-click on it to initiate the installation process.
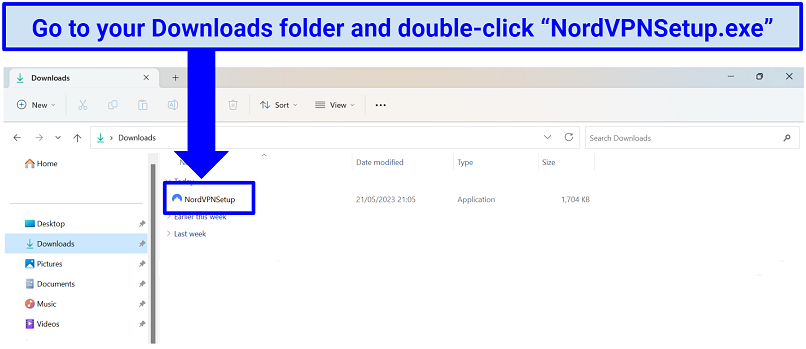 NordVPN is now downloaded, it’s time to now install it on your Windows device
- Start the installation process. Once you open NordVPN’s installation file, a prompt from Windows will appear on your screen asking if you want NordVPN to make changes to your computer. Click “Yes” to begin the installation. Then, choose the location you want the app to install on your device. Lastly, you have the option to have a shortcut for NordVPN created on your desktop or in your Start menu.
-
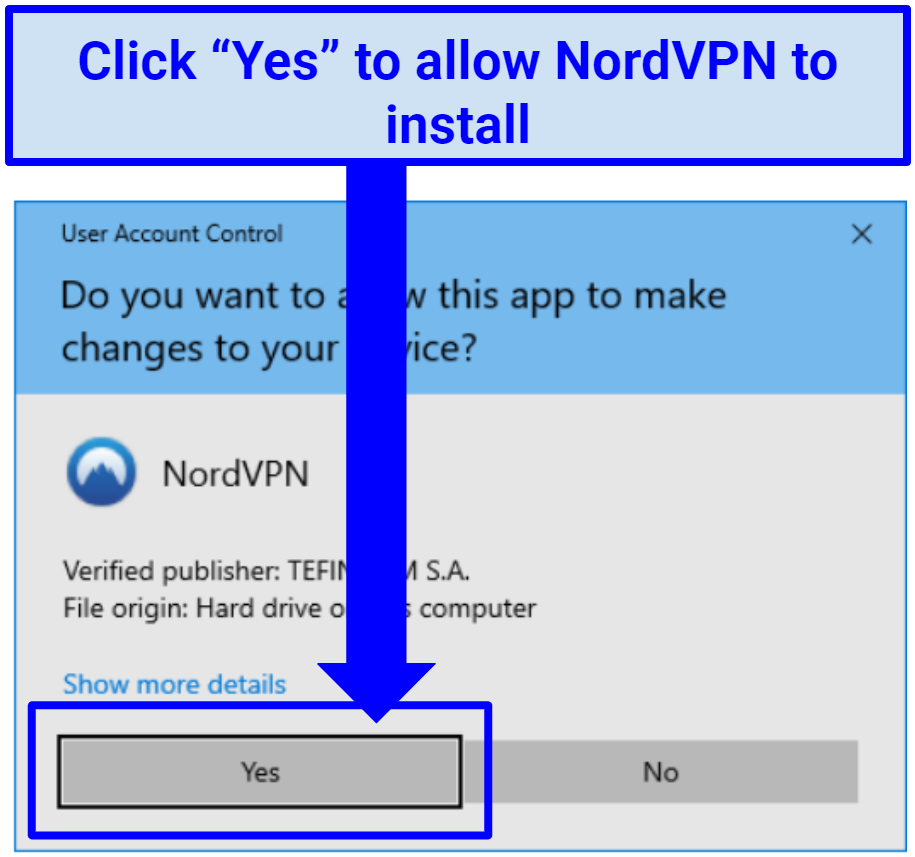
- You need to give NordVPN permission to be able to move forward with the installation.
-
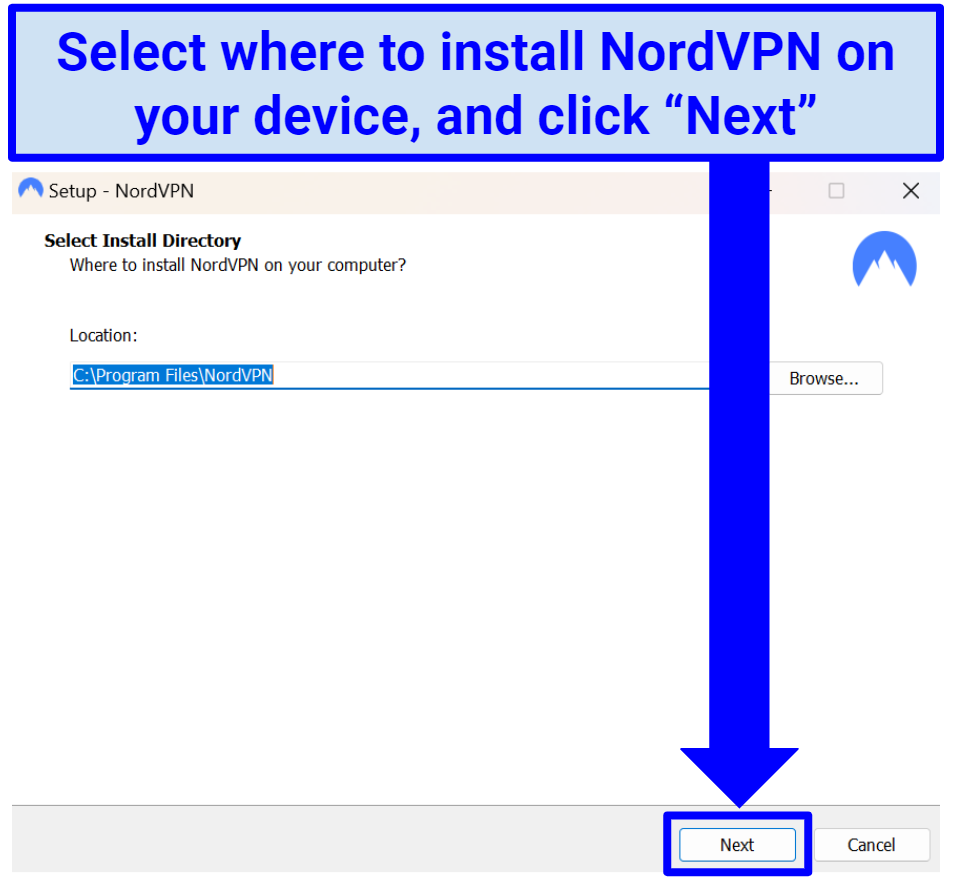
- If you don’t care too much about it, you can just use the already selected location
-
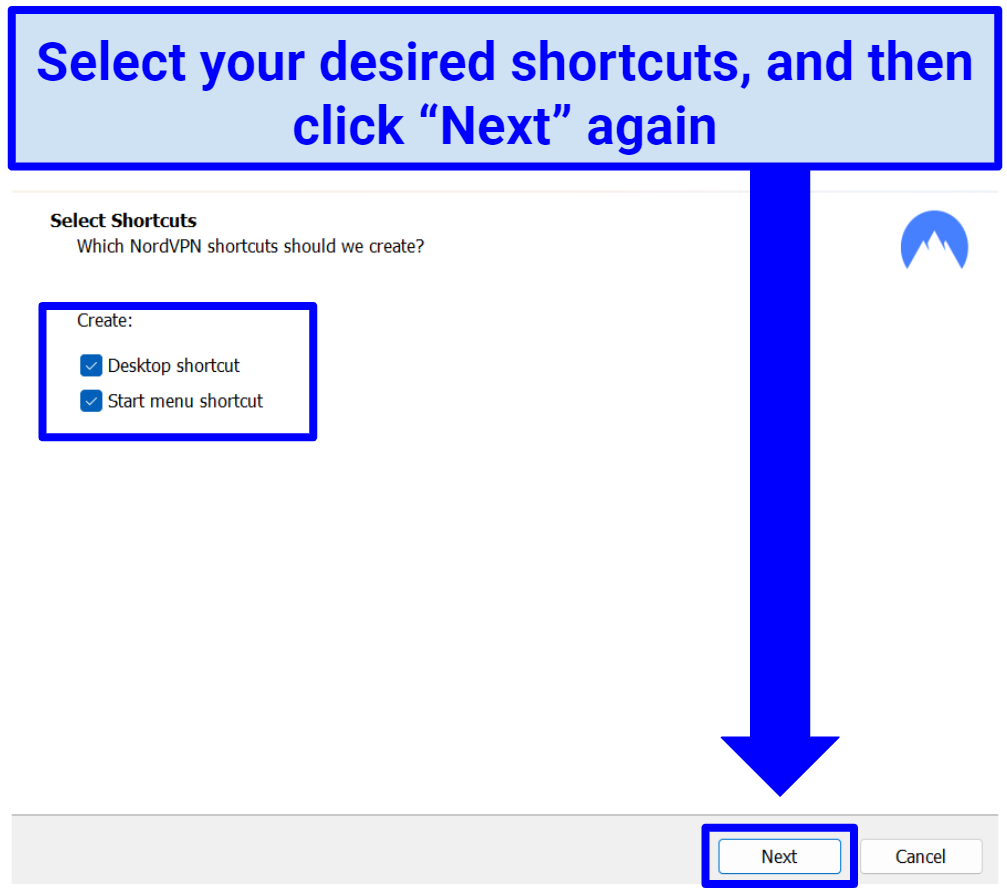
- You can make NordVPN easy to find and launch with a convenient shortcut
-
- Install the app. Finally, click “Install” once the installation is complete. The NordVPN app will launch on your Windows device.
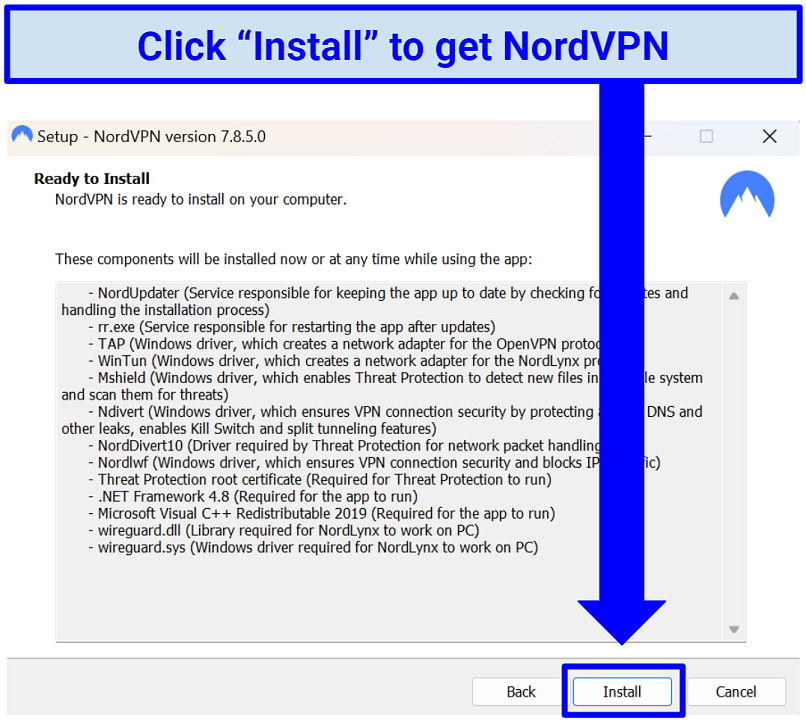 Once initiated, the installer will automatically proceed with the installation process
- Log in to NordVPN. Your NordVPN app is ready and will automatically launch upon installation. You will then be prompted to log in to your account to start using it.
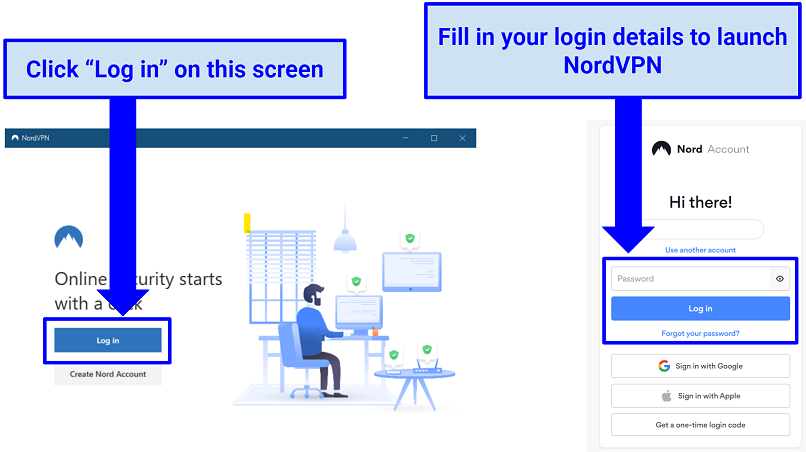 Use the same username and password credentials that you signed up with to sign in
- Optional quick setup. Once you log in for the first time, a convenient “quick setup” will launch. Follow the steps and select your preferences before clicking “Next.” You can still enable or disable these features afterwards.
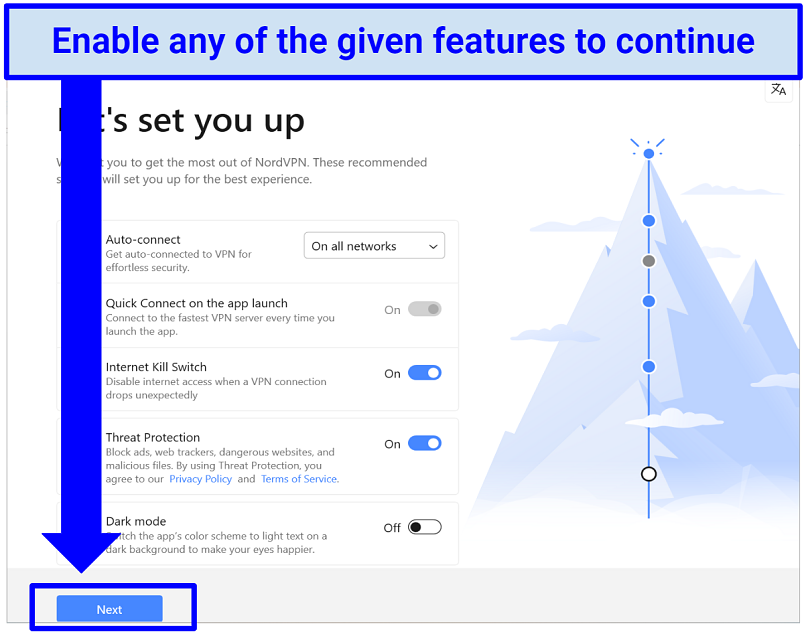 You can select NordVPN features such as turning on auto-connect, kill switch, Threat Protection, and Dark Mode
- Pick a server and start using NordVPN. Now that the NordVPN app is up and running on your Windows computer, you’ll need to pick a server to connect to. You can select the Quick Connect button at the top of the app, and NordVPN will automatically connect you to the fastest server closest to you.
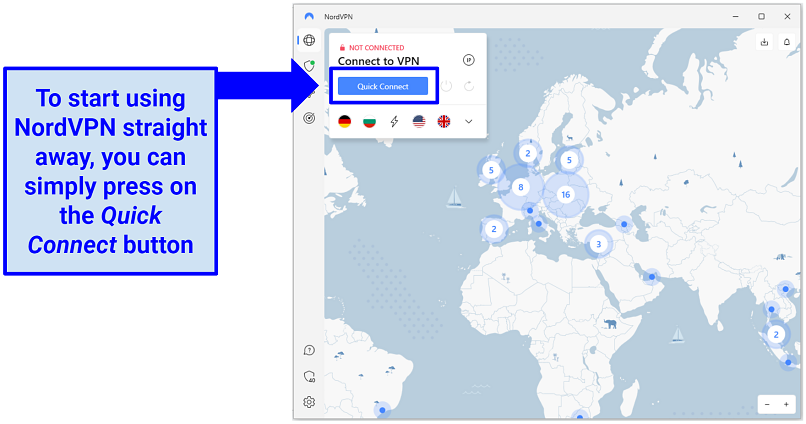 Wait till you see the status change from ‘Not Connected’ to ‘Connected’, then you’re all set and secure


How to Use NordVPN on Windows
Using NordVPN on your Windows device is a straightforward process. Simply open the NordVPN app on your Windows computer and wait for it to load. Enter your NordVPN username and password, then log in to proceed.
On the main screen, you'll find a list of servers and a large map. Access the app server settings by clicking on the icon in the top-right corner. To establish a connection, you can select Quick Connect for NordVPN's recommended server, search the list of servers via the drop-down menu, or click on a country's pin on the map to connect to a specific server.
When successfully connected, the pin will turn green, and you will see the status change to "Connected." Even if you close the app window, NordVPN will continue to protect your connection from security breaches.
You can access NordVPN's features in the Settings menu, represented by the gear icon in the app's bottom-left corner. In the General section, you can enable the Launch the app at Windows startup feature for the VPN to automatically launch when you turn your PC on.
Furthermore, in the Settings menu, you'll also find additional options that include activating split tunneling to choose which apps to use NordVPN with and which to bypass it. There’s also NordVPN's automatic kill switch, providing a safety net for your data in case of connection drops on your Windows device.
The settings are readily accessible and simple to operate, making it hassle-free even for those using it for the first time.
What Can I Get With NordVPN on Windows?

 Try Risk-Free for 30 Days
Tested June 2025
| Best feature | Fast speeds on local and international servers assisted with its proprietary NordLynx protocol |
|---|---|
| Security | AES 256-bit encryption, a kill switch, and DNS leak protection |
| Privacy | A strict no-logs policy, based in Panama (outside the 5/9/14 Eyes Alliance) |
| Works with | Netflix, Disney+, Max, Hulu, Amazon Prime Video, BBC iPlayer, Paramount+, ESPN/ESPN+, Fox Sports, ITVX (formerly known as ITV Hub), and more |
I used the NordLynx protocol for the tests I did on my Windows laptop. The consistently fast speeds meant I could smoothly stream movies and shows, even in 4K on Netflix and Paramount+, without buffering. My base speed was 101.44 Mbps, and my average speed while connected to different-distance servers was 93.6 Mbps.
NordVPN was very easy to download, set up, and use during testing. It didn’t require anything more than a few clicks and my login info. The world map showcasing server locations and the Quick Connect button made for effortless server selection. The Auto-connect feature allowed me to customize it and connect to my preferred server. I found these features enhanced the usability and personalization of my experience with the NordVPN app.
The only thing that I felt was missing is that there was no option to favorite servers. But there are many options to pick and connect to specific servers, so it’s not that big of a deal.
Additionally, I used the Threat Protection feature in my testing to effectively block pop-up ads, third-party trackers, and malware, even when I wasn’t connected to the VPN on my Windows laptop.
NordVPN offers a 30-day money-back guarantee. I contacted its customer service via the 24/7 live chat to cancel my subscription and test the guarantee. They were very accommodating, helped me cancel, and processed my refund, which I received in full three business days later.
Useful Features
- RAM-only servers. NordVPN's diskless server network ensures maximum security and privacy as no data, not even the operating system, is stored on the servers, reducing the risk of breaches or government seizure.
- Dark Web Monitor. This feature alerts you if your personal information appears in any data leaks on the dark web.
- Meshnet. It operates as a secure LAN and lets you connect devices remotely. It’s ideal for file sharing, work collaborations, and multiplayer gaming on your Windows device.
- Split tunneling. This feature allows you to selectively route certain apps through the VPN connection while keeping others on your real IP address, offering convenience and control over your online privacy and access.
FAQ on Downloading and Installing NordVPN on Windows
How can I download NordVPN on my Windows computer or laptop?
There are four methods you can follow:
- Install NordVPN on your Windows device via its official website. Visit the official NordVPN website and download a compatible Windows version for your PC. Locate the download link, run the installer, and follow the on-screen prompts to complete the installation process.
- Manual NordVPN setup for Windows. You can manually set up NordVPN on your Windows PC and laptop by firstly downloading and installing the OpenVPN GUI application on your computer. Next, visit NordVPN's website and obtain the server configuration files. Copy these files to the directory: C:\Program Files\OpenVPN\config. Now, open the.ovpn configuration file with a text editor and add the line "block-outside-dns" to prevent DNS leaks. Save the changes and close the file.
Launch the OpenVPN GUI app and ensure it has the necessary permissions to make network connections. To connect to a server, right-click on the app icon in the system tray and select the desired server. Enter your NordVPN credentials when prompted and click OK to establish the connection. To disconnect, simply right-click the app icon, hover over the server, and click Disconnect.
- Configure NordVPN for Windows via Network & Sharing Center. Access this center and make the necessary changes to the settings to connect to NordVPN.
- Set up the NordVPN Windows client from the Microsoft Store. Search for NordVPN in the store, download the app, and follow the instructions to set it up on your Windows device.
Why can't I install NordVPN on Windows 10?
NordVPN is fully compatible with Windows 10; you should have no trouble installing it. However, if you encounter difficulties, there are a few possible reasons. Firstly, ensure that your Windows system meets the minimum requirements for NordVPN and that there are no compatibility issues.
Additionally, check for conflicting software or antivirus programs that could interfere with the installation process. Make sure you have a stable internet connection and appropriate user account permissions. If you continue to experience problems, it is recommended to contact NordVPN's support team for assistance or consult its documentation for troubleshooting steps.
Can I download NordVPN on older Windows versions like XP and Vista?
Unfortunately, NordVPN is no longer supported on Windows XP and Windows Vista. These operating systems are no longer actively supported by Microsoft and do not receive security patches, leaving them vulnerable to exploits. The outdated Windows XP and Vista platforms do not meet the requirements of NordVPN's advanced infrastructure, which aligns with the latest technology.
However, there are two options available to continue using NordVPN:
- To ensure uninterrupted use of NordVPN, upgrade your Windows operating system to a supported version like Windows 7 or later. This upgrade provides the latest security patches from Microsoft, safeguarding your system against various threats. After the upgrade, download the native NordVPN application and enjoy the service effortlessly.
- If you prefer to stick with Windows XP or Vista, you can set up a manual OpenVPN connection. While it requires a bit more effort and lacks the intuitive interface of the NordVPN application, a manually configured OpenVPN connection offers the same level of security. NordVPN provides detailed tutorials to guide you through this process.
Should I use NordVPN or a free VPN on Windows?
When considering whether to use NordVPN or a free VPN on Windows, there are important factors to keep in mind. While free VPNs may seem enticing, they often come with limitations such as slower speeds, restricted server options, and potential privacy concerns.
On the other hand, a paid VPN like NordVPN offers a premium service with robust security features, a wide range of server locations, and faster speeds. It prioritizes user privacy and has a strict no-logs policy.
Making an investment in a dependable VPN such as NordVPN provides improved performance, bolstered security, and assurance during your internet browsing experience on your Windows machine.
Download and Install NordVPN on Windows in Minutes
Installing NordVPN on Windows is as easy as any other native app. Just make sure to download the version that’s compatible with your PC or laptop and that NordVPN supports that version. Even if it doesn’t (like Windows XP and Vista), there’s still a way to set it up manually through the OpenVPN GUI app.
However, it’s recommended that you upgrade your Windows to a compatible version so you can easily download and install NordVPN on your PC or laptop.
About the Author
Zane was a Cybersecurity Researcher and Writer at vpnMentor. His extensive experience in the tech and cybersecurity industries provided readers with accurate and trustworthy news stories and articles. He aimed to help individuals protect themselves through informative content and awareness of cybersecurity's crucial role in today's digital landscape.


Please, comment on how to improve this article. Your feedback matters!