
How to Use a VPN With Chromecast: Easy Setup

It’s impossible to install a VPN directly onto most Chromecast models, but there are several workarounds. I’ll show you 4 proven ways to set up a VPN with your Chromecast so you can watch your favorite shows and movies.
My methods are easy, even if you’re a beginner. All you need is your Chromecast with Google TV or an older-generation model, plus a VPN-compatible router or PC. The easiest option is the one with Google TV, but the router option lets you use the VPN on any Chromecast model.
How to Set Up a VPN for Chromecast: 4 Easy Ways
Quick Guide: How to Install a VPN on Chromecast With Google TV in 3 Easy Steps
Chromecast with Google TV devices can access the Google Play Store. You can directly download and install VPNs on these devices by following these steps:
- Get a VPN.
- Install your VPN and connect to a nearby server. Once you open your VPN for the first time, you’ll need to log in or create a new account. Then, choose a nearby server in your country to get the best speeds possible. You may need to give your device permission to establish the VPN connection.
- Stream your favorite shows on Google TV. You can now open the streaming platforms licensed for your country from the Google TV dashboard and watch your preferred content.
Cast Your VPN-Connected Device to Your Chromecast
This is the easiest way to set up a VPN for an older Chromecast using the Chrome browser on your computer.
- Run Google Chrome. Click the menu button that looks like three vertical dots at the top right of your browser. From the dropdown menu, click on Cast…
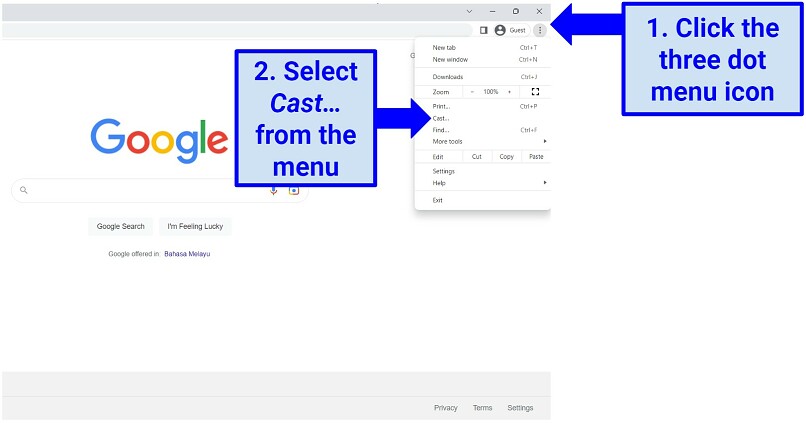 Chromecast works with the Chrome browser on Windows, Linux, or macOS devices
 - Choose your cast source and destination. In the small pop-up window, set Source to Cast tab and make sure your Chromecast is selected.
- Configure your VPN app. Go to the settings and make sure that you enable access to local network devices.
- Connect to a VPN server in your country. Choose a nearby server for optimal speeds.
- Start streaming. You can now visit your licensed streaming platforms in the Cast tab you selected earlier, and cast shows to your Chromecast TV.
Set Up a VPN on a Virtual Router and Connect to Chromecast
You can create a virtual VPN router with your Windows or Mac if you have administrative rights and a Broadcom-based Wi-Fi adapter.
To use this method in Windows, sign up for a VPN that supports the OpenVPN protocol. Every VPN on this list includes it. If you use macOS, find a VPN that has L2TP/IPSec or IKEv2.
Setting up a virtual router using Windows 8
- Open the Command Prompt. Use the search bar on your PC and type “cmd.” Then, right-click on Command Prompt, and select Run as administrator.
- Enter a command. Type the following: netsh wlan set hostednetwork mode=allow ssid=NETWORKNAME key=PASSWORD.
- Set values to name your virtual router. Choose a name and password for your network and press Enter.
- ssid=[choose a name for your network]
- key=[choose a password for your network] - Wait for a message to appear. It should say:
“The hosted network mode has been set to allow.
The SSID of the hosted network has been successfully changed.
The user key passphrase of the hosted network has been successfully changed.” - Start your virtual router. Type netsh wlan start hostednetwork in the Command Prompt and press Enter. The following message should now be displayed: “The hosted network started.”
- Enable your virtual router. Type “Network Connections” in the search bar of your PC. Right-click on the VPN connection you’ve created and go to Properties. Click on the Sharing tab.
a. Check the box next to “Allow other network users to connect through this computer’s Internet connection.”
b. Check the box next to “Allow other network users to control or disable the shared Internet connection.”
c. Under Home Network Connection, select the connection you’ve just created. Then, Click OK. - Turn on the Chromecast app. Follow the on-screen instructions to set it up. When you reach a screen that states, “Connect Chromecast to your Wi-Fi,” select the virtual router that you have created. Enter the password for your virtual router, then click Set Network.
- Enjoy streaming with your Chromecast. You are now connected to your VPN-enabled virtual router and ready to enjoy content safely.
Setting up a virtual router using Windows 10 and 11
- Get a VPN.
- Find the Mobile hotspot settings on your PC. Go to the Settings menu. Use the search on your PC to get there easily. Navigate to Network & internet. There you’ll find the Mobile hotspot option.
- Enable your mobile hotspot. Toggle the option on. Choose Wi-Fi for the Share my internet connection from setting.
- Set a new network name and password for your hotspot. Click Edit and type your new hotspot name and password. You’ll need these credentials to connect your Chromecast to this Wi-Fi network. Click Save when you’re done.
- Find your Network Connections.
- Enable the hotspot. In the Sharing tab, do the following:
a. Check the box next to “Allow other network users to connect through this computer’s Internet connection.”
b. Check the box next to “Allow other network users to control or disable the shared Internet connection.”
c. Under Home Network Connection, select the connection you’ve just created credentials for in step 4. Then, Click OK. - Choose a nearby VPN server. Open your VPN app on your PC, and choose a server in the country you’re in.
- Connect your Chromecast to Wi-Fi. Look for the Wi-Fi name that you gave to your newly created connection in step 4, and type in the password when prompted.
- Start streaming. You can now stream shows in UHD on Chromecast.
Setting up a virtual router connection on your Mac
- Get a VPN. You’ll need one that has L2TP/IPSec, which is a less common protocol that not all VPNs include.
- Go to your Mac’s Sharing settings. Click on the Apple icon, go to System Preferences, Network, and click the ‘+’ icon to create a new service.
- Configure Internet Sharing on your Mac. Make sure the settings look like the below, and click Create:
a. Interface: VPN
b. VPN Type: L2TP over IPsec
c. Service Name: You can change this to whatever you want. - Enter your VPN connection details. In the Network window, enter these details:
a. Configuration: Default
b. Server Address: Enter the domain name for your VPN server.
c. Account Name: Enter your account name with your VPN provider. - Click Authentication settings. Enter the following details and leave the rest blank:
a. Password: Enter the password provided by your VPN.
b. Shared secret: Enter the “psk” code generated in earlier steps. - In the Network panel, click Advanced. Make sure “Send all traffic over VPN connection” is checked. Confirm the settings by clicking Apply.
- Connect to the newly set up network service. In the same window, click Connect, and it will connect to the VPN server.
- Go back to System Preferences > Sharing > Internet Sharing. Make sure you configure the following:
a. Share your connection from: Select the L2TP/IPSec VPN connection created above from the dropdown.
b. To computers using: Check the Wi-Fi option. - Click Wi-Fi Options in the bottom right corner. Configure these details and click OK to confirm:
a. Network Name: Create a name of your choice
b. Channel: Default
c. Security: WPA2 Personal
d. Password: Create a password and verify it. - Connect your Chromecast to your Mac virtual router. Find the Wi-Fi network you created and connect using the password.
- Stream content using your Chromecast. You can now launch streaming apps via your Google TV and catch up on your favorite shows.
Set Up a VPN on Your Physical Router and Connect to Chromecast
By configuring a VPN on your router, you can use it for all your Wi-Fi-connected devices. I found this to be the most complicated (and riskiest) way to set up a VPN for Chromecast since mistakes could damage your router, and you’ll miss out on some VPN features.
You can skip these steps by buying a special physical router with built-in VPN protection or make them easier by using a VPN with dedicated router firmware.
- Get a VPN. To find one that will work, you need to find out what kind of router you have. Look at the sticker on the back with the model information, or check the manual.
- Install it on your router. Top VPNs like the ones on this list have step-by-step guides and fast-replying support agents to help you with setup.
- Connect to a server in your country. Choose a nearby server for the best streaming speeds.
- Connect your Chromecast to the router. Make sure your Chromecast is connected to that router’s Wi-Fi network before opening a streaming app.
- Stream on Chromecast. You can now watch your favorite shows in HD or even UHD safely.
FAQs
Can I use a VPN with Chromecast?
Yes — if you have a Chromecast with Google TV, you can use the native Android VPN app. But with older Chromecast models that don’t support VPNs natively, you'll need to set up your VPN on a router or PC and connect your Chromecast to it via Wi-Fi. While it may be a bit tricky, the guides above are detailed and should help you out immensely.
Why is my Chromecast not working with a VPN?
Chromecast relies on your streaming device to be on the same network, but using a VPN can interfere with this connection. You can fix it by first configuring a VPN on your router or creating a virtual router on your Windows or Mac computer. Then you can connect both your device and Chromecast to the same network.
For the best results, use a VPN on this list. However, any VPN could have occasional issues, like servers going down for maintenance or temporary connection interruptions. If your VPN isn’t working, try disconnecting and then try again with a different server in your country.
How to install a VPN for Chromecast on Google TV?
If you have a Chromecast with a Google TV device, you can install a VPN using the Google Play Store.
Can I use a VPN with Chromecast to stream Netflix?
Yes, you can use a VPN with Chromecast to stream your native Netflix library safely in HD. However, using one to hypothetically access region-locked content can go against Netflix’s Terms of Service and could constitute copyright infringement. My team and I don’t condone using VPNs for any illicit activities.
How can I install a VPN for Chromecast on Android?
For most models, you need to set up a virtual router and connect both devices to it. Unfortunately, you can’t use the native VPN app to cast from your Android phone. However, Chromecast with Google TV models supports a native Android app.
Can I use a Smart DNS with Chromecast?
Yes, but you’ll need to configure the Smart DNS on your router. If you’re already touching the router, it’s better you just install a full-fledged VPN on it. That way, you can easily protect your Chromecast with a VPN connection and stream more reliably. That’s why I recommend you choose a VPN with an easy router setup process instead of using Smart DNS.
Should I use a free VPN with Chromecast?
I don’t recommend using free VPNs for Chromecast or anything else. They tend to have limited server options, slower speeds, and untrustworthy logging policies. Many free VPNs also don’t work with streaming platforms like Netflix. Some even sell your data for profit or spread malware via their apps.
To ensure a smooth streaming experience, I recommend using a paid VPN with a good track record for good-quality streaming and a money-back guarantee. The VPNs on this list have faster speeds, stronger security features, and more server options than free VPN apps.
Set Up a VPN on Chromecast in Minutes
After installing and testing multiple VPN apps, I found there are a variety of ways that you can use a VPN with Chromecast and start casting to your TV. However, it’s important to choose a VPN with fast speeds, reliable connections, and strong security.
About the Author
Hendrik is a former writer at vpnMentor, specializing in VPN comparisons and user guides. With 5+ years of experience as a tech and cybersecurity writer, plus a background in corporate IT, he brought a variety of perspectives to test VPN services and analyze how they address the needs of different users.

Please, comment on how to improve this article. Your feedback matters!