Quick Overview: ExpressVPN justifies its price if you want a polished VPN with reliable performance, easy-to-use apps, and strong results across streaming, torrenting, gaming, and router setup. It starts at $2.49/month and includes a 30-day money-back guarantee, giving you time to decide if ExpressVPN fits your needs.
ExpressVPN is among the most popular and trusted names in the industry. It’s known for being one of the safest and fastest VPNs around, so I wanted to see if it can live up to these claims. Its longer plans often come with discounts that improve the overall value.
To find out, we performed extensive tests on desktop and mobile devices running Windows, Mac, Linux, Android, and iOS. We checked its speeds while gaming, streaming, and torrenting. I also explored its security features, device compatibility, and its own Lightway protocol. To see if it's still trustworthy, I dove into its privacy policy, independent audits, and company history.
My conclusion: ExpressVPN is a top premium VPN for users who value consistency, powerful security features, and a smooth experience across devices.
Try ExpressVPN Risk-Free >>
ExpressVPN Pros, Cons, and Needed Improvements
ExpressVPN Features — 2026 Update
10.0
|
💸
Price
|
2.49 USD/month
|
|
📆
Money Back Guarantee
|
30 Days |
|
📝
Does VPN keep logs?
|
No |
|
🖥
Number of servers
|
3000+ |
|
💻
Number of devices per license
|
14 |
|
🛡
Kill switch
|
Yes |
|
🗺
Based in country
|
Virgin Islands (British) |
|
🛠
Support
|
24/7 Live Chat Support |
|
📥
Supports torrenting
|
Yes |
Can ExpressVPN Stream in HD and UHD?
10.0
ExpressVPN worked with every streaming platform we tried, including Netflix, Disney+, Amazon Prime Video, and BBC iPlayer. From what we saw, streams loaded quickly in HD or UHD, and we didn’t need to switch servers or change settings for smooth playback.
While testing, we focused on its speed, stability, and compatibility with popular streaming platforms. ExpressVPN constantly updates its servers, and all 3,000 servers are optimized for streaming, so we simply hit connect and started watching.
It’s possible to securely access the following platforms with ExpressVPN:
| Netflix |
Hulu |
Disney+ |
BBC iPlayer |
Max |
Crunchyroll |
| Amazon Prime Video |
Peacock |
ESPN+ |
Paramount+ |
Rai Play |
Globoplay |
| DStv |
ProSieben |
6Play |
ORF |
CBC Gem |
Vudu |
| Pluto TV |
Discovery+ |
Locast |
Rakuten Viki |
IPTV |
AT&T TV |
| Now TV |
ITV |
|
Crackle |
Zatto |
Channel 4 |
| Sky TV |
beIN Sports |
DAZN |
fuboTV |
Sling TV |
Kodi |
| Showtime |
Apple TV |
YouTube |
Spotify |
UKTV |
Crave |
Be advised: The VPNs we recommend have strict no-logging policies that prevent them from tracking your online activities. This means you’re responsible for how you use a VPN, so please follow all applicable rules and regulations. My colleagues and I don’t condone copyright infringement.
Which Netflix Libraries Worked With ExpressVPN?
ExpressVPN safely accessed 20+ Netflix libraries, including the US, UK, and Japan. We watched Netflix for several hours without delays, and its UK servers loaded Netflix UK consistently.
 There were no dips in quality throughout the entire episode
Our checks covered the following libraries:
| United Kingdom |
Canada |
United States |
Australia |
France |
| Chile |
Japan |
Germany |
Italy |
Brazil |
| Sweden |
New Zealand |
Hong Kong |
Netherlands |
Switzerland |
| Colombia |
Malaysia |
Romania |
Spain |
Greece |
Does ExpressVPN Work With Disney+?
Disney+ played reliably with ExpressVPN across the US, Australia, Canada, Italy, and the UK. Shows like Welcome to Wrexham opened almost instantly, with no quality drops during the stream.
 We were pleased to discover that all servers we tried worked equally well with Disney+
Does ExpressVPN Work With Prime Video?
Prime Video UK and US streamed in HD without changing servers or settings. Canada, Germany, and Australia also loaded without issue, despite using the platform’s standalone primevideo domain.
 Videos loaded in the best quality right away with no pixelation
How Did ExpressVPN Perform With BBC iPlayer?
ExpressVPN accessed BBC iPlayer on the first attempt. Because the platform is so popular, we also tried servers in all 6 UK locations; each one reached iPlayer without extra setup, and we binge-watched coverage of Radio 1’s Big Weekend.
 We were able to watch BBC iPlayer with superb video quality too
How Did ExpressVPN Handle Hulu?
Hulu ran in HD on ExpressVPN’s US servers, with short load times for the shows and movies we watched. That result matters because Hulu’s VPN detection can make the platform difficult for some VPNs, but the video stayed stable throughout.
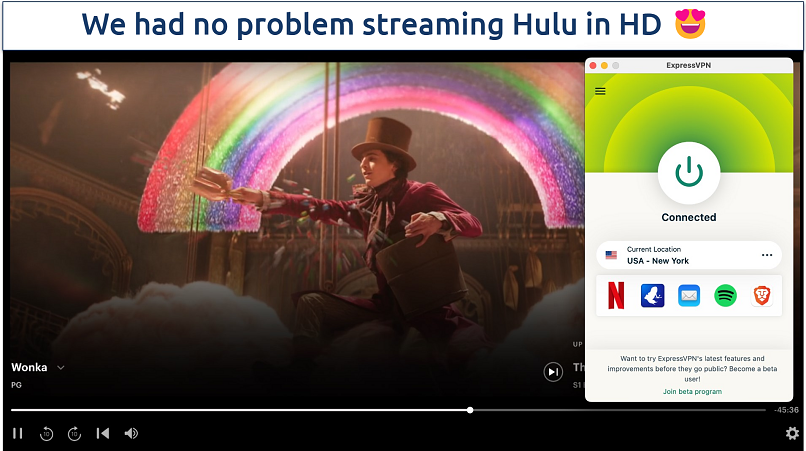 We watched the whole of Wonka with no lag or quality drops
Which Other Platforms Worked With ExpressVPN?
ExpressVPN also handled Max, Peacock, Crunchyroll, ESPN+, DAZN, RTL, Kodi, and the other platforms we reviewed. We streamed the public-domain movie Night of the Living Dead on Kodi; for setup help, see our guide on how to install Kodi addons and builds.
Beyond streaming platforms, ExpressVPN also connected normally to popular sites and apps, including Facebook, Instagram, Google services like Gmail, Twitter/X, YouTube, WhatsApp, Snapchat, Tinder, and more.
We didn’t find a major platform that needed a separate “doesn’t work with” note in this round.
80% Off
Pay less when purchasing ExpressVPN today!
Considerable savings can be made with this offer!
How Fast Is ExpressVPN? — Speed Test Results
10.0
ExpressVPN recorded the fastest results in our speed tests, with steady performance on both local and long-distance servers. Its speeds rarely dropped by more than 40%, even on the farthest locations we tested.
We have a dedicated VPN speed tester who regularly checks ExpressVPN and other leading VPNs from the same location in the US. This helps us create fair comparisons because every entry in the table below comes from the same connection. ExpressVPN was measured with the Lightway UDP protocol, which performed best in these checks.
See how ExpressVPN compares to other fast VPNs
 USA (Dallas)
Download Speed
Upload Speed
Ping
USA (Miami)
Download Speed
Upload Speed
Ping
USA (Los Angeles)
Download Speed
Upload Speed
Ping
USA (New York)
Download Speed
Upload Speed
Ping
 Canada
Download Speed
Upload Speed
Ping
 Brazil
Download Speed
Upload Speed
Ping
 UK
UK
Download Speed
Upload Speed
Ping
 France
Download Speed
Upload Speed
Ping
 Japan
Japan
Download Speed
Upload Speed
Ping
 Australia
Download Speed
Upload Speed
Ping
 Singapore
Download Speed
Upload Speed
Ping
203.60 Mbps
46.40 Mbps
5 ms
150.32 Mbps
55.06 Mbps
8 ms
166.89 Mbps
111.88 Mbps
53 ms
169.57 Mbps
66.42 Mbps
42 ms
175.09 Mbps
46.30 Mbps
45 ms
158 Mbps
80.81 Mbps
50 ms
139.03 Mbps
68.73 Mbps
228 ms
133.12 Mbps
89.52 Mbps
115 ms
158.51 Mbps
62.77 Mbps
118 ms
134.14 Mbps
42.65 Mbps
152 ms
142 Mbps
115.86 Mbps
173 ms
150.43 Mbps
85.31 Mbps
211 ms
218.73 Mbps
50.42 Mbps
6 ms
169.58 Mbps
83.50 Mbps
9 ms
143.62 Mbps
77.82 Mbps
54 ms
161.10 Mbps
103.06 Mbps
42 ms
8.23 Mbps
8.39 Mbps
64 ms
186.87 Mbps
63.28 Mbps
150 ms
70.57 Mbps
102.14 Mbps
114 ms
111.83 Mbps
95.40 Mbps
120 ms
87.54 Mbps
11.23 Mbps
193 ms
128.44 Mbps
10.25 Mbps
208 ms
234.37 Mbps
183.14 Mbps
4 ms
147.88 Mbps
171.73 Mbps
12 ms
129.56 Mbps
132.36 Mbps
46 ms
152.41 Mbps
112.51 Mbps
47 ms
5.51 Mbps
7.42 Mbps
68 ms
183.28 Mbps
17.64 Mbps
140 ms
67.86 Mbps
96.83 Mbps
120 ms
6.61 Mbps
17.78 Mbps
122 ms
203.32 Mbps
13.17 Mbps
142 ms
59.36 Mbps
13.25 Mbps
191 ms
60.81 Mbps
5.33 Mbps
210 ms
These tests are conducted from the USA
*N/A indicates that we do not currently have speed test data for this location
For context, even fast VPNs commonly reduce speeds by around 20% on local servers and up to 60% at long distances.
Is ExpressVPN Good for Gaming?
9.5
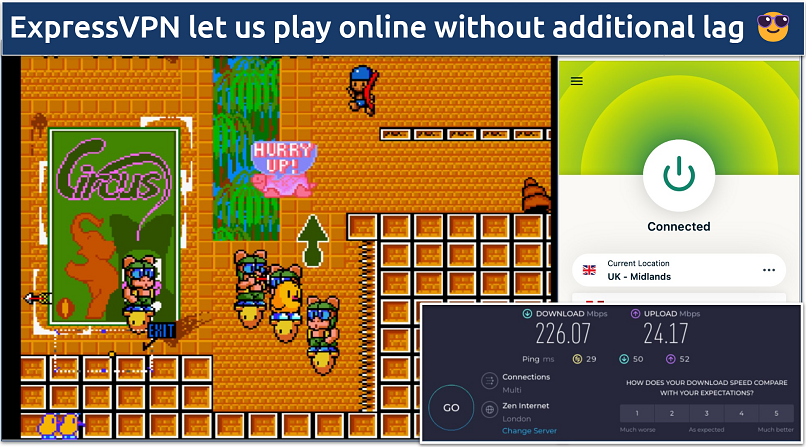
ExpressVPN is a good VPN for gaming on nearby and mid-range servers. From our gaming test location, the closest UK server lowered ping from 32ms without a VPN to 29ms, and ExpressVPN kept ping below 85ms on all European servers.
Ping is the key metric for gaming because it measures the delay between your actions and the on-screen response. When it gets too high, even small delays can make competitive games feel less responsive.
 Our character could run, jump, fly, and shoot with zero delays
We could play different genres comfortably, including fast-paced shooters. In Counter-Strike 2, matches opened normally, and gameplay felt close to using no VPN on nearby servers.
Distant servers are less suitable for online gaming, but that’s common. Sending data across the world almost always increases ping, even with high-performing VPNs.
How Many Servers and Locations Does ExpressVPN Offer?
9.6
ExpressVPN has 3,000+ servers in 105 countries. That’s a smaller server count than Private Internet Access, which has 29,650 servers, but ExpressVPN avoided overcrowding in our tests and rarely took longer than 2 seconds to connect.
Most of its servers are 10Gbps, meaning each server has enough bandwidth to handle very high traffic from multiple users. We also used the same UK Midlands server across several UK-based checks to show that ExpressVPN’s performance isn’t limited to one type of activity.
Its network includes:
- 6 locations in the UK
- 62 locations in the US, covering every US state
- City-level servers in countries like Germany, Italy, Japan, Australia, and Canada
- Coverage in less common VPN locations, including Panama, Honduras, Lebanon, Kenya, Macau, Mongolia, Armenia, and Malta
ExpressVPN also offers dedicated IPs, which are useful if you want the same IP every time you connect. They can help with school platforms, business accounts, and online banking by reducing repeated verification checks.
While ExpressVPN owns its IP addresses, it works with third-party data centers to maintain the servers. After contacting ExpressVPN, I was told those partners can see traffic coming in and out of a server, but they don’t have the credentials needed to tie online activity to individual users.
How Does ExpressVPN’s TrustedServer Technology Work?
ExpressVPN’s TrustedServer Technology uses RAM-only, or diskless, servers to reduce the risk of data being stored after a session ends. Since RAM is wiped when restarted, any session data is deleted during reboot. Everything, including the operating system, is loaded fresh from a secure read-only image.
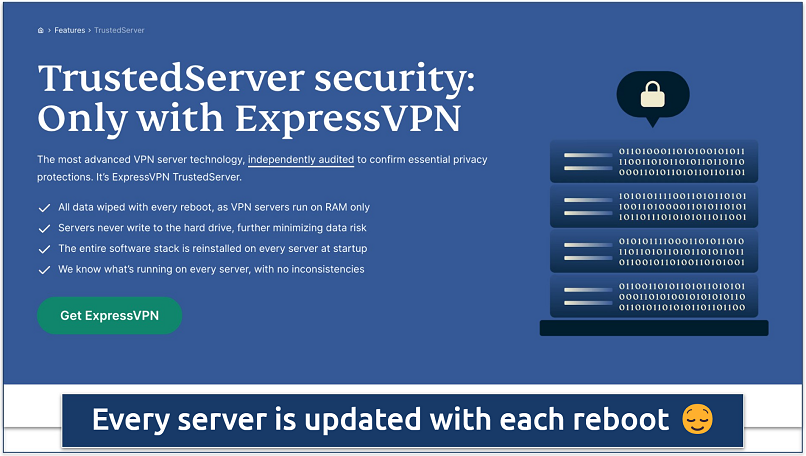 This improves security by getting each server on the latest code
This is different from traditional hard-drive setups, where data can remain until it’s manually deleted. ExpressVPN’s servers are rebooted every 1–2 weeks, which helps ensure they run updated software and don’t keep session data.
ExpressVPN also offers a $100,000 bug bounty for anyone who finds flaws in its servers. This is one of the highest sums offered on Bugcrowd, where it hosts its bug bounty program, and it adds another layer of external security testing.
How Well Does ExpressVPN’s Smart Location Work?
Smart Location is convenient, but it didn’t always choose the quickest server in our results. For example, it kept connecting our US-based speed tester to Dallas, while Houston was 2–3% faster.
Does ExpressVPN Obfuscate VPN Traffic?
All of ExpressVPN’s servers include automatic obfuscation, so you don’t need specialty servers, extra settings, or a separate obfuscating protocol. Keep the protocol set to Automatic, and ExpressVPN detects VPN blocks and applies obfuscation when needed.
This helps on networks that block VPN traffic, such as some media services, workplaces, colleges, or public WiFi hotspots. In practice, you may not notice it working because the feature runs in the background.
Why Does ExpressVPN Use Virtual Servers for India?
ExpressVPN uses virtual servers for India because the country’s data-sharing rules could conflict with a VPN no-logs policy. These servers provide an Indian IP address, but they aren’t located in India — they’re hosted in Singapore and the UK.
These are ExpressVPN’s only virtual servers, letting users connect to an Indian IP while keeping the underlying infrastructure outside the country.
How Secure Is ExpressVPN?
10.0
ExpressVPN is secure, with industry-standard encryption and a strong set of privacy tools that protect your data. I thoroughly tested its kill switch, split tunneling, and Tor compatibility, compared its protocols, and took a closer look at its proprietary Lightway technology.
Lightway is one of ExpressVPN’s biggest technical advantages because it’s designed for both security and efficiency without making the app harder to use.
Encryption — AES-256, ChaCha20, and Perfect Forward Secrecy
ExpressVPN protects your private information with AES-256 encryption, a 4096-bit RSA key, and SHA-512 HMAC authentication. This is the same level of encryption used by militaries, banks, and governments, and it makes your data extremely difficult to decrypt.
A 256-bit key creates an enormous number of possible combinations. For comparison, 1 bit gives 2 combinations and 8 bits gives 256; with 256 bits, the number is 78 digits long, making brute-force decryption unrealistic.
The Lightway protocol also supports ChaCha20. ExpressVPN chooses the best cipher automatically, but you can switch between them yourself. This can be useful on older devices that might not be optimized for AES-256, so it’s worth testing both ciphers if your connection feels slow.
ExpressVPN uses SHA-512 HMAC authentication to verify data transfers, including P2P file sharing. It relies on a shared secret key so the sender and receiver can confirm a file’s authenticity; if the key changes, it can indicate tampering.
It also uses perfect forward secrecy, which changes your encryption key with each session. This means that even if one key were compromised, previous and future VPN sessions would remain protected by different keys.
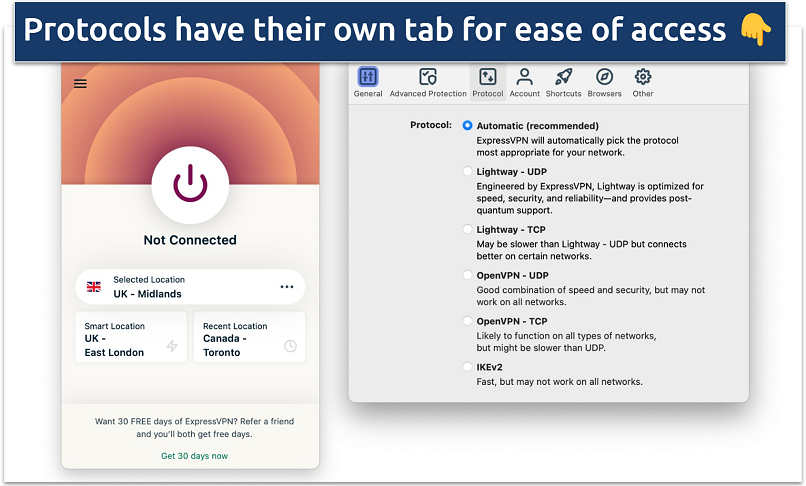
Security Protocols — Lightway, OpenVPN, and IKEv2
VPN protocols are the rules a VPN uses to encrypt and route your information. ExpressVPN lets you switch them in the Protocols tab on Windows, Mac, Android, and iOS, though the available options vary slightly by device.
 You can use advanced options to change the encryption cipher
The main options are:
- Lightway: ExpressVPN’s in-house protocol, built in Rust for security, performance, and efficiency. It drains less battery and transitions smoothly between networks, which makes it a good choice for phones. Lightway has UDP and TCP options; UDP was faster in our speed tests, while TCP can be more reliable on unstable networks.
- OpenVPN: A widely trusted open-source protocol that is continuously reviewed to strengthen its security. It also offers UDP and TCP options.
- IKEv2: Available on Mac.
- Lightway Turbo: Available on Windows as ExpressVPN’s faster, low-latency upgrade to Lightway. ExpressVPN is also rolling it out to more platforms.
There’s also an Automatic setting, which chooses a protocol based on your setup and situation. Overall, I’d recommend Lightway UDP because it offers the best balance of speed and security.
Lightway Protocol — Rust, Audits, and Post-Quantum Protection
Lightway is ExpressVPN’s proprietary protocol, now reimplemented in Rust, a modern programming language designed to reduce common code-level risks. Its code base has just 2,000 lines, which makes it easier to audit and helps keep the protocol lightweight, power-efficient, and suitable for safer multi-core processing.
To validate the Rust upgrade, ExpressVPN commissioned independent audits from Cure53 and Praetorian in late 2024. Lightway also remains open-source on GitHub, so others can review, adopt, and build on it.
Aircove, ExpressVPN’s router, also benefits from Lightway’s Rust integration. The AircoveOS v5 update introduced guest WiFi for better privacy control, enhanced security from that integration, and up to two times faster VPN speeds. Aircove’s security has also been audited by Cure53.
On mobile devices, Lightway can move between WiFi and mobile networks without ending the VPN connection. When the signal drops, it idles and reconnects quickly, establishing connections in under a second and maintaining an advantage over OpenVPN — up to 14% faster.
Lightway also has two practical advantages over WireGuard: it supports obfuscation and offers a TCP option. With some VPNs, obfuscation requires switching to the slower OpenVPN protocol, while WireGuard doesn’t include TCP.
Lightway now includes post-quantum protection as well. Standard encryption is still unrealistic for most computers to crack, but quantum attacks could change that risk in the future. This update helps protect VPN sessions if quantum-based attacks become more practical later on.
Leak Tests — No IP, DNS, IPv6, or WebRTC Leaks Found
ExpressVPN passed all of my leak tests on Windows, Mac, Android, and iPhone apps. For the first round, I used ipleak.net with 10 different servers, and every result only showed the VPN’s Canada IP address and DNS server I was connected to in the app.
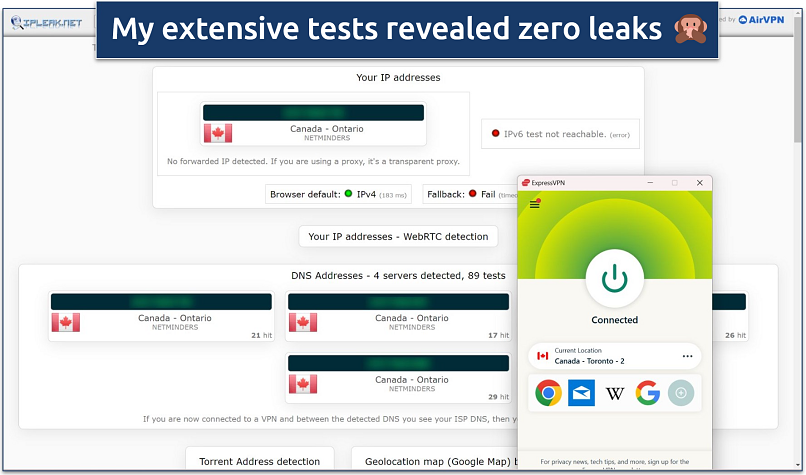 Every protocol was tested and my location was never revealed
IPv4, IPv6, WebRTC, and DNS leaks can expose data even when a VPN is connected. ExpressVPN’s built-in leak protection helps prevent these issues by keeping your real IP address, DNS requests, and browser-based WebRTC data hidden.
The IP Shuffle feature enhances your privacy by changing the assigned IP address for each website or session. This makes it harder for trackers to link activities or profiles to you, and it works without disconnecting the VPN.
Private DNS — Safer DNS Requests
ExpressVPN uses private DNS on every server, which helped confirm that DNS requests stayed protected. DNS, or the Domain Name System, translates website names into the addresses your device uses to load them. By handling DNS requests on its own servers, ExpressVPN removes an extra third-party step where browsing information could leak.
You can choose your own DNS, but I recommend sticking with ExpressVPN’s private DNS servers whenever possible because they keep DNS requests inside the VPN tunnel.
Kill Switch — Network Lock
ExpressVPN’s kill switch, called Network Lock, stops internet access if the VPN disconnects. This prevents your traffic from continuing outside the VPN tunnel, making it an essential security feature.
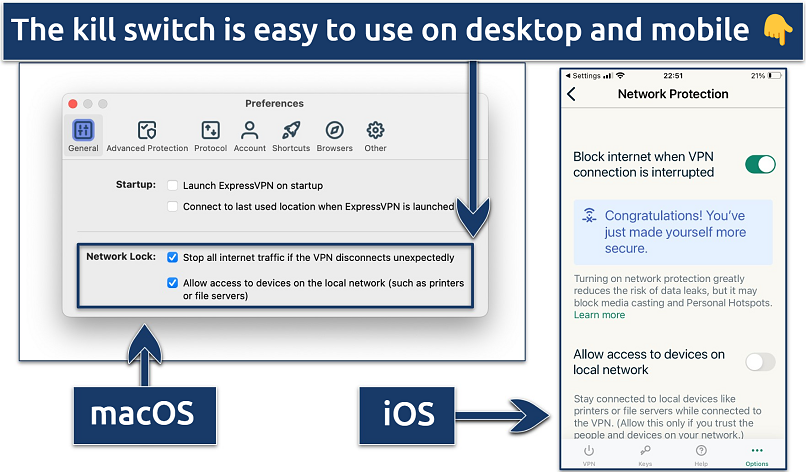 On the mobile apps, it's called Network Protection in Settings
On Windows, Linux, and Mac, Network Lock is enabled by default. You can also allow access to devices on your local network (LAN), which is useful if you have a printer or other Wi-Fi-connected devices.
Tor Compatibility — Tor Over VPN
ExpressVPN can be used with Tor through the Tor over VPN method. Tor, short for The Onion Router, is a separate browser that encrypts traffic within its own network. It was originally built for anonymous browsing on the regular web, but it can also be used to access the dark web.
The dark web is often associated with criminal activity, but it also gives activists and whistleblowers a way to share information anonymously. Since ISPs and government agencies can detect Tor Browser use, connecting to a VPN first adds privacy before opening Tor.
Crypto Trading Compatibility — Tested on Bitpanda and Blockchain
ExpressVPN worked with the crypto platforms we tried, but compatibility can depend on the exchange or app. On Mac, I logged into Bitpanda and sold IOTA after responding to an “Authenticate this new browser” security email. On iPhone, I logged into Blockchain and bought Litecoin.
I also asked ExpressVPN’s live chat about this, and they said some websites and apps block proxies and VPNs.
Advanced Protection — Threat Manager, Ad Blocker, and Parental Controls
ExpressVPN’s Advanced Protection features add browsing safeguards beyond the VPN tunnel. They’re available on all ExpressVPN apps and on the Aircove router.
These tools include:
- Threat Manager: Stops websites and apps from communicating with third parties known for tracking activity or malicious behavior.
- Ad Blocker: Works with Threat Manager; together, they stopped 59% of ads and trackers in my tests.
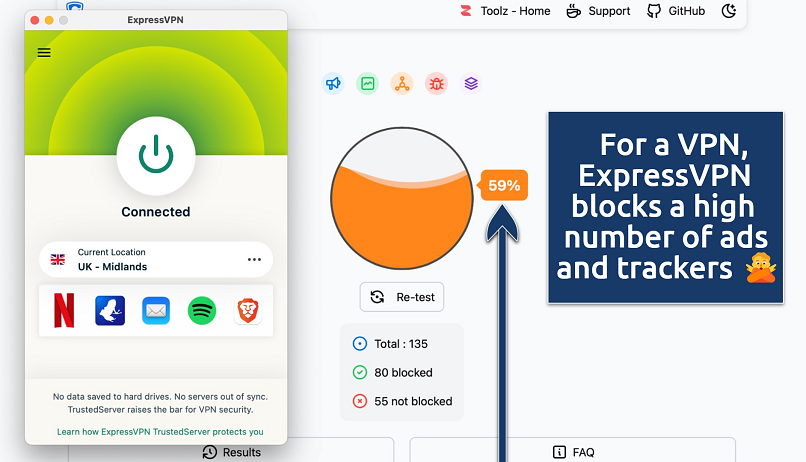 I tested ExpressVPN with an online ad blocker test tool
- Parental Controls: Blocks adult sites, which is useful for family PCs and children’s devices.
The blocker performed well for a VPN-based tool, but you can still pair it with a dedicated free ad blocker if you want stronger ad filtering.
Identity Defender — ID Alerts, Insurance, Data Removal, and Credit Scanner
Identity Defender is ExpressVPN’s identity protection suite for monitoring personal information, removing exposed data, and checking for signs of fraud. Currently, Identity Defender is available only to new US-based users on iOS and Android. ExpressVPN says support for more devices and regions is coming soon.
The tools are:
- ID Alerts: Free with all ExpressVPN offers. It monitors sensitive information, such as Social Security numbers, and alerts you to potential identity risks, including unauthorized address changes or mail redirection.
- ID Theft Insurance: Comes with the 1-year and 2-year deals. It offers up to $1 million in coverage for identity theft-related damages, including support for recovering stolen accounts and addressing fraud-related expenses.
- Data Removal: Part of the 2-year offer. It helps identify and remove personal information from data brokers and people-search websites, with monitoring for future exposures.
- Credit Scanner: Bundled with the 1-year and 2-year offers. It tracks credit changes that may signal fraudulent activity, while the 2-year offer also gives you a detailed monthly credit report covering credit status, accounts, balances, and payments.
If you subscribe to the 1-month or 1-year offer, you can still get Data Removal for an additional fee. Editor's Note: ExpressVPN and this site are in the same ownership group.
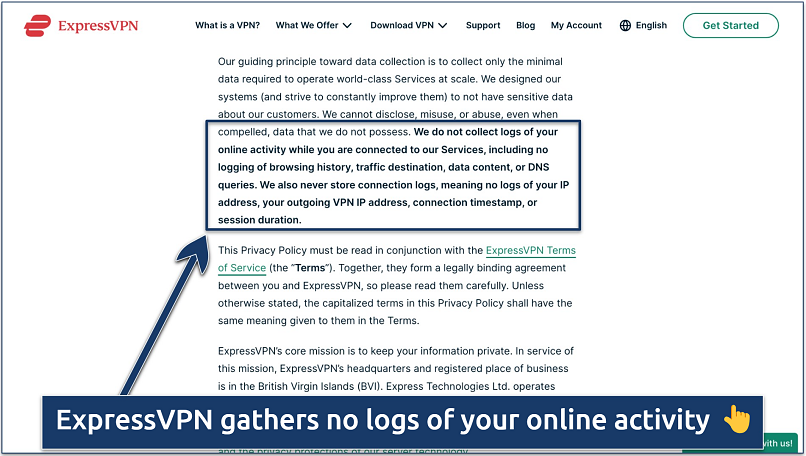
Privacy — No-Logs Policy and Company Ownership
10.0
ExpressVPN has a no-logs policy and is based outside the 14 Eyes Alliance. Its privacy policy has also been tested in court several times, giving its claims stronger real-world support than many VPNs can show. ExpressVPN is owned by Kape Technologies, which also owns CyberGhost and Private Internet Access. Reuters reported that Kape’s 2021 ExpressVPN acquisition was intended to create a larger digital privacy and security company.1
Does ExpressVPN Keep Logs?
 I appreciate how clear ExpressVPN's privacy policy is
ExpressVPN doesn’t store activity tied to your browsing or app use. The service states it only collects:
- Information used to sign up, such as billing details and email address
- How many apps and app versions you’ve activated
- The day a connection was made, but not the specific time
- The server location you connect to, but not the IP address assigned to you
- The amount of data transferred in one day
These details can show that you used the VPN on a given day and server location, but not what you did while connected.
A key example is from 2017, when Turkish authorities seized one of ExpressVPN’s servers during a criminal investigation. ExpressVPN said it couldn’t identify which customer used the IPs cited by investigators because it doesn’t keep connection logs, and its no-activity-logs policy meant it couldn’t see which customers accessed Gmail or Facebook.2 The server inspection supported the company’s logging claims.
Was ExpressVPN Audited?
ExpressVPN has completed 27 independent audits and security assessments by several reputable firms. These reports didn’t find major issues, and reported vulnerabilities were fixed quickly.
According to TechRadar, KPMG’s 2025 assessment found “no exception noted” when reviewing ExpressVPN’s TrustedServer controls.3
Notable audits and assessments include:
- Cure53: Audited Lightway in 2021 and 2024, TrustedServer technology in 2022, and the Chrome and Firefox extensions in 2018. The browser extensions are open-source, so others can inspect them too. Separate app assessments also covered Linux and macOS in 2022.
- Cure53: Audited ExpressMailGuard and Identity Defender in May 2026. The audits covered its email relay service and identity protection tools.
- PricewaterhouseCoopers: Reviewed ExpressVPN’s privacy policy and TrustedServer technology for a month in 2019 by examining code and interviewing team members.
- KPMG: Audited TrustedServer technology and ExpressVPN’s privacy policy in 2022, with a third audit of its privacy commitments completed in June 2025.
- F-Secure: Tested the Windows v.12 app in 2022 and found no weaknesses.
- ioXt Alliance: Certified the Android app in 2021 after checking for low-level security issues.
- Nettitude: Ran a Windows app penetration test in March 2024 after a tech writer reported leaks. It found a medium-level risk that ExpressVPN quickly fixed. The testing also led ExpressVPN to publish a paper in the engrXiv Engineering Archive about more thorough DNS leak testing methods.
You can read these audit results in ExpressVPN’s Trust Center. This section of its site also includes biannual transparency reports, which show legal requests received in the previous 6 months, plus details about its bug bounty program and privacy initiatives.
Where Is ExpressVPN Based?
ExpressVPN is based in the British Virgin Islands, a jurisdiction with no mandatory data retention laws. This matters because a VPN company must follow the laws of the country where it’s incorporated, and legal requests for user data are handled under BVI law.
The BVI is also outside the 14 Eyes Alliance, also known as SIGINT Seniors Europe, which is an intelligence-sharing group between member countries. Combined with ExpressVPN’s no-logs policy, this gives the company a stronger privacy position than VPNs located in countries with stricter data-sharing rules.
Does ExpressVPN Work in China?
ExpressVPN can work in China, but access isn’t guaranteed because the Great Firewall can block VPN traffic and cause downtime. The service has a dedicated China support page, and its 30-day money-back guarantee gives you time to test it.
For the best chance of connecting, ExpressVPN suggests:
- Using the Automatic protocol option
- Trying recommended servers such as US — Los Angeles 5 and UK — Wembley
- Checking the recommended server list before traveling or contacting support for the latest options
- Installing the app before arriving in China, since the ExpressVPN website may be blocked there
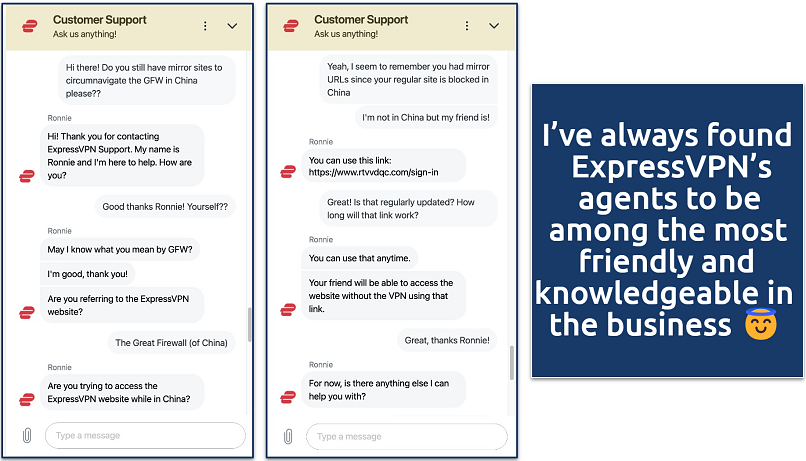 With ExpressVPN, you can usually chat to a live agent within 30 seconds
ExpressVPN also maintains a mirror URL for use in China, but it’s best to contact customer support for the latest link. Live chat also told me the service works in other restrictive countries, including Iran, the UAE, Turkey, Russia, and Saudi Arabia.
China has banned many VPNs, but there have been no publicly reported cases of tourists being targeted for using one. My teammates and I don’t condone illegal activity, and we advise checking local laws before using a VPN.
Can You Torrent With ExpressVPN?
10.0
ExpressVPN supports torrenting on every server, with unlimited bandwidth and compatibility with major P2P apps. Many VPNs restrict P2P to specialty servers, but ExpressVPN lets you choose the closest or fastest location instead. It works with qBittorrent, Transmission, Vuze, Deluge, uTorrent, and other widely used clients.
To test its torrenting performance, I used Vuze to download the public-domain movie Night of the Living Dead. Using the UK — Midlands server, the download reached 8.3 MB/s, and the 1.76 GB file finished in under 4 minutes. That was only 1% slower than the same transfer without a VPN.
ExpressVPN doesn’t offer a SOCKS5 proxy. It does support port forwarding, but only at router level, so it takes more setup than using the regular VPN app. For most users, the standard VPN connection is the better option because it includes leak protection and the Network Lock kill switch.
Torrenting is legal in most countries, but downloading copyrighted files usually isn’t. We strongly urge you to only access public-domain torrents to avoid breaking any laws.
Installation & Apps
10.0
Simple Design and Built-In Controls
ExpressVPN’s desktop and mobile apps are stable, modern, and straightforward. The main screen keeps the layout uncluttered, with a large power button in the center and a Refresh button next to your VPN IP address on iOS and Android. You can use it to reconnect when speeds feel slow without fully disconnecting the VPN.
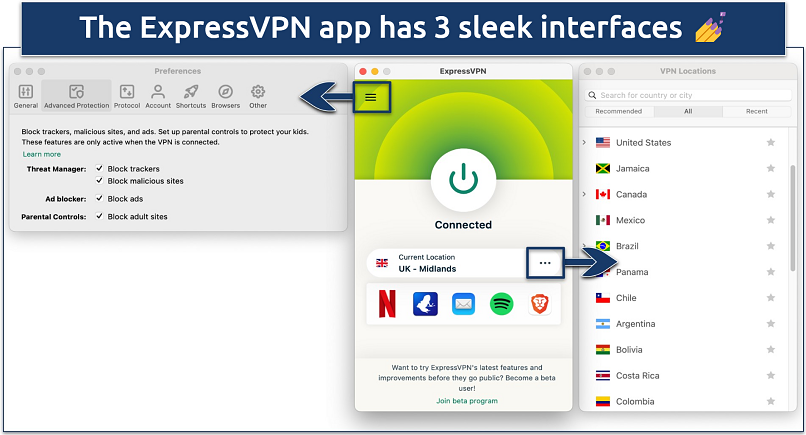 The 3 lines in the upper left corner take you to the settings
The app layout is also easy to follow:
- Server list: Separate from Preferences and divided into 4 geographical subcategories, making locations easier to find.
- Preferences: Organized into 7 clearly labeled tabs, so settings aren’t buried.
ExpressVPN doesn’t offer as many adjustable security features as some competitors. However, features like automatic obfuscation are built into every server, so the app stays streamlined because much of the functionality is integrated rather than separated into extra toggles.
How to Set Up ExpressVPN
It took me less than 3 minutes to sign up for and install ExpressVPN in my tests. To get started, follow these steps:
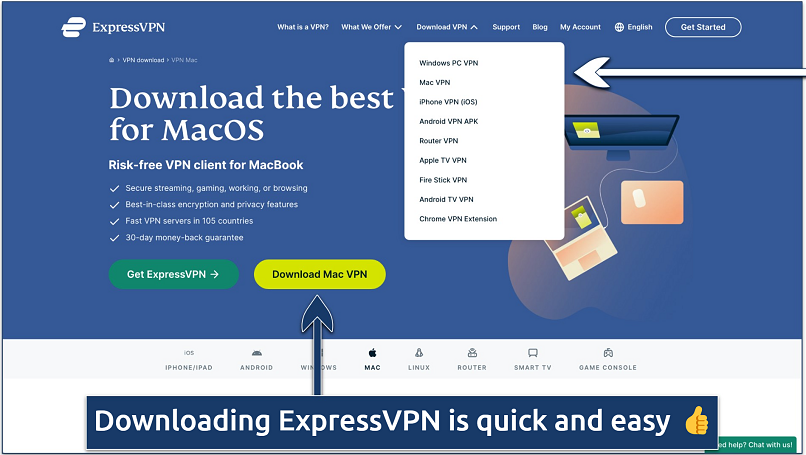 Just find your OS on the menu and hit the download button
- Choose an offer. Go to ExpressVPN’s website, pick a plan, and enter your sign-up details.
- Install the app. Download the app on your preferred device and enter your activation code.
- Connect to a server. Select a server and start streaming, browsing, gaming, or torrenting with the VPN connected.
This method works for Windows, Mac, iOS, and Android devices. For Linux, you’ll need to use the command line, but ExpressVPN provides detailed setup guides on its website.
Which Devices Does ExpressVPN Support?
ExpressVPN supports all major operating systems, many streaming devices, routers, and some devices that don’t normally run VPN apps. It has native apps for Windows, macOS, Android, iOS, Linux, and Android TV.
Streaming and TV platforms include:
- Apple TV
- Amazon Fire TV and Fire Stick
- Chromecast with Google TV
- TCL smart TVs released after 1 February 2024, where ExpressVPN is pre-installed with a 30-day trial subscription
These apps are available through the relevant device stores. You can also encrypt traffic on many routers using ExpressVPN’s router app.
For devices that don’t support VPN apps, such as gaming consoles and some smart TVs, MediaStreamer can help with setup.
Does ExpressVPN Have Desktop Apps for Windows, Mac, and Linux?
ExpressVPN’s Windows, Mac, and Linux apps are consistent across desktop platforms, but there are a few feature differences. Windows and Mac both support OpenVPN and Lightway, while IKEv2 is only available on macOS. Split tunneling also isn’t available on macOS 11 and newer.
Desktop compatibility includes:
- Windows: Requires Windows 7 or newer.
- macOS: Works on macOS 10.11 or later and has native support for Apple Silicon Macs, including M1 and M2 devices. Some apps need to be “translated” to run on Apple Silicon, which can cause issues, but ExpressVPN avoids that if you update to the latest Mac app.
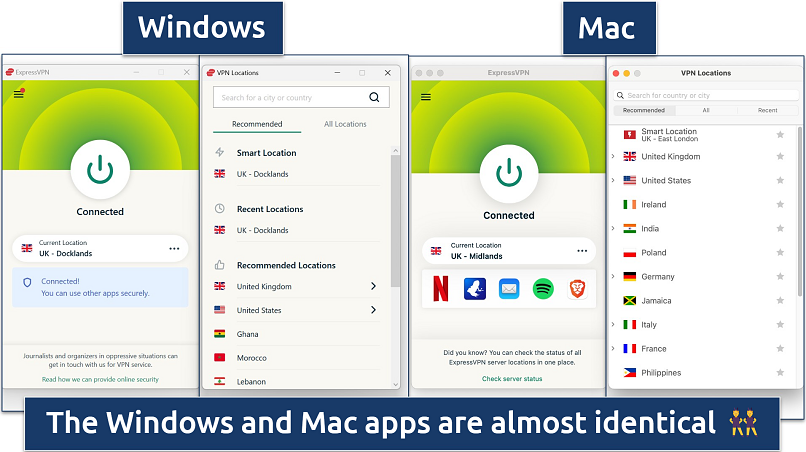 This makes it an easy transition if you switch devices
- Linux: Still needs command-line installation, but ExpressVPN now has a graphical user interface. After setup, you can click through the app instead of memorizing commands.
What Do ExpressVPN’s Android and iOS Apps Include?
The mobile apps are similar to ExpressVPN’s desktop apps, but Android has a few extra controls. The Android app includes split tunneling, a kill switch, auto-connect, and a tips bar at the bottom of the home screen that links to ExpressVPN’s blog.
Android also has an option to disable in-app screenshots. This prevents other apps or anyone viewing your screen from capturing sensitive information shown inside the ExpressVPN app.
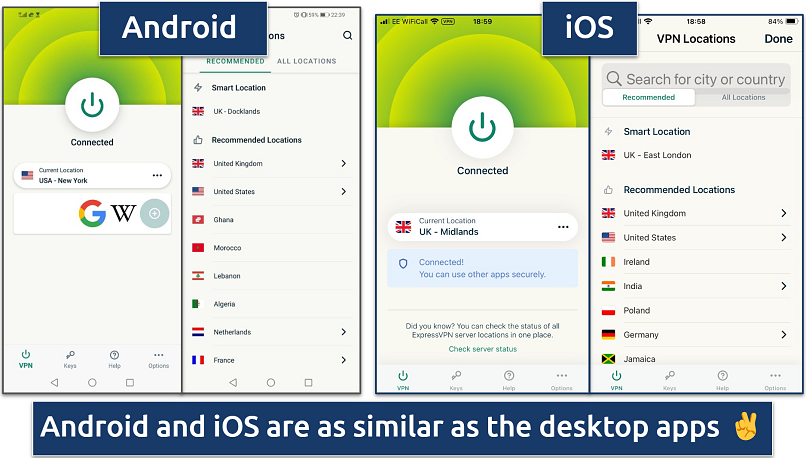 Apps for iOS rarely have split tunneling due to its design
ExpressVPN Keys is available on Android and iOS as the company’s password manager. It provides unlimited password storage, encryption, and a password generator for creating unique logins. You can also use Keys on Windows, macOS, and Linux through its browser extension.
Which Browsers Work With ExpressVPN’s Extensions?
ExpressVPN has browser extensions for Chrome and Firefox, and you can also use the Chrome extension with Edge, Brave, and Vivaldi. These extensions only work on desktop because they control the main ExpressVPN app rather than acting as standalone browser proxies.
For Edge, Brave, and Vivaldi, you’ll need to download the extension through the Chrome Web Store. On Microsoft Edge, you also have to allow extensions from other stores in the browser settings.
Unlike proxy extensions, ExpressVPN’s browser extensions connect through the full desktop VPN app. That means you need ExpressVPN installed on your computer first. When you connect in the browser, the desktop app connects too, so protection applies beyond the browser.
How Does ExpressVPN Work on Fire Stick?
We installed ExpressVPN on an Amazon Fire Stick. Setup took a few minutes longer than on desktop because we had to enter details with a remote control. Once installed, the app ran smoothly and felt consistent with ExpressVPN’s other platforms.
For most TV devices, you can install ExpressVPN through the relevant app store, so sideloading an APK usually isn’t necessary. However, that option is still available if your device needs it.
MediaStreamer lets you use ExpressVPN on devices that don’t normally support VPN apps, such as Xbox, PlayStation, Nintendo consoles, and older smart TVs. It works by replacing the default DNS server address in the device’s internet settings with ExpressVPN’s MediaStreamer DNS.
MediaStreamer is only meant for streaming and isn’t the same as the full VPN app. Key differences include:
- MediaStreamer doesn’t encrypt your traffic or hide your IP address.
- It doesn’t let you switch between many VPN locations; once connected to the MediaStreamer DNS, only US and UK locations are available.
- It uses one of your simultaneous device connections.
It took us less than 5 minutes to set up MediaStreamer on an LG smart TV. We registered our IP address in our ExpressVPN account, received new MediaStreamer IPs, and entered the new address into the TV’s network settings in a couple of seconds. We didn’t record any speed difference while using it.
Is ExpressVPN Compatible With Routers?
ExpressVPN has a browser-based router app, along with manual configuration for selected devices. This is one of its stronger usability features because it can protect devices that don’t usually run VPN apps.
With ExpressVPN on a router, you can:
- Use ExpressVPN’s full server network across your home network, extending VPN coverage to connected devices like Roku and older Chromecast models.
- Encrypt traffic and reduce throttling on game consoles, smart TVs, and streaming devices.
- Cover an unlimited number of devices through the router.
- Use router-level features like a kill switch and split tunneling.
The setup guide was easy to follow, and I was ready to go in under 10 minutes. The app is compatible with numerous router models from Asus, Linksys, Netgear, Microsoft, and more.
The easiest option is to buy a router with ExpressVPN pre-installed, although this is also the most expensive method. ExpressVPN lists several routers with the firmware already configured on its website.
ExpressVPN also makes Aircove 6, its own WiFi 6 router with the router app pre-installed. It lets you place devices into 5 groups, each connected to a separate server. There’s also a portable version called Aircove Go, which doesn’t need an Ethernet cable, making it useful if you travel with several devices. Every version of Aircove has also had its security verified in an independent Cure53 audit.
How Many Devices Can You Use With ExpressVPN?
ExpressVPN’s device limit depends on the plan: Pro allows up to 14 simultaneous connections, Advanced allows 12, and Basic allows 10. That’s more than many VPNs, but Surfshark, Private Internet Access, and IPVanish are better choices if unlimited app connections are the main concern.
To test this, we set up ExpressVPN on a Windows laptop, desktop Mac, iPhone, and Android tablet. We watched the same YouTube video on each device while playing Doom Eternal multiplayer online. None of the videos dropped in quality or buffered, and there was no lag in the game, so simultaneous connections shouldn’t affect ExpressVPN’s performance.
A router setup can also bypass the app connection limit. ExpressVPN makes this easier than many VPNs because of its router app and firmware, but it requires router-level setup rather than separate app connections.


