How to Delete Facebook Account Permanently (2025)
- Deactivating vs Deleting Facebook — What You Need to Know
- How to Permanently Delete Your Facebook Account: Step-By-Step Guide
- How to Temporarily Deactivate Your Facebook Account
- How to Backup Your Facebook Information
- How to Reactivate a Facebook Account
- Tips on Using Facebook Safely
- FAQs on Deleting a Facebook Account
- Delete Your Facebook Account in Minutes
Having a Facebook account means you're always in the spotlight. Ads that know too much about you, companies tracking what you do online, and the stress of keeping up with endless posts and updates can be overwhelming. It's like you're giving away pieces of your privacy every day without even realizing it.
You might want to delete your Facebook to take back control, find peace, and protect your personal information. Whether it’s to stop seeing photos of your ex or prevent Facebook from draining your phone's battery, the reasons for wanting out are many. It might seem tough to cut ties with something that's been part of your daily life for so long, but it’s worth it for the sense of relief and freedom you’ll gain.
This article shows you how to permanently delete your Facebook account, whether you're using your phone or PC. With easy steps to follow, you can say goodbye to the noise and worries of Facebook and start enjoying a more private life.
Deactivating vs Deleting Facebook — What You Need to Know
If you’re not 100% sure if you want to permanently delete your Facebook account, you can deactivate it first and see if you missed it. Understanding the difference between deactivating and deleting your Facebook account is important before you decide which route to take. Here’s a simple breakdown to help you make an informed choice:
- Deactivating Facebook means you can take a break without permanently losing your profile. Your name, photos, and some activities will be hidden, but you can come back anytime by logging in again.
- Deleting Facebook is a permanent move. Once you delete your account, you can’t get your data back. Your profile, photos, and posts will be gone forever. However, it's important to note that while your account data is deleted, messages you have sent to others will still be visible to the recipients. These messages will appear without your name, labeled as "Facebook user," ensuring that the content remains but not directly linked to your deleted profile.
Here's a quick table highlighting the key differences and the pros and cons of both options:
| Deactivating Facebook | Deleting Facebook | |
| Visibility | Your profile is hidden but not removed | Your profile and content are permanently removed |
| Data | Preserved for future reactivation | Deleted permanently (but it might take a while) |
| Access | Can be reactivated at any time | After the 30-day grace period, no reactivation possible |
| Messages | Still visible to others. You can still chat with friends on Messenger | Still visible to others (labeled as "Facebook user”). You can’t chat with friends on Messenger |
| Third-party apps | You won’t be able to log in to third-party apps | You won’t be able to log in to third-party apps |
| Pros | Flexible and reversible | It ends data tracking and removes your digital footprint |
| Cons |
|
|
Deciding between deactivating and deleting depends on your needs. If you just want a temporary break, deactivation is the way to go. But if you're concerned about privacy and want a fresh start, deleting your account is the better option.
When you choose to delete your account, it initially enters a 30-day grace period, during which you can cancel the deletion by logging back in. If you don’t cancel during this period, your account will be permanently deleted. However, it's important to note that it can take up to 90 days for all your data to be fully removed from Facebook's servers. During this time, other users can’t access your information.
After the deletion process is complete, you can’t recover your account or any of the associated data, such as posts, photos, and videos.
How to Permanently Delete Your Facebook Account: Step-By-Step Guide
Follow these simple steps to permanently delete your account from any device (like phones and PCs). Thankfully, the entire process only takes a few minutes.
Step 1. Open the Facebook app on your device or access the Facebook website using a browser.
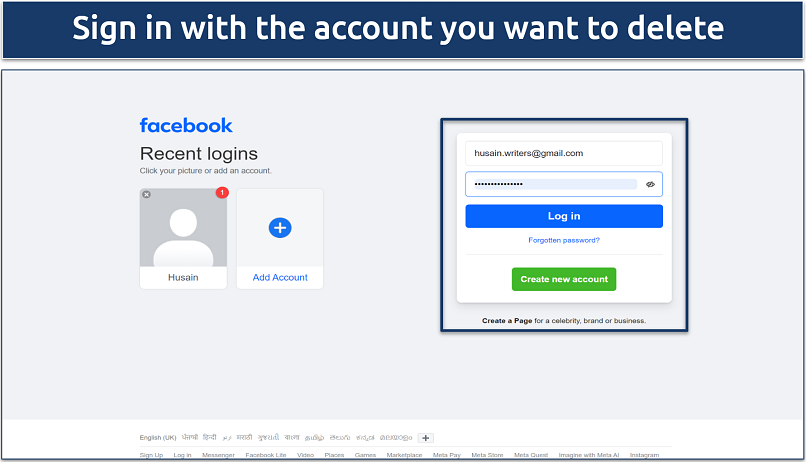 You may also use your phone number to log in to your account
Step 2. Log in to your account. If you use a web browser, simply click on your profile icon. If you use your phone:
- iPhone: Tap the three-line menu button in the bottom-right corner of the screen.
- Android: Tap the three-line menu button in the top-right corner of the screen.
Step 3. Go to Settings & Privacy, then select the Settings option.
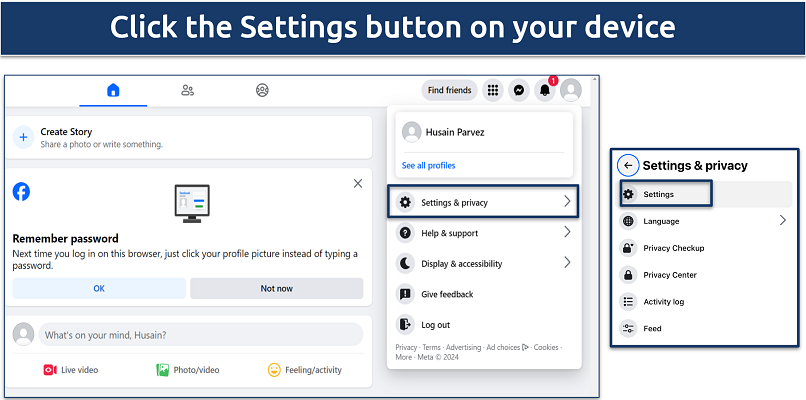 I found the desktop version of Facebook easier to navigate
Step 4. Tap on the Meta Accounts Centre tab.
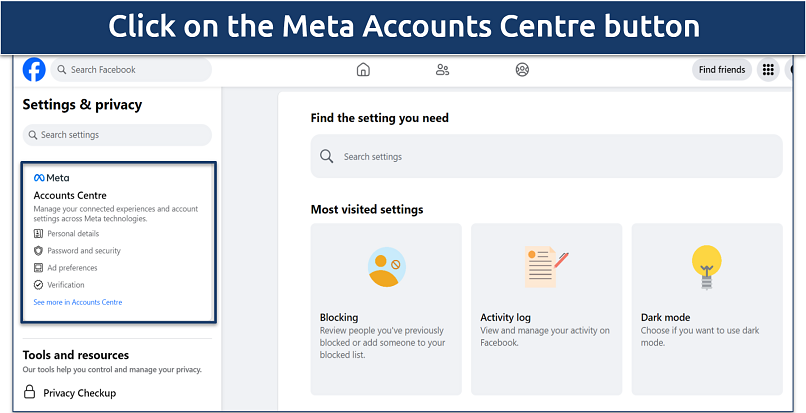 The Meta Accounts Centre handles all your Meta accounts including Instagram
Step 5. Look for the Personal details tab, select it, and then click on Account ownership and control. If you have an account with another Meta product (like Instagram), you'll see those accounts here.
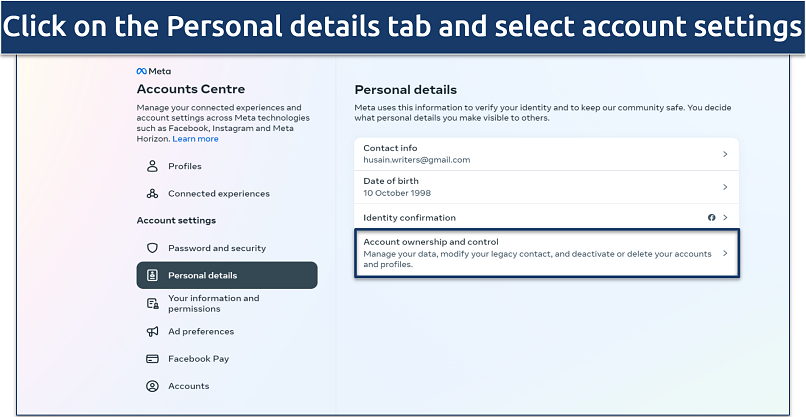 You can also change your contact information or date of birth
Step 6. Click on the Deactivation and deletion button.
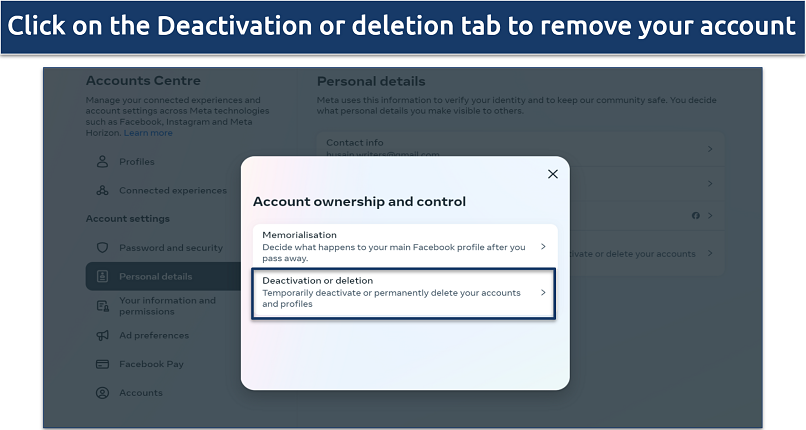 The Memoralisation tab lets you specify the preferences for your account after your death
Step 7. Select the Delete account option and tap on Continue to Account Deletion to delete your account.
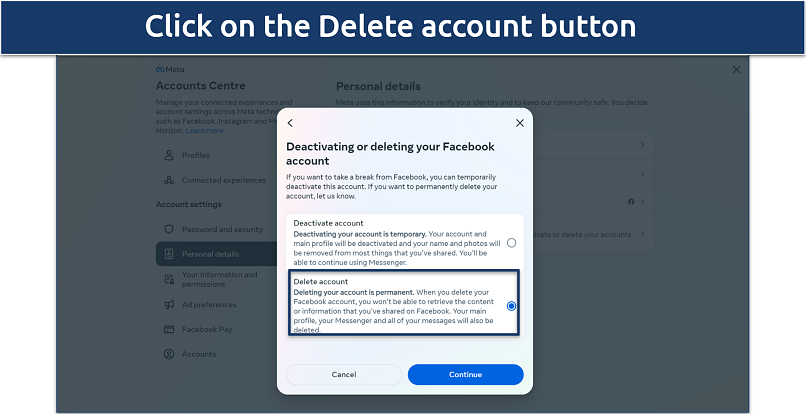 The second option is for deleting your account
How to Temporarily Deactivate Your Facebook Account
The steps to temporarily deactivate your Facebook account are nearly identical to the account deletion process. Just go to the Account ownership and control settings and click on Deactivation and deletion. Finally, select the Deactivate account option and re-enter your password to confirm deactivation.
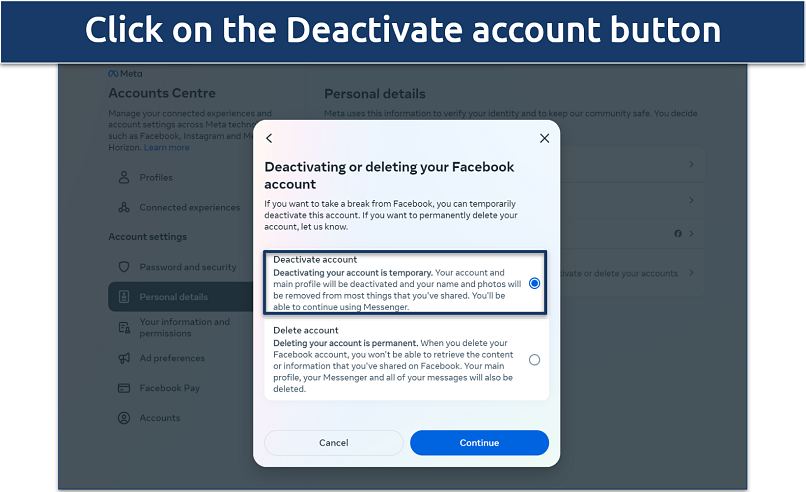 The first option is for deactivating your account
If you try to log in to another website using your Facebook credentials while your account is deactivated, you might be prompted to reactivate your Facebook account. Logging into another service with Facebook requires an active account, so attempting this will essentially log you back into Facebook.
How to Backup Your Facebook Information
Backing up your data on Facebook is simple and lets you save everything from photos to messages. Here’s how to do it:
Step 1. Go to your settings page, look for Your information, and select the Download your information option.
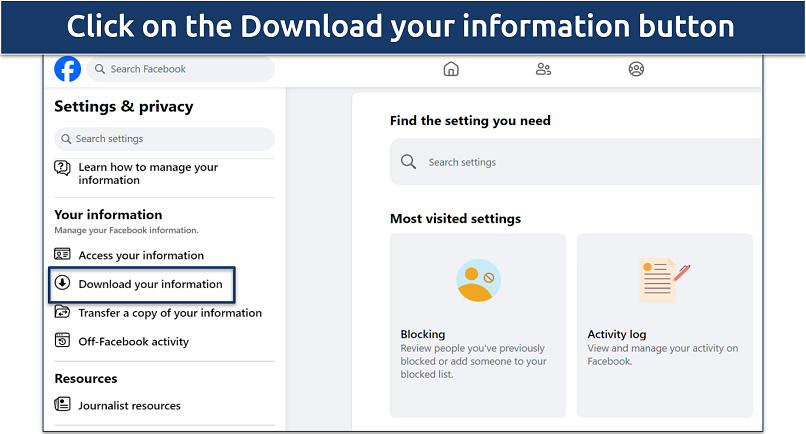 The Your Information tab helps you get access to all your data
Step 2. Click Continue and select the Download or transfer information button. Choose the specific data you want to download. Also, scroll down to include or exclude different categories depending on your needs.
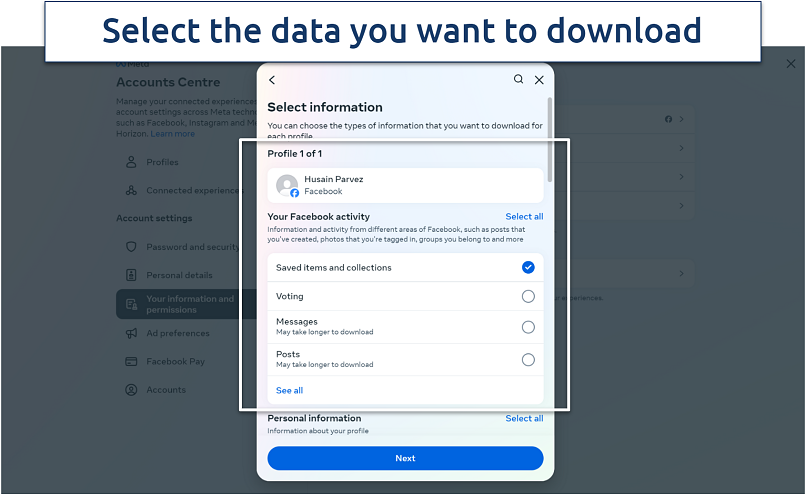 You can adjust the date range, file format, and media quality
Step 3. Click Next and choose to save the data to your device or transfer it. Tap the Create Files button. This starts the process of compiling your selected data into a downloadable archive. Your file will show as In Progress and will be downloaded in a few minutes.
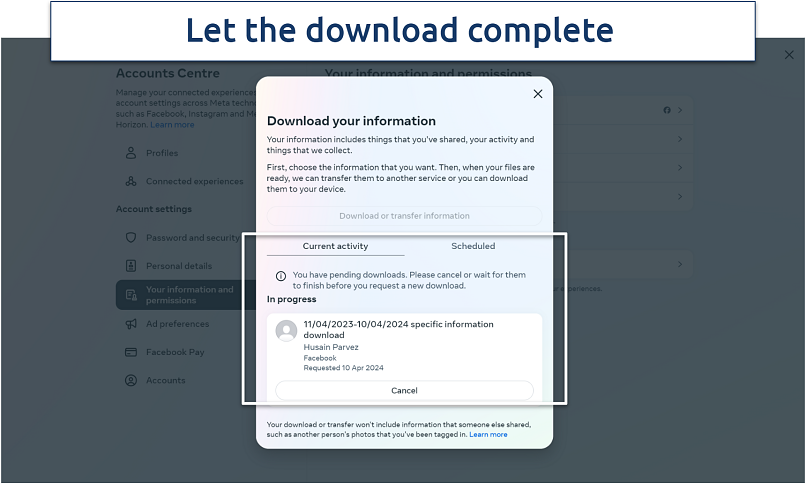 The download time depends on the amount of files you've selected
How to Reactivate a Facebook Account
Reactivating your Facebook account is straightforward if you've previously deactivated it. Here’s what you need to do:
Step 1. Go to the Facebook website or open the app on your device.
Step 2. Use your email address or phone number and password to log in to your account.
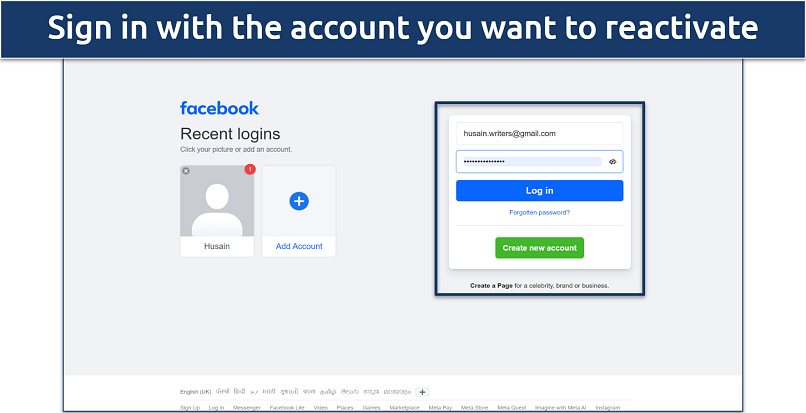 You may also use your phone number to log in to your account
Your account will automatically be reactivated. This means your profile, friends list, photos, and posts will become visible again. Reactivation is only possible in the 30-day grace period if you've permanently deleted your account or deactivated it.
When you reactivate your Facebook account, the process is private. The platform doesn’t notify your friends or post on your timeline about your return, so your reactivation goes unnoticed by others.
Tips on Using Facebook Safely
If you're thinking about deleting your Facebook account due to concerns about online security and privacy, consider trying these safety measures first. Here are some tips to help you protect your account and control your personal information:
- Adjust your privacy settings. Regularly review and customize your privacy settings to control who sees your posts and personal information. Go to the Default audience settings and choose Public, Friends, or Custom. You can also tailor Ad preferences to get more control over how your data is used by advertisers. Additionally, go to the Privacy Checkup to ensure all of your privacy settings are configured in the way you want.
- Be selective with friend requests. Only accept requests from people you know to avoid exposing your information to strangers.
- Think before you share. Be mindful of what you post, as information shared online can be saved, shared, and used in ways you might not expect.
- Use strong and unique passwords. Create a strong password that’s different from those you use on other sites to make it harder for hackers to access your account. It’s also advised to use a trustworthy password manager.
- Enable two-factor authentication (2FA). Add an extra layer of security by requiring a second form of identification beyond just your password.
- Be cautious with links and downloads. Avoid clicking on suspicious links or downloading attachments from unknown sources to prevent malware and phishing attacks.
- Limit app permissions. Regularly check and limit which apps have access to your Facebook data to reduce the risk of data misuse.
- Be aware of scams. Recognize common scams like phishing attempts and social engineering scams, where attackers try to trick you into giving up personal information.
- Log out after use. Especially when using shared or public computers, always log out of your account to prevent unauthorized access. It’s also a good practice to regularly clear the cache.
- Monitor your account activity. Regularly check your account for any unusual activity or unauthorized access to prevent data breaches.
FAQs on Deleting a Facebook Account
Why can’t I delete my Facebook?
It could be because your account is suspended. First, make sure you're logged into the correct account you want to delete. Then, use a browser to access the Meta Account settings and proceed with the deletion. If you still can't delete your account, it's a good idea to contact Facebook's customer support for help.
How do I delete another account on my Facebook?
To delete another account you manage, you must first log in to that specific account. Each account has its own set of login credentials and must be deleted individually. That said, it’s generally a safe idea to make sure you back up your data before you proceed with deleting a Facebook account.
Can I deactivate Facebook and keep Messenger?
Yes, you can deactivate your Facebook account while keeping Messenger active. When you go through the process of deactivating your account, you can choose to continue using Messenger. This allows you to stay in touch with friends and family through messages without maintaining an active Facebook profile.
How can I delete my Facebook account without a password?
You have several options to delete your Facebook account without a password. If you have access to the email or phone number associated with the account, you can use the "Forgot your password" link on Facebook’s login page to reset your password. After regaining access, you can proceed to delete your Facebook account.
Here are a few other options to try:
- Contact Facebook’s Help Team. You can try contacting Facebook’s Help Team through their support page or ask a friend who had access to your account to help delete it. This might involve answering security questions or providing additional information to verify ownership
- Report as fake or impersonation. If other methods fail, reporting the old account as fake or for impersonation might help. Facebook has processes for dealing with fake accounts, which might be easier to navigate than deleting an old account without login credentials.
Is there a link to delete a Facebook account?
No, Facebook doesn’t provide any specific link for account deletion. That said, you can directly navigate to Meta’s Account Manager and delete your Facebook account from there.
How can I delete my Facebook account but save photos?
Before proceeding with account deletion, you can download and save your photos and data. This is done through the account settings, where you can select the data you wish to keep, allowing you to retain a copy of your memories before you permanently remove your Facebook account.
Can I delete a Facebook account created by others?
Directly deleting an account created by someone else isn't possible without the login details. However, if an account is impersonating you or violating terms, it can be reported to Facebook for necessary actions, leading to its potential removal after review. Also, make sure to follow some tips on keeping your account safe.
How can I delete a Facebook post?
To delete a post on Facebook, follow the steps below. Once deleted, the post is permanently removed from your profile, page, or group. However, users who try to access the post directly (e.g., via a direct link) will see a note indicating that the post has been deleted. This ensures transparency about the content's removal but doesn't restore the original content. If you’re concerned about privacy, check out the Facebook safety tips.
- Navigate to the post. Find the post you want to delete on your timeline or your page.
- Access the options. Click or tap the three dots in the top right corner of the post.
- Delete the post. Select Delete from the dropdown menu. Facebook will ask you to confirm that you want to delete the post.
- Confirm deletion. Confirm your choice to permanently remove the post from Facebook.
Delete Your Facebook Account in Minutes
Deleting your Facebook account in 2025 is easy and quick. If you want to clean up your online space or keep your data safe, you can do it in just a few steps. Once you delete your account — there's no going back. So, make sure you're ready and have saved any important stuff you want to keep.
Just follow the simple steps we talked about to delete your Facebook account for good. If you're not ready for a permanent deletion, you can choose to temporarily deactivate your account instead. Either way, it's easy to do.



Please, comment on how to improve this article. Your feedback matters!