How to Install NordVPN on Kodi in 2025: Quick & Easy Setup

You can’t always access services like your BBC iPlayer and Netflix US accounts on Kodi as they aren’t available globally. Besides, some Kodi add-ons might contain malware, leaving you vulnerable to man-in-the-middle (MITM) and phishing attacks.
But there’s a way to watch your favorite content on Kodi and protect your devices from snoops and malware. I don’t want anyone prying on my online activity, and I bet you don’t, either. A VPN like NordVPN lets you access the content you need quickly and safely. Plus, it helps avoid bandwidth throttling for interruption-free 4K streaming.
Installing NordVPN on Kodi can be tricky — that’s why I made this easy-to-follow tutorial. It guides you through the setup process, even on Linux and Fire Stick. NordVPN has a large network of servers that makes it possible to access any content anywhere. The service also protects your connection with robust AES 256-bit encryption. You can try NordVPN risk-free since it’s backed by a 30-day money-back guarantee. So, getting a refund is hassle-free if you’re not fully satisfied.
Quick Guide: How to Install NordVPN on Kodi in 3 Easy Steps
- Download NordVPN. With its large server network, accessing the content you need takes no time. The service also offers fast speeds for streaming with no buffering. You can try NordVPN for free as it’s backed by a 30-day money-back guarantee.
- Choose one of the setup methods. I recommend installing the NordVPN app directly on Kodi, as it’s the easiest and safest way.
- Start using Kodi. Connect to a server, and enjoy access to your favorite platforms.
Why You Need a VPN for Kodi
Kodi is a free, open-source media player designed to bring your movies, TV shows, music, and games together. It’s excellent for watching on-demand content on a big screen. However, platforms like Disney+ and HBO Max are geo-restricted (only work with certain IP addresses). This means you can’t fully access Kodi’s library and watch all your favorite shows when traveling.
Plus, installing Kodi add-ons can be unsafe and leave you vulnerable to hackers and snoops targeting your private data. Your ISP can also intentionally slow down your speeds when it detects too many high-bandwidth activities (like gaming and UHD streaming).
If you’re subscribed to NordVPN, you know that a VPN hides your current location and changes it with an IP address of a chosen country. This makes it possible to get access to international streaming accounts while on vacation. For example, a US VPN server changes your location by assigning you a US IP address. So, this allows watching shows on Hulu and Netflix US purchases while traveling around the UK.
NordVPN has an extensive network of 7,900 servers across 126 countries for easy access to international sites. It offers excellent speeds to stream in 4K without buffering. My average download speed clocked at 95.3Mbps. I recorded the fastest speeds while using the proprietary NordLynx protocol. Some servers are P2P-optimized for reliable torrenting.
You’re also safeguarded with robust security and privacy features (like AES 256-bit encryption, a kill switch, and a no-logs policy) to keep your Kodi device safe from cyber threats. Besides, obfuscation tech helps with the toughest firewalls, and Threat Protection blocks malware. Many of these options are customizable, so you can set them up the way you like it.
If you ever get stuck, contacting customer support using 24/7 live chat is very convenient. NordVPN is easy-to-use and compatible with all major operating systems. I quickly set it up on my Kodi device. The VPN allows up to 10 simultaneous connections. Plus, you can install it on a router and cover your entire home network, including an Xbox, Kindle Fire, and Google TV.
It’s possible to try NordVPN for free since it’s backed by a trustworthy 30-day money-back guarantee.
How to Install NordVPN on Kodi in 3 Easy Steps
Setting up NordVPN on Kodi can get a bit tricky with all the steps you have to go through. However, my guide below helps you install NordVPN on your Kodi device in no time. There are 2 easy-to-follow methods, so go ahead and choose the one that works for you.
Make sure to subscribe to NordVPN first — choose the offer best suited to your needs before downloading the app. You can try NordVPN without risk, as it’s backed by a tried-and-tested 30-day money-back guarantee. To safely access your favorite content on your Kodi device, follow the steps below.
Method 1: Use the NordVPN Client With Kodi
Using the NordVPN client is the easiest way if you have Kodi installed on your phone, laptop, or Smart TV. This helps you access streaming platforms, watch game streams (for example, on Twitch, Steam Community, and YouTube), and protect your Kodi experience with reliable security and privacy features. It’s recommended to connect to a NordVPN server before launching Kodi to ensure your new IP works properly.
Install NordVPN on Kodi for Windows/macOS
It's worth noting that certain versions of Windows 10 may not be compatible with NordVPN, specifically those that lack the.Net Framework 4.8 or higher. For installation on Windows, Kodi provides both 32-bit and 64-bit options, so you should select the one that matches your PC's configuration.
Step 1. Download the NordVPN installer for your device from the official webpage.
Step 2. Run the downloaded.exe/.pkg installer and complete the setup process.
Step 3. Launch the VPN service, log in to your account, and connect to a server.
 Choose the server you want to use for accessing streaming and gaming platforms
Step 4. Launch Kodi and access your favorite streaming platforms without issues.
Install NordVPN With Kodi on Android/iOS and Fire TV/Android TV
Step 1. Install the NordVPN app on your device using Google Play Store (for Android, Fire Stick, Fire TV, and Kindle Fire devices) or Apple App Store. You can also sideload the app on Android devices (Google TV or Android TV) using the.apk file.
Step 2. Launch the VPN and connect to a server.
Step 3. Start Kodi and enjoy access to your favorite content.
Install NordVPN on Kodi for Linux
Step 1. Download the NordVPN.rpm installer (for RedHat distros) or the.deb installer (for Debian distros).
Step 2. If you’re using GUI distros such as Ubuntu or Mint Linux, you can run the installer and start installing NordVPN. However, if you want to use the Terminal, follow the commands below to set up the VPN directly:
Make sure to change the /pathToFile/ with the location of the folder where you’ve downloaded the.deb installer file.
Step 3. Enter the root password for your Linux distro and wait for the process to complete.
Step 4. Enter the following command and update the package:
Step 5. Input the command below to start installing NordVPN:
Step 6. After installing the VPN, sign in to your account by running the following command:
Step 7. Connect to a server using the command below:
Step 8. Launch Kodi and start streaming without issues.
Note: Installing Kodi on Linux can be challenging. With all my experience with Linux, I still struggle with some Terminal commands. However, here’s a quick guide on installing Kodi on your Linux distro. Enter the following commands below one by one:
- sudo apt-get install software-properties-common
- sudo add-apt-repository ppa:team-xbmc/ppa
- sudo apt-get update
- sudo apt-get install kodi
Method 2: Use the NordVPN Add-on for Kodi
Using the NordVPN add-on also allows you to install the service on your Kodi device. It lets you stream content like documentaries and TED Talks without errors. Plus, you get all the security features the VPN offers.
However, this method is more challenging than installing the app. This option usually works better if you have Kodi set up on a TV box or other streaming device.
Install the NordVPN Add-on on Kodi
Step 1. Make sure you have an active NordVPN offer. If you’re not yet subscribed, you can try NordVPN risk-free since it’s backed by a 30-day money-back guarantee.
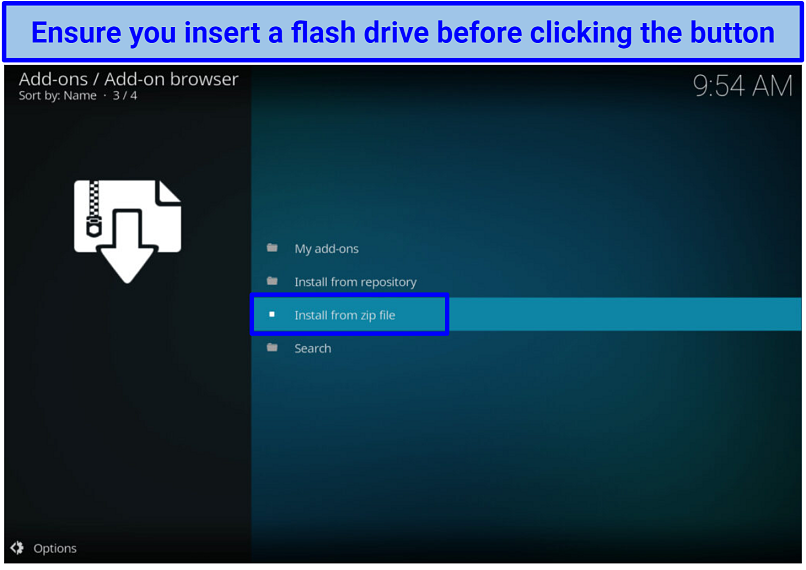
Step 2. Download the NordVPN add-on zip for Kodi. Copy the zip on a USB flash drive and insert it into your Kodi device.
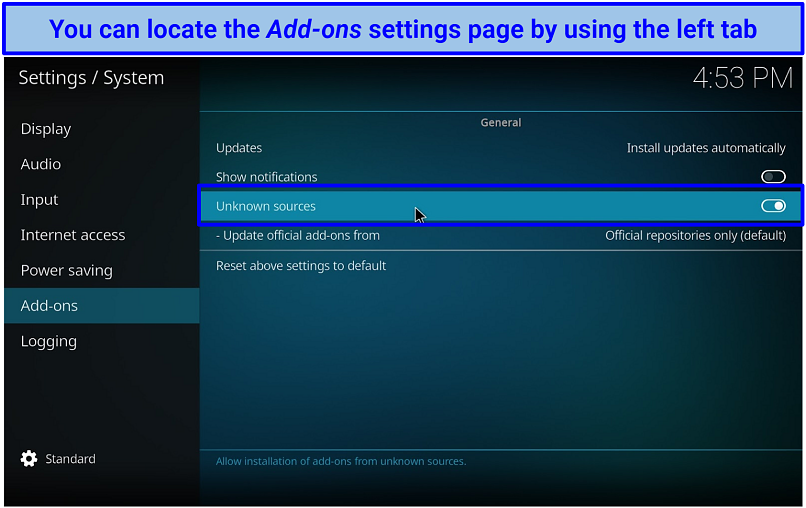
Step 3. Go to the Add-ons tab under System Settings and toggle on Unknown sources.
 Click the Yes button if a “Warning!” window pops up
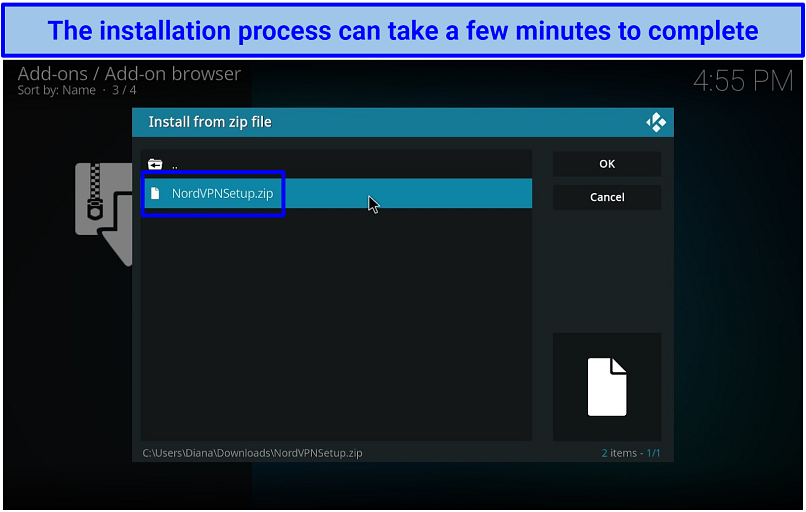
Step 4. Head back to the Add-ons menu and click on the Package button in the top-left corner. Use the Install from zip file option and select the NordVPN add-on zip file to install the service on your Kodi device.
 You’ll see a notification on the top-right corner after NordVPN is set up
Step 5. Once the installation completes, you’ll see a notification saying, “Add-on installed.” The setup wizard will guide you and ask you to log in to NordVPN with your credentials.
Step 6. Choose the server you want to connect to automatically, then hit the Yes button.
Step 7. Once you’re connected to a server, enjoy Kodi streaming.
Install NordVPN on Kodi for Raspberry Pi
The configuration procedure necessitates a certain level of technical expertise. However, once the installation is complete, NordVPN will secure your Kodi device.
Step 1. Download the Kodi OpenVPN plugin for your Raspberry Pi.
Step 2. Copy the file to a USB flash drive and transfer it to your Kodi device.
Step 3. Go to Settings and select the Add-ons tab. Click on the Install from zip file option.
 You can use the file manager to select the downloaded zip file
Step 4. Locate the downloaded zip file and start the installation process.
Step 5. Once the process is completed, create a new.txt file (for example, nordvpnaccount.txt) with two lines. Enter your NordVPN username in the first line and the password in the second one.
Step 6. Download the.ovpn configuration file of the server you want to connect to (click Show available protocols).
Step 7. Once the download completes, edit the file and change the auth-user-pass line to contain the location of the.txt file on your Kodi. For example: auth-user-pass /location/of/nordaccount.txt.
Step 8. Transfer both files to your Raspberry Pi. Run the OpenVPN add-on and select the.ovpn configuration file to connect to a VPN server.
Step 9. You can safely access favorite platforms on Kodi using your Raspberry Pi.
How to Disconnect/Log Out NordVPN From Kodi
Disconnecting NordVPN from Kodi isn’t that tricky. If you want to log out, follow the steps below:
Step 1. Run NordVPN on your device.
Step 2. Select the Change or disconnect VPN connection button.
Step 3. Click the Disconnect button and log out.
How to Change Servers/Countries on NordVPN with Kodi?
To access desired content using NordVPN, switching servers can be beneficial. Adhere to the instructions provided below:
Step 1. Launch the VPN and click the Change or disconnect VPN connection button.
Step 2. A list of server locations should pop up. Choose a server in a desired location and wait for it to connect.
Step 3. Start Kodi and stream your favorite shows without issues.
FAQs on Using NordVPN on Kodi
Is it legal to use NordVPN with Kodi?
Yes, using NordVPN on Kodi is legal. It’s even recommended to safely access your streaming accounts, such as Fox Sports Go. Once you’re done setting up NordVPN, just connect to a server and access the content you want on Kodi.
Just bear in mind that VPNs are also banned or restricted in countries like China and Russia. So ensure you check the laws of using a VPN in your location beforehand.
Why should I use NordVPN on Kodi?
You get many benefits from using NordVPN with Kodi, like accessing favorite services thanks to its extensive server network. The VPN comes with impressive speed for buffer-free streaming. Plus, your device is safeguarded by robust encryption and IP leak protection. Thanks to a trusted money-back guarantee, you can try NordVPN without risk.
A VPN helps you safely install add-ons and stream your favorite English Premier League and Test cricket matches on Kodi. VPNs also encrypt your traffic, so your ISP can’t see your activity. Some add-ons have copyrighted content and don’t inform you about it, so you should be wary of this.
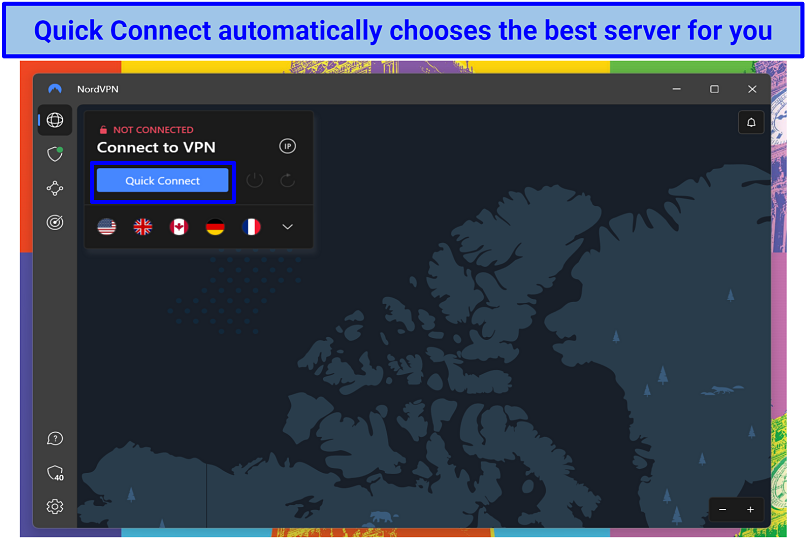
What NordVPN servers should I use with Kodi?
The best server for Kodi depends on your location. You can use the Quick Connect feature to let NordVPN automatically choose the fastest server for your device. Or, it’s possible to select a specific server to get an IP that allows you to enjoy the content you want. Install the VPN and connect to a server to quickly access your Spotify, Vimeo, and Pluto TV accounts.
How do I stop my ISP from blocking Kodi?
A VPN helps you avoid any restrictions imposed by your ISP. Kodi’s library can be filled with pirated content that, if filtered out, might result in your ISP throttling your speeds or entirely blocking your network. Using a premium VPN (like NordVPN) masks your location information. It also provides a US IP address, making it possible to watch shows on platforms like MLB.TV and Red Bull TV from anywhere.
Besides, ISPs can reduce your speeds if they detect high-bandwidth activities. Using a VPN helps avoid discrimination against particular types of internet traffic (like UHD streaming and gaming).
Can I watch Netflix and Hulu with NordVPN on Kodi?
Yes, you can watch Netflix and Hulu shows on Kodi with NordVPN. Just make sure you install the add-ons and log in to your streaming accounts beforehand. Then, simply set up NordVPN and connect to a server to safely access your favorite platforms.
What should I do if NordVPN is not working with Kodi?
Resetting your Kodi to default settings is a good way to solve most errors. You can also set up NordVPN on a different device and connect to a new server to see if it works. Just reinstall the app to access your favorite content on Kodi. However, if these don’t work, try the fixes below:
- Ensure you have the official NordVPN app installed.
- Check and fix the date and time on your Kodi device.
- Try changing to a different server, as it might be down.
- Unblock Kodi and NordVPN in the firewall settings of your device.
If all else fails, there are other VPNs to consider, like ExpressVPN. This is a highly recommended service that also works well with Kodi.
Will I know I’m protected while using NordVPN with Kodi?
The easiest way to see if you’re protected is on the NordVPN page. At the top, you’ll see your IP address and “unprotected” if your connection isn’t safe. Make sure you see “protected” here before using Kodi, and set up NordVPN beforehand.
You can also perform an IP and DNS leak check by using a site like IPleak.net.
Can I install a free VPN on Kodi?
You can, but using a free VPN on Kodi can be risky. Free services usually don’t run on Kodi devices. They also don’t offer reliable servers to access your content. A premium VPN (like NordVPN) with a money-back guarantee is a safer option.
Many free VPNs lack advanced security and privacy features — some even sell your sensitive information to make a profit. It’s also common to face bandwidth limitations that restrict your speeds and receive annoying pop-up notifications that push you to upgrade to a paid offer.
Start Using NordVPN on Kodi Now
Installing NordVPN on Kodi is easy if you follow the right guide. You can use two simple methods to get the VPN on your Kodi device — setting it up via a NordVPN client or installing it as an add-on. Just make sure you’re subscribed to NordVPN before proceeding with the installation process.
NordVPN itself is my top pick for any Kodi setup. It offers speedy connections and has a vast server network to access your favorite content from anywhere. The service also comes with reliable security and privacy features to keep your data safe. You can try NordVPN risk-free since it's backed by a trustworthy 30-day money-back guarantee. So, getting a refund is straightforward if the VPN isn’t right for you.
About the Author
Husain Parvez is a Cybersecurity Researcher and News Writer at vpnMentor, focusing on VPN reviews, detailed how-to guides, and hands-on tutorials. Husain is also a part of the vpnMentor Cybersecurity News bulletin and loves covering the latest events in cyberspace and data privacy.
Leave a comment
I wasted my time following your instructions installing NordVPN on my Raspberry Pi LibreElec/Kodi Omega system. This system requires Python 3 and only supports 2.7.0 and you didn't mention it. I have used NordVPN for years and now have to switch to another supplier.
Thank you for your feedback, and we’re sorry to hear about the inconvenience you experienced. You’re correct that the NordVPN add-on currently supports Python 2.7.0 and not Python 3. However, you should still be able to use NordVPN with your Raspberry Pi LibreElec/Kodi Omega system by setting it up via the OpenVPN add-on.
We appreciate you pointing this out. If you have any further questions or need assistance, feel free to reach out. Thanks


Please, comment on how to improve this article. Your feedback matters!