How to Set Up a VPN on iPhone: Easy Guide (Updated 2025)
Installing a dedicated VPN app from the Apple App Store is the easiest way to set up a VPN on your iPhone. The process is quick and straightforward and doesn’t require any specific tech knowledge. You can also manually install a VPN on your iPhone. However, it’s slightly more complex and best suited for tech-savvy users.
Not every VPN offers a good iOS app. During our tests, we found many apps that hadn’t been updated in years, so we couldn’t verify that they were completely secure. Of those that were regularly updated, some VPNs just weren’t fast enough, which meant securing our iPhones was a frustrating experience.
Overall, I recommend ExpressVPN — it’s the fastest VPN we tested, and it has a regularly updated iOS app that’s easy to set up on your iPhone. You can try ExpressVPN risk-free, thanks to its 30-day money-back guarantee*. I've personally tested the refund process, and it's hassle-free. If you're not satisfied, you can get a full refund, no questions asked.
How to Set Up a VPN on iPhone — 2025 Guide
Setting up a VPN on your iPhone is a really easy process if you’re using a reputable, premium service. All it takes is a few clicks, and you’ll be able to go online without risking your data, even if you’re using unsecured public networks with your iPhone. For more ways to safeguard your phone, take a look at our guide to protecting your iPhone privacy.
1. Subscribe to a VPN
Choose a reliable VPN service that offers robust security features and a user-friendly iOS app. Our top recommendation is ExpressVPN because its iOS app is easy to use and regularly updated to ensure it keeps working smoothly. This guide will show you setup examples from this specific VPN, but all of our recommended services follow the same process or are very similar.
To get started, visit your chosen VPN provider’s website and select a subscription plan. Create an account by entering your email address and payment information. Premium VPNs often cover multiple devices under one subscription, so you can protect your Mac and other Apple devices at the same time.
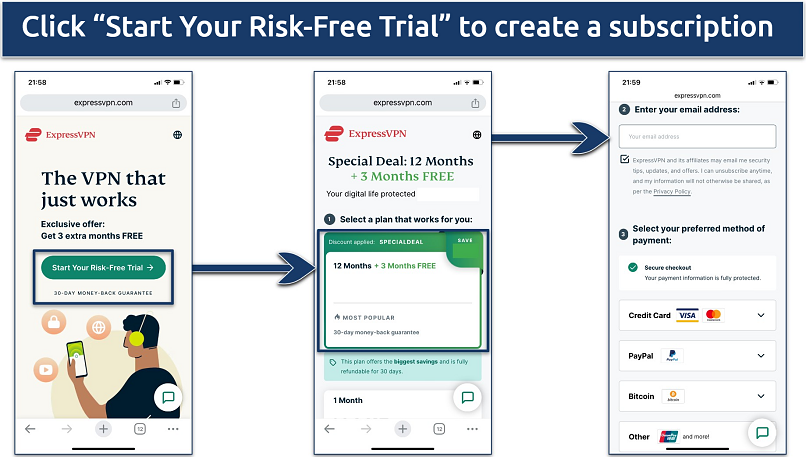 You can set up your account in only three easy steps
Pro Tip: We don’t recommend setting up a subscription through a VPN’s iOS app (i.e., through the app store). By setting up a subscription directly through your VPN provider’s website, you’ll be covered by its money-back guarantee. However, if you pay through the App Store, your payment will be covered by Apple’s terms instead, which means you may not be able to claim a refund if you’re not satisfied.
2. Download the VPN
Head to the App Store on your iPhone to download the VPN app. Simply search for your chosen VPN and tap Get to start the download. These apps are relatively small, so installation will only take a few moments, even on slower connections.
Once the download is complete, tap Open to launch the app. You'll be prompted to sign in using the account credentials you created during the subscription process.
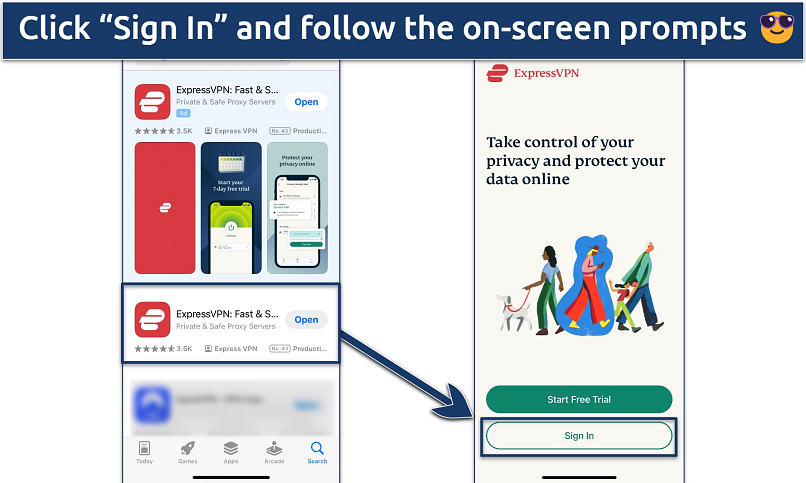 ExpressVPN will guide you through every step of the process
3. Configure Your VPN App (Optional)
While most VPNs work well with their default settings, you might want to customize some options before you connect for the first time. Even if you don’t want to change anything, I recommend taking a look at the settings menu, as it’ll give you more of an idea of how your VPN works.
In particular, you should check to make sure that the kill switch is enabled. This feature prevents data leaks by stopping your iPhone from using the internet if your VPN connection drops. In the ExpressVPN iOS app, this is the Network Protection feature, so you should toggle this on.
If your VPN provides an obfuscation feature to mask your encrypted data, you can activate it, too. For ExpressVPN, select the Automatic option, which is turned on by default. With other VPNs, you may need to manually enable an obfuscation or “stealth” protocol.
You can also set up the app to automatically connect when you join untrusted WiFi networks. This feature is particularly useful for protecting your data when you're using public hotspots at cafes, airports, or hotels.
For a deeper look at the best features to use, read our full guide on setting up a VPN on any device.
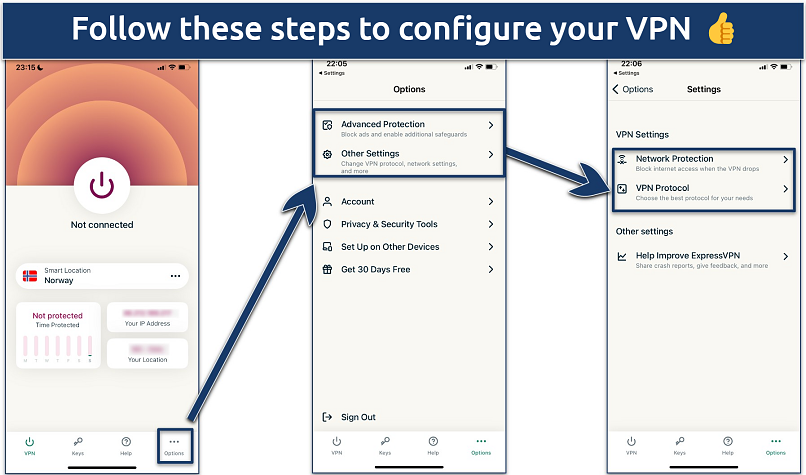 In the VPN settings you can also turn on “Advanced Protection” to block ads or adult sites
4. Connect to a Server
Now you're ready to secure your connection. On the app's main screen, you'll see a large power button. Tap it, and your VPN will automatically connect you to the fastest available server. If you want to, you can also manually select a server location from the list provided.
The app will inform you once the connection is established. Once it is, your iPhone's internet traffic is encrypted, and your real IP address is masked, providing you with better privacy and security.
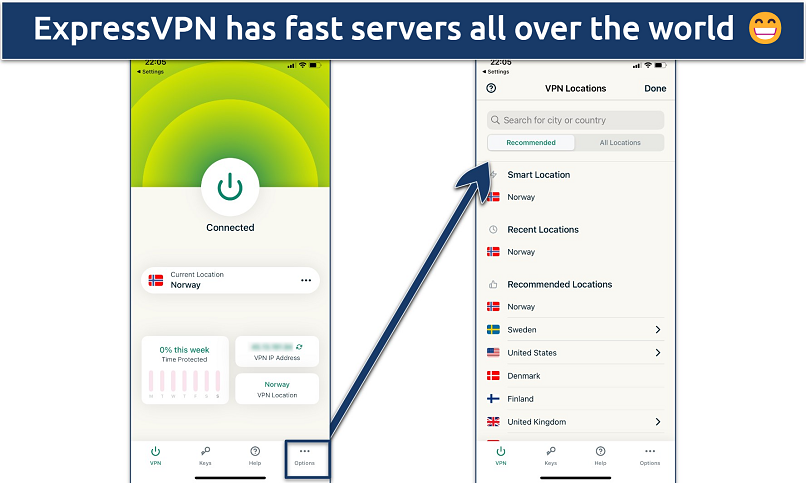 ExpressVPN’s "Smart Location" feature will automatically connect you to the best server based on your location
5. Start Browsing Securely
With your VPN connected, you can now safely go online with your iPhone, knowing that your data is safe from hackers, snoops, and other third parties. Remember to keep your VPN connected whenever you're online, especially when using public WiFi networks. If you need to disconnect, simply tap the power button in the app again.
Best VPNs for Easy iPhone Setup in 2025
A good iPhone VPN needs to be safe, reliable, and efficient. It should also have an iOS app that’s easy to use and regularly updated to keep it secure. After rigorous testing, we've identified the top VPNs that offer all this and more. Here's a comparison of the best VPNs for iPhones.
1. ExpressVPN — Fastest iOS VPN for Uninterrupted Streaming and Browsing
Tested July 2025
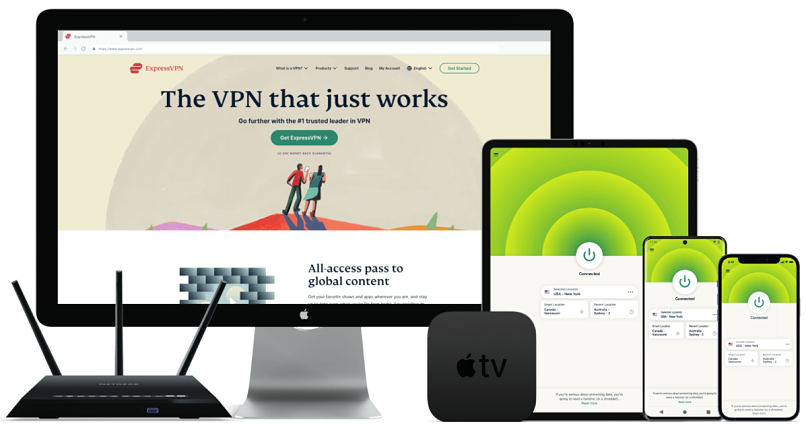
ExpressVPN was the fastest VPN we tested, with a speed drop of only 1% on nearby servers which let us browse and stream without any noticeable delays. This is largely thanks to its proprietary protocol, Lightway, that’s designed for fast connections without compromising your iPhone’s battery life. This means it’s possible to browse, stream, and game securely from anywhere, even on public WiFi networks.
ExpressVPN offers an intuitive iOS app that prioritizes both security and ease of use. The app's clean interface makes it simple to connect to servers quickly, even for VPN newcomers. Its Threat Manager feature adds an extra layer of protection by blocking malicious websites and trackers. Plus, I noticed that the app is updated multiple times a month, which shows its teams are dedicated to keeping your iPhone secure.
One minor drawback is the higher price point. However, ExpressVPN frequently offers discounts, and you can get it for $4.99/month. Plus, you can try it risk-free as it’s backed by a 30-day money-back guarantee.
- One of the fastest VPNs
- Works with top streaming sites
- A proven no-logs policy
- Limited customization
- Smart Location isn't always the fastest
2. CyberGhost — User-Friendly iOS VPN With Optimized Servers
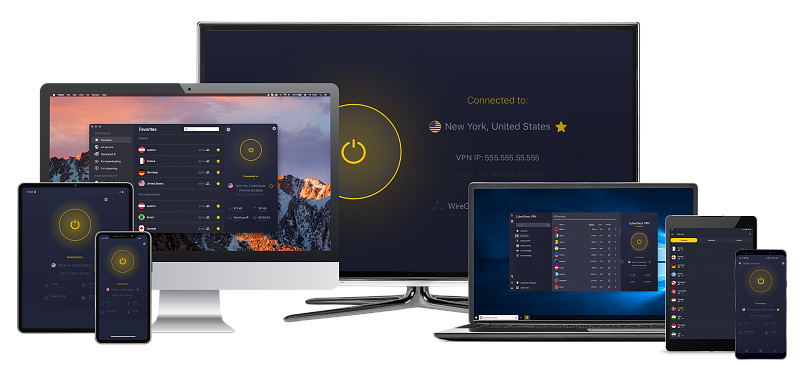
CyberGhost impresses with its easy-to-use features and a vast server network. The app's one-tap connect function and server recommendations make it incredibly easy to use, even for those new to VPNs. During our tests, we found CyberGhost’s setup process quick and straightforward and its iOS app extremely intuitive.
Its optimized servers for streaming and torrenting worked great on iPhones, and even its regular servers were effective with a lot of streaming platforms. Although the VPN was not as fast as ExpressVPN, it was still fast enough to allow safe, buffer-free HD streaming from anywhere. You can try it for yourself with its 45-day money-back guarantee.
- Secure access to streaming
- Military-level security
- Designed for ease of use
- Slower long-distance servers
- Doesn't work in China
3. Private Internet Access — Customizable iOS VPN to Adjust to Your Needs
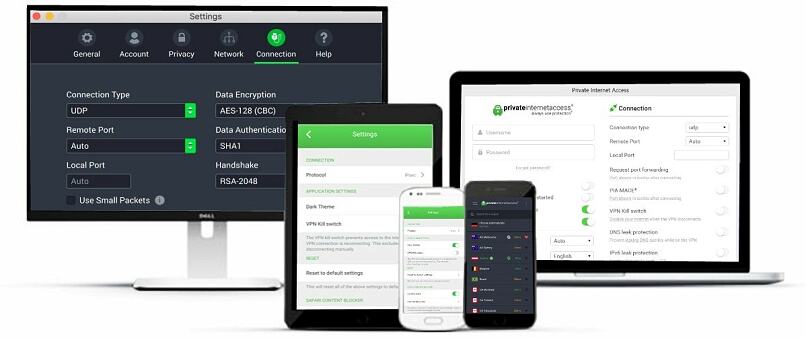
Private Internet Access (PIA) stands out with its highly customizable iOS app, so it’s ideal if you want to fine-tune your VPN. I appreciated PIA’s ability to switch between encryption protocols and adjust connection settings directly from the iPhone app. This level of control is rare in mobile VPN apps.
Although PIA may seem less beginner-friendly than other VPNs on my list, it’s not too complex to use. Its default settings are perfect to start with, and its 24/7 live chat will help you with anything in no time. Give it a try for free; just claim a refund under its 30-day money-back guarantee if it’s not for you.
- Many servers to choose from
- Customizable security settings
- Solid choice for torrenting
- Hit-or-miss customer support
- Tricky to navigate
Our Methodology for Testing VPNs for iPhone
We rigorously tested each VPN's iOS app to evaluate its user-friendliness, setup process, speed, and security. We examined each VPN's encryption protocols, specifically those optimized for mobile devices. Our team also tested for IP and DNS leaks to confirm that your online activities remain truly private when using these VPNs on your iPhone.
We conducted speed tests on a range of servers to determine how each VPN affected browsing, streaming, and download speeds on iPhones. For a comprehensive understanding of our VPN testing process, visit our methodology page. You are welcome to use our checklist to perform your own tests.
How to Manually Configure a VPN on Your iPhone
While using a VPN’s iOS app is the easiest method, you can also manually set up a VPN on your iPhone. Manual configuration can be useful if your VPN provider doesn't offer an iOS app, and it can give you more control over your connection settings. If you accidentally deny VPN permissions on your iPhone when you download the app, you may need to use a manual setup to get it to work.
Here's a step-by-step guide to manually configure a VPN on your iPhone.
- Get a VPN. While iPhones have VPN settings available, they don’t have a built-in VPN service. You’ll need to set up a subscription for it to work.
- Access VPN settings. Go to Settings > General > VPN & Device Management > VPN.
- Add a new configuration. Tap on Add VPN Configuration and then select the VPN protocol you want to use (IKEv2, IPSec, or L2TP).
- Enter VPN details. Fill in the required information, including server address, account name, and remote ID. This information should be provided by your VPN service.
- Input authentication details. Enter your username and password. For added security, you might need to provide a shared secret or certificate.
- Save and connect. Tap Done to save the configuration. You can control the VPN from the main Settings screen.
If you’re an iCloud+ subscriber, you can use iCloud Private Relay as an alternative to a VPN. While not a full VPN, iCloud Private Relay provides some privacy features similar to a VPN. It hides your IP address and encrypts the traffic from your device when browsing with Safari. However, it only works in Safari and a few specific apps, not system-wide like a VPN.
Troubleshooting Common VPN Issues on iPhone
Even the best VPNs can sometimes encounter problems. Here are solutions to common VPN issues on iPhones.
- The VPN won't connect. Start by checking your internet connection. A weak or unstable connection can prevent your VPN from establishing a secure tunnel. If your internet is fine, try connecting to a different server. Sometimes, specific servers can be overloaded or temporarily down.
- Slow internet speeds. VPNs can sometimes slow down your connection due to the encryption process. If you're experiencing significant slowdowns, try connecting to a server closer to your physical location. The shorter distance data has to travel, the faster your connection will be.
- The VPN keeps disconnecting. Make sure your iOS version is up to date, as older versions may have bugs affecting VPN stability. If the problem persists, try disabling battery optimization on your phone. While this might slightly increase battery consumption, it can prevent your iPhone from closing the VPN app in the background, ensuring a more stable connection.
- App compatibility issues. Some apps may not work correctly when a VPN is active. Check if your VPN offers split tunneling, which allows you to choose which apps use the VPN connection and which don't. By excluding some apps from the VPN tunnel, you can maintain their functionality while keeping the rest of your online activities protected.
- VPN configuration error. This error typically occurs when there's a problem with your VPN settings or profile. To resolve it, try deleting the VPN profile and setting it up again. Go to Settings > General > VPN & Device Management > VPN, tap the i icon next to the VPN configuration, and select Delete VPN. Then, make a new VPN profile or reinstall your VPN app.
FAQs on Setting Up VPNs on iPhone
Will using a VPN slow down my iPhone's internet speed?
Using a VPN will slightly reduce your iPhone's internet speed, but the impact is often minimal with a quality service. The encryption process and routing through a remote server can reduce your speed and introduce some latency. However, top-tier VPNs use high-speed servers and protocols to minimize speed loss.
In some cases, a VPN might even improve your speed by preventing ISP throttling. The actual impact depends on factors like server distance, current network conditions, and the VPN protocol used. To maintain optimal speeds, connect to nearby servers and use lightweight protocols like Lightway or WireGuard when available.
How do I know if my iPhone VPN is working correctly?
To verify your iPhone VPN is functioning properly, check for the VPN icon in your status bar. After successfully setting up a VPN on your iPhone, you’ll see a small icon when you're connected to a VPN server.
For a more thorough check, visit an IP address lookup website before and after connecting to your VPN. Your IP address and location should change when the VPN is active. Some VPN apps also offer built-in tools to test your connection and check for leaks.
Why do I need a VPN for my iPhone?
A VPN helps protect your data from being exposed. While iOS devices are pretty secure, it’s a myth that they are not vulnerable to internet threats. Getting a good quality VPN is the first step in safeguarding your online activities.
All in all, there are a lot of reasons why you should be using a VPN on your iPhone. For more details, take a look at our guide to the best VPNs for iOS devices.
Can I use a free VPN on my iPhone?
Technically yes, but I don’t recommend it. While free VPNs exist for iPhones, they often come with significant drawbacks and risks. These services typically have limited server options, slower speeds, and restrictive data caps, which can hinder your browsing experience. Most of the time, you’ll be better off investing in a tested, high-quality VPN.
Additionally, many free VPNs have questionable privacy practices. Some may log and sell your data to advertisers or may even infect your iPhone with malware. It’s always safer to choose paid VPNs or at least VPNs following a freemium model — it means that they offer both free and paid plans, so you know where their money is coming from.


Your online activity may be visible to the sites you visit
Your IP Address:
216.73.216.208
Your Location:
US, Ohio, Columbus
Your Internet Provider:
Some sites might use these details for advertising, analytics, or tracking your online preferences.
To protect your data from the websites you visit, one of the most effective steps is to hide your IP address, which can reveal your location, identity, and browsing habits. Using a virtual private network (VPN) masks your real IP by routing your internet traffic through a secure server, making it appear as though you're browsing from a different location. A VPN also encrypts your connection, keeping your data safe from surveillance and unauthorized access.



Please, comment on how to improve this article. Your feedback matters!