How To Remove Personal Information From Internet

- Quick Guide: How To Remove Your Personal Information From the Internet
- Pro Tip: Use a VPN To Limit Online Data Collection in the First Place
- How To Remove Your Personal Information From the Internet: Ultimate Guide
- Why Remove Your Personal Information From the Internet?
- How To Stay Safe Online and Prevent Sites From Collecting Your Information
- FAQs
- Conclusion
It’s possible to remove your personal information from the internet without difficulty. Search engines, apps, and websites frequently collect, share, and even sell your data, compromising your online privacy and increasing your risk of cyber threats like hacking or fraud.
After exploring the best paid and free data removal solutions, my team and I found DeleteMe and Incogni the most straightforward options. What sets these two services apart is their ability to automatically request the removal of your personal information from websites, saving you hours of effort. They also perform regular checks to confirm your private information stays protected and doesn’t resurface.
Quick Guide: How To Remove Your Personal Information From the Internet
- Sign up for a data removal service.
I recommend Incogni or DeleteMe as they reliably remove your personal information from the internet. - Enter your details.
Provide your information to help the algorithm scan for your data on the internet. - Track deletion progress.
Your chosen service will automatically request data brokers and sites to delete your information. You can track their progress and read regular reports via your service’s dashboard.
Pro Tip: Use a VPN To Limit Online Data Collection in the First Place
A Virtual Private Network (VPN) is one of the simplest and most effective tools for protecting online privacy. By routing your internet traffic through an encrypted tunnel, a VPN hides your actual IP address and replaces it with one from its private servers. This prevents websites, advertisers, and trackers from pinpointing your location or linking your activity to your identity.
Choose a VPN with strong encryption, a strict no-logs policy, and an extensive server network for comprehensive protection.This is particularly valuable on public WiFi networks, where hackers often attempt to intercept personal information. Some VPNs have features that block ads, malware, and trackers.
How To Remove Your Personal Information From the Internet: Ultimate Guide
1. Use a Data Removal Service
We recommend using specialized services like Incogni and DeleteMe, which handle the entire personal information removal process for you. For a reasonable fee, they can help delete all mentions of your name, contact details, or other sensitive data on the internet.
Incogni
Incogni automatically contacts sites to remove your personal information. This service covers all types of data brokers, and people search sites. For now, it’s only available to users in the US, UK, the EU, and a handful of other countries that live under GDPR, UK GDPR, CCPA, PIPEDA, and similar laws. Read our full Incogni review here.
- Visit Incogni. Go to the Incogni website and click Get Started.
 Incogni offers monthly or annual plans for individuals or families (up to 4 people)
 - Choose a plan. You can opt for a monthly or annual plan for an individual or family (covers up to 4 persons).
- Complete the purchase and sign up. Create an account by providing some details. Incogni uses this to look for your information online and delete it.
- Authorize requests. Grant Incogni permission to contact data brokers on your behalf using a simple authorization form.
- Monitor progress. Incogni will automatically start scanning for your details periodically and issue takedown requests. You can follow its progress in the dashboard.
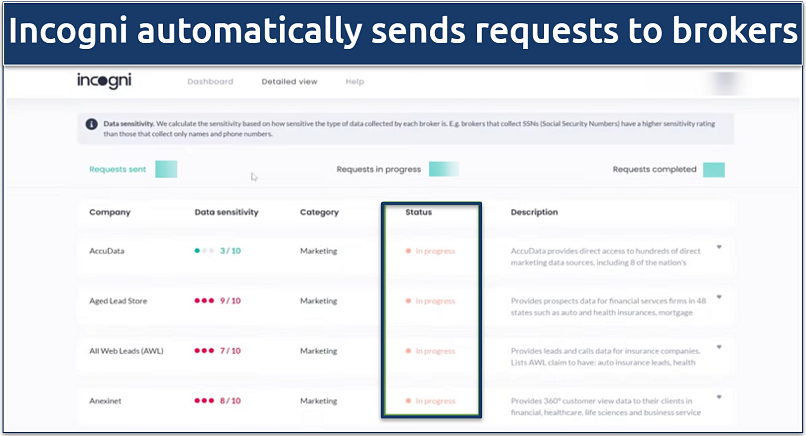 The service lets you track the progress of each data removal request
DeleteMe
This service is similar to Incogni, except that DeleteMe also targets search engines. Another difference is that DeleteMe offers 24/7 live chat and email support, allowing you to get instant help whenever needed. However, it’s slightly more expensive and doesn’t offer a monthly option. Check out our comprehensive DeletMe review to learn more.
- Create an account. Sign up on DeleteMe, provide your name, email, phone number, and any additional data you want removed.
- Initiate scans. DeleteMe scans search engines and data broker sites for instances of your personal information.
- Review reports. Access detailed reports showing where your data is found and targeted for removal.
- Approve removals. Confirm removal requests for specific entries, ensuring accuracy in the data deletion process.
- Receive ongoing updates. Regularly monitor progress and receive updates on data removal efforts directly in your dashboard.
2. Manually Request Data Brokers and Sites To Remove Your Info
Instead of using an automated service, you can manually request data deletion from entities holding your information. This process is entirely free, and you can repeat it as many times as you want. However, manually removing your data from the internet is time-consuming and complex.
It requires identifying where your data is stored, contacting each platform to opt out, and following up to confirm compliance. Having many online accounts complicates this process, and new sites or data breaches can reintroduce your information.
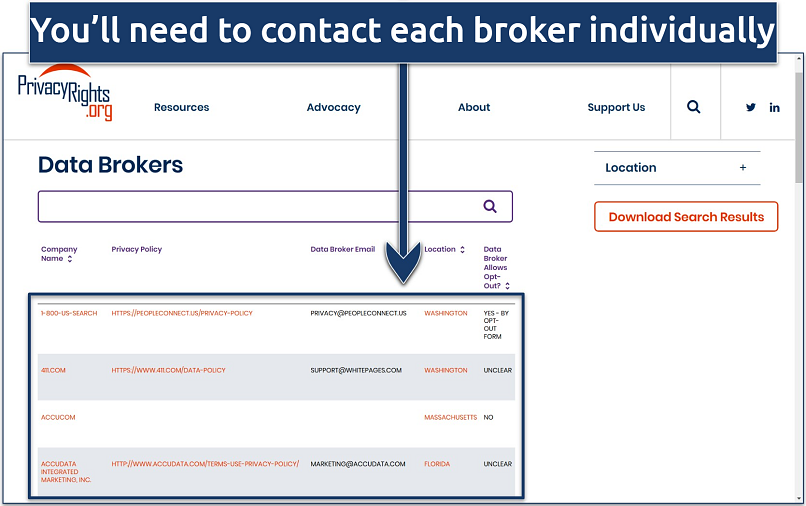
- Find data brokers. Searching your name online can reveal sites with your info. Or, you can search for your data on the biggest broker sites (listed on the Privacy Rights Clearinghouse site).
- Look for your information. Broker sites like WhitePages and Spokeo typically allow you to search for your information.
- Follow the opt-out procedure. These sites nearly always offer procedures to allow consumers to request removal from their database. Some sites, like WhitePages, require you to sign in or provide identification to request deletion (like a photo ID). I suggest always using a throwaway email address.
- Periodically repeat the process. New broker sites will continue to pop up and existing brokers can still collect your information even after you opt out. So be sure to perform this process regularly.
 Prioritize larger brokers like WhitePages, Spokeo, and MyLife
3. Stop Banks From Sharing Your Data
Banks collect extensive financial data, such as income and spending habits. They then often share this data with affiliates or third parties, which can result in targeted advertising or solicitations. Fortunately, most banks allow you to opt out of such practices and are required to do so by law in some jurisdictions.
While the steps will be different depending on your bank, it will typically go like this:
- Review privacy policies. Check your bank's privacy policy to understand its data-sharing practices. Look for sections outlining "affiliates" and "third-party sharing" to see what information is shared.
 For international banks, the privacy policy may differ by country
 - Adjust settings online. Most banks let you manage data-sharing preferences through your online account. Log in and go to the privacy, marketing preferences, or communication preferences section.
- Submit an opt-out request. These can often be completed via a form or by calling customer support. Ask for written confirmation of your request.
4. Opt Out of Marketing Associations and Loyalty Programs
Retailers and their marketing associations collect data about your purchase histories, product preferences, and contacts. They use this information for targeted advertising campaigns. Worse yet, they often share your info with data brokers.
There are a couple of steps to getting this data removed. To start, identify retailers and loyalty programs that may be sharing your data by reading the privacy policies of the e-commerce platforms you use. Whenever you find one that is likely sharing your information, see if you can disable data sharing in your account settings. If this isn’t an option, contact the retailer directly.
Another alternative is to use consumer protection services, such as DMA Choice, YourAdChoices, and NAI. These services automate the process for you by ensuring your browser and device settings indicate that you have opted out of personalized advertising.
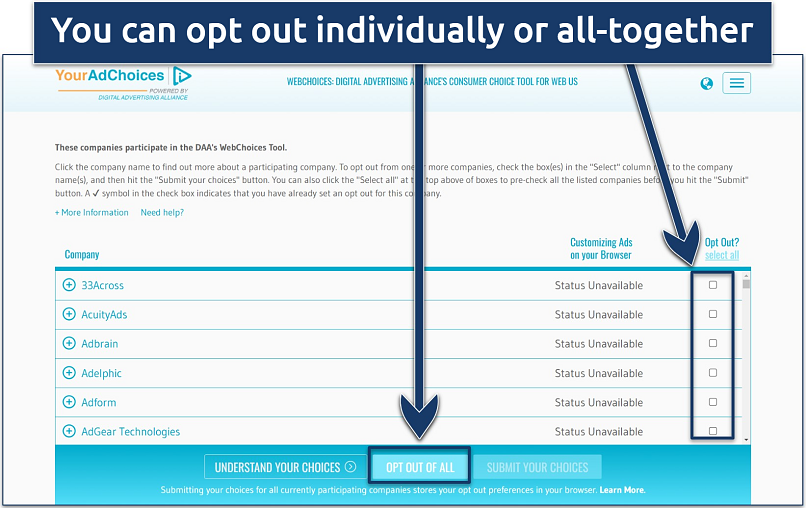 These opt-ins are typically enabled by default when you use certain devices or browsers
5. Close Unused Online Accounts
Rarely used accounts can become targets for cybercriminals and contribute to a cluttered digital presence. They contain usernames, passwords, and sometimes payment information that can be used to steal from you or commit fraud. Besides, any company that acquires the relevant service gets automatic access to any data associated with your account.
Another risk comes from ownership changes. If a company acquires the service where your account exists, it gains automatic access to all associated user data. This could lead to privacy violations or unwanted data sharing.
To fix this, I recommend listing all your unnecessary online accounts. Then, take a couple of hours to close these accounts. You can use services like Just Delete Me to speed up this process.
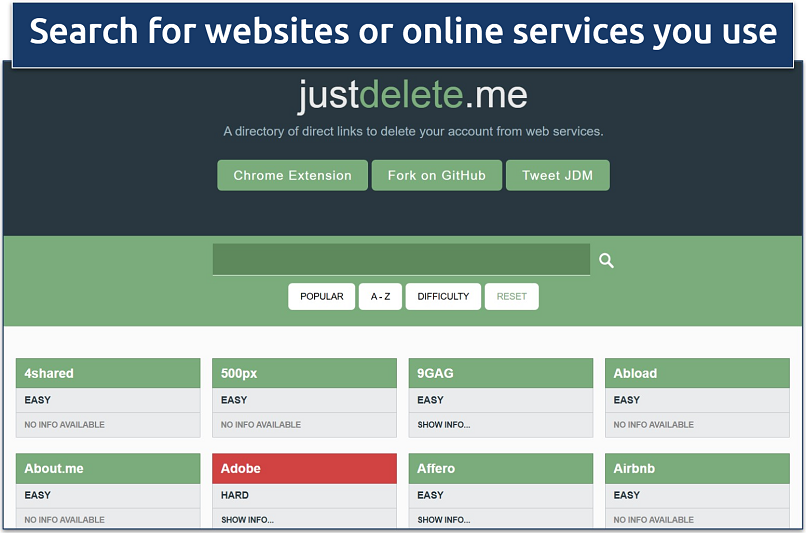 You'll find data removal instructions and the difficulty rating for each site
6. Delete or Clean Up Social Media
Social media networks hold a wealth of information about you, all of which can be sold (or used to sell things to you). Your location, friends list, and preferences are all used to create a comprehensive marketing profile.
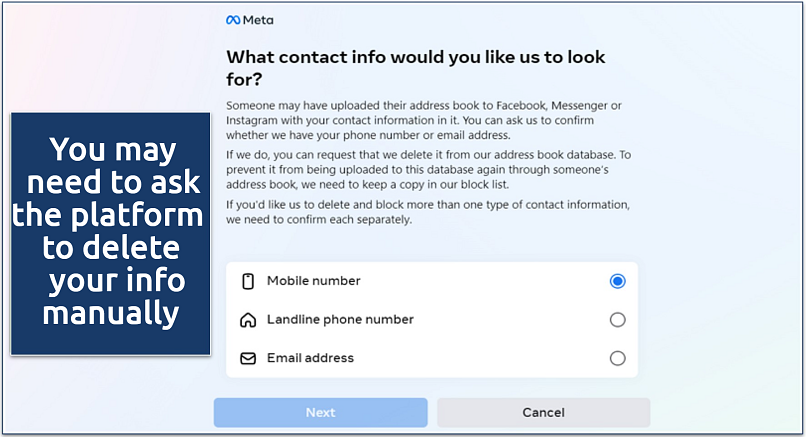
The only way to completely avoid this is by deleting your accounts. You also have the right to contact social media networks directly and ask them to delete all information they have stored on you.
If you don’t want to delete your account, here are some tips to avoid your personal information leaking from social media sites in the future:
- Delete old posts. You can clean up your profile without deleting it completely. Facebook, for example, has a Limit Old Posts setting that prevents anyone from seeing your past activity.
- Restrict data sharing. Opt out of ad and activity tracking along with data sharing on your account.
- Turn off location tracking. Disable location tracking so your uploaded posts or photos don’t share your whereabouts.
- Audit your friends' list. Remove unknown or inactive contacts. People you don’t know in real life or accounts with small or weird friends list may just be dummy accounts used to see your info.
- Remove or delete apps. Disconnect social apps on your devices linked to your accounts. Connected apps, like Facebook quizzes or games, also often collect more data than necessary.
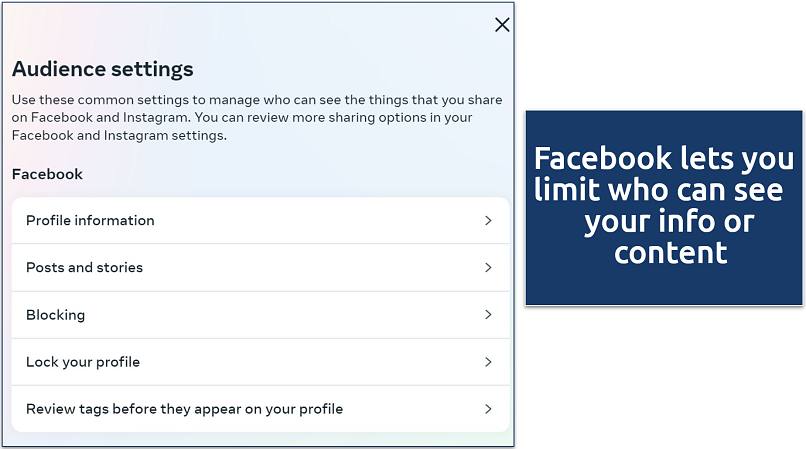 You can also usually change advertising settings and delete specific data
7. Request Data Removal From Search Engine Results
Search engines like Google may display outdated or sensitive personal information on search results pages. They can also index personal details such as home addresses, family members, and employment history from various websites. Here are a few ways you can remove this information:
- Contact the support team. For example, you can use the Google Help Center to directly request the removal of certain data related to yourself.
- Use the Results about you tool. This tool lets you find and delete search results with your information. It can be found in your Google account settings, as described here.
Regardless of the method you choose, you should also request a cache refresh once you’ve received confirmation that your data has been deleted. This will stop the already-deleted information from continuing to show up in search results due to page caching. While not as widely used, you can follow similar steps with search engines like Bing and Yahoo.
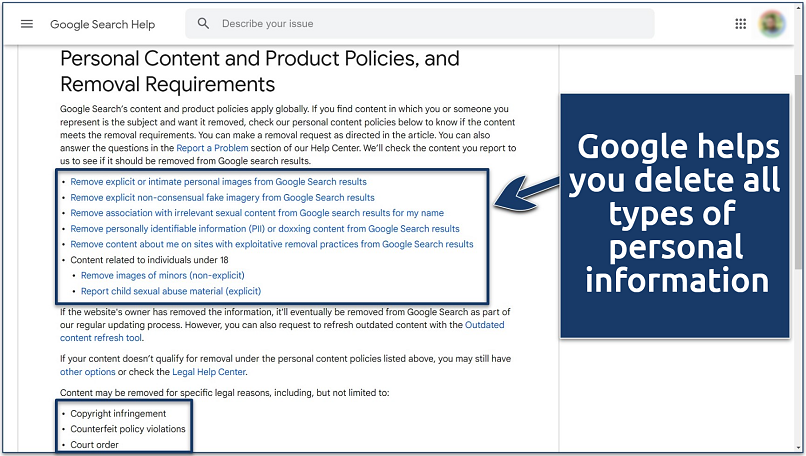 You can also request the removal of copyrighted and illegal content
8. Remove Data From Google
Alongside its search engine, Google’s other services also collect a vast amount of data like your location, device information, and more. Luckily, you can limit the amount of activity that’s tracked and delete stored data in your Google Activity controls. I’d recommend the following:
- Erase your data. Delete your data in the Web & App Activity section.
- Set up data to delete automatically. It’s also a good idea to configure web, app, YouTube, and location data to delete automatically at set intervals.
- Disable tracking. Turn off tracking to avoid your location and real-life movements being recorded by Google.
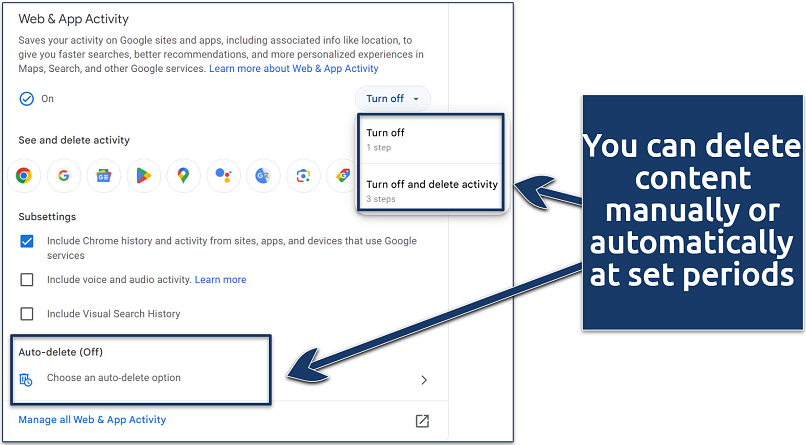 You can disable tracking and remove data for specific apps or types of services
9. Delete Info From Your Browser
Sites automatically upload cookie files to your browser that share information about your preferences with other sites. Similarly, browsers can store data about your device, operating systems, or search history. You can delete all of this information in your browser’s settings, usually under a name like Clear Browsing Data or Clear Cookies and Cache.
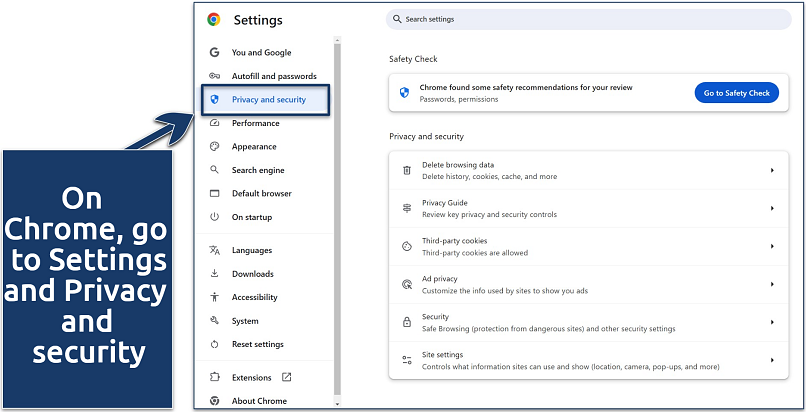 Most mainstream browsers, like Firefox and Edge, have similar options
Depending on your browser, you may already have various other privacy settings. Chrome, lets you block third-party cookies, set a no-tracking flag for sites you visit, manage individual site permissions, and limit some targeted advertising.
Here are some other tips to help you keep your browsing activity private:
- Check if your browser is secure. You can use an online checker to see if your browser leaks your info.
- Use a privacy-focused service. Secure browsers like Tor or Brave are designed with online privacy in mind.
- Use a private browsing mode. Private modes, like Chrome’s Incognito, ensure your browsing information is never saved on your device. It also makes sure you’re logged out of social media sites, so social networks can’t track what you do and link it to your account.
- Check websites before visiting. Privacy inspectors like Blacklight can scan pages to reveal user-tracking technologies, like cookies and spyware.
10. Contact Websites and Blogs Directly To Delete Your Data
Old blog and website accounts and comments may contain revealing information, like your name, opinions, and contact information. You should consider deleting them regularly to maintain privacy and avoid doxxing.
Visit sites you used to use and check for any old information still present on the platform. First, identify sites with your content — this can include social media profiles, dating sites or online shopping accounts. If you’re having trouble remembering what sites you may have used in the past, try searching for your previous nicknames or other keywords linked to you. You can also look through old email accounts to see what services you were previously registered with.
From there, most platforms will allow you to edit or delete any revealing posts or comments. If you’re unable to do this for any reason, such as you can’t remember your login details or your personal information has been posted by another user, contact support or the site owner to request removing the information. If you need to get in touch with the site owner, you can usually use the Contact Us page or search for the owner’s contact details on www.whois.com.
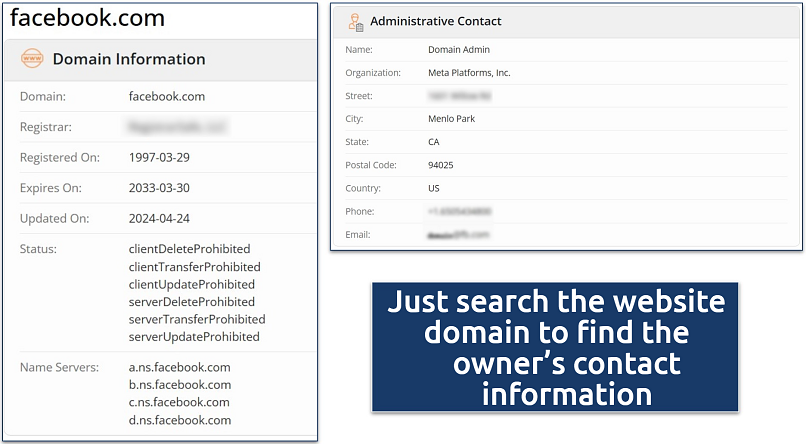 The contact information is under the Registrant Email or Administrative Contact sections
11. Delete or Clean Unused Email Accounts
Unused email accounts may contain private information like communications, contacts, and personal data. It’s also common for old email addresses to have been compromised by data breaches. This is a huge problem if they’re still connected to accounts that store sensitive information. Because of these factors, I’d recommend deleting any unused email accounts.
Here are some tips for securing old accounts if you don’t want to delete them:
- Check if your email address has been compromised. Use services like Have I Been Pwned to check if your email credentials were leaked due to a data breach.
- Change your passwords. If your email address has been leaked, it’s crucial to change your password immediately to prevent any of your data from being further exposed.
- Delete old emails. It’s good data hygiene to delete any emails you no longer need, as many of them will contain sensitive data.
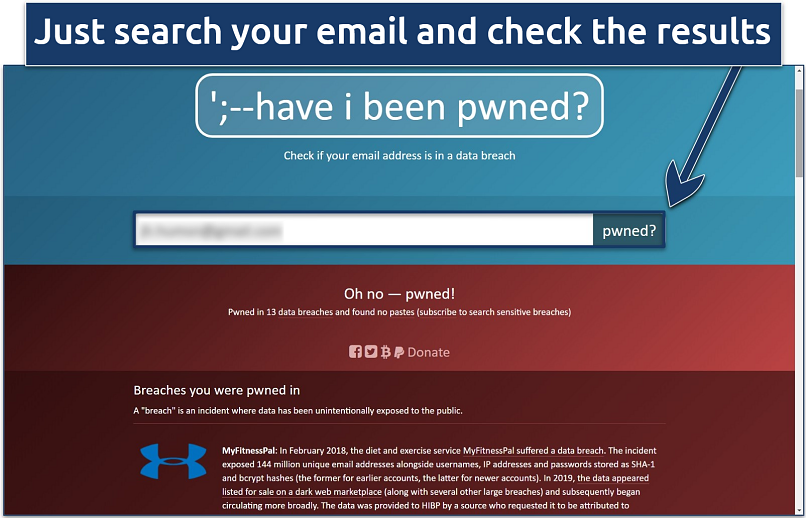 You can see what info was leaked and when they occurred
12. Uninstall Old Apps
Apps can store lots of data. Many of them request permissions to collect a wealth of information that isn’t actually necessary to the app’s functionality. Examples include a flashlight app requesting access to your contacts or a food delivery app requesting to use your camera. It’s best to delete any apps you no longer use, to ensure they no longer have access to your information.
It’s important to note that uninstalling old apps doesn’t necessarily mean all your data will be deleted too. You may still need to contact the app creator to ask them to erase any information they hold on you.
 If you cannot contact the app owner, I’d recommend contacting Google or Apple for assistance
Why Remove Your Personal Information From the Internet?
The majority of personal information online comes from what you willingly share when creating an online account or on social media. Details like your name, workplace, and relationship status, along with location data, posts, and comments, form a comprehensive profile. Cybercriminals, data brokers, advertisers, and corporations all find this highly valuable.
Beyond voluntary sharing, personal data is routinely harvested without your consent through browser cookies, app trackers, and public databases. Brokers aggregate this data and sell it to marketing firms, financial institutions, and government agencies. This can have real consequences, as this data may affect your creditworthiness, insurance rates, or employment.
For example, GM was caught collecting car owners’ driving behavior and selling it to insurers without their consent. Many customers ended up suing the company, alleging that this directly led to higher insurance rates.
However, in addition to these “legitimate” gathering methods, major platforms like Facebook, LinkedIn, and Instagram have also experienced breaches. When your data falls into the hands of hackers with unknown motives, you lose all control of how and when it’s used. You may fall victim to identity theft, targeted scams, and other privacy risks.
How To Stay Safe Online and Prevent Sites From Collecting Your Information
Protecting your privacy begins with reducing the amount of data collected about you. Here are key measures to enhance your security and minimize data collection:
- Use a VPN. A VPN encrypts your internet traffic and masks your IP address, making your online activity invisible to ISPs, hackers, and data trackers.
- Block trackers and cookies. Often available as browser extensions, tools like uBlock Origin and Privacy Badger, prevent sites from tracking your online activity.
- Switch to private browsers and search engines. Mainstream browsers like Chrome typically rely heavily on data collection for their income. Instead, look for privacy-focused browsers such as Brave or Tor. For search engines, use DuckDuckGo, which does not store search histories or track users.
- Share minimal data. Be mindful of the information you share online. Avoid oversharing on social media and limit personal details when signing up for services. Consider using pseudonyms and disposable credentials whenever possible.
- Use private email services. Switch to secure email providers like ProtonMail or Tutanota, which prioritize user privacy and offer encrypted communications. Also, services like 10MinuteMail allow you to create a temporary email for account verification or signups.
- Monitor data leaks and identity theft. Regularly check if your information has been compromised using services like “Have I Been Pwned.”
FAQs
What is PII (Personally Identifiable Information)?
Personally identifiable information means data that can be used to identify you. It includes sensitive data like your full name, address, Social Security number, or medical records. It can also include indirect information, such as zip code, gender, or date of birth. You should regularly erase your PII from the internet to prevent data theft, fraud, online harassment, or other cyber threats.
What personal information can data brokers collect on me? Do they need my permission?
Data brokers collect huge amounts of private information such as names, addresses, phone numbers, email addresses, purchasing behaviors, social media activity, and public records like property deeds and court filings. At best, this data can be used to target you with ads. At worst, hackers or snoops can use it to commit fraud or attack you online.
They collect this data when you fill out forms or passively with website cookies that log your online actions, including IP addresses and browsing habits. This data is then sold to data brokers and advertising networks.
While brokers do not always require explicit permission to collect your data, privacy laws like GDPR and CCPA provide you the right to request its deletion. Proactively removing information from these platforms reduces your exposure to misuse and privacy breaches.
What should I do before removing my information?
Identify all sources that hold your data first. Of course, you can skip all this work by outsourcing the information removal to specialized tools like Incogni. To do it manually though, search for your info on Google, Bing, and other search engines.
Here’s what you should look for:
- First name, last name, and middle name
- Physical address (current and previous)
- Contact data (phones and emails)
- Education and training institutions
- Websites and blogs you posted on
- Combinations of the information above
Is it possible to be totally anonymous online?
It’s nearly impossible to achieve total anonymity online. Most services collect baseline data, such as IP addresses and browsing activity, for functionality and compliance. Even after removing your information, new online actions will cause your information to reappear. However, you can significantly reduce exposure by using privacy tools like VPNs, secure browsers, and disposable email accounts.
Which privacy laws protect my data?
Privacy laws vary based on your region and type of information. The most cited when it comes to removing personal information from the internet include GDPR, CCP, PIPEDA, and HIPAA. These laws are used by data removal services to force sites into deleting your personal information.
How do I remove my email from the dark web (darknet)?
Removing leaked data from the dark web is difficult — these sites hide their owners and have no central authority. If you detect that your email address was leaked, you should link all your online accounts to a new email and change their credentials. You should then delete the compromised email account.
Conclusion
By understanding the type of data collected by various entities, you can methodically delete all your information from the internet. It’s possible to contact both data brokers and individual companies to request that they remove your personal information from the internet.
Still, the process can be very time-consuming. Specialized services like Incogni and DeleteMe automate data removal — making it much easier to keep your personal data off the internet.
About the Author
Hendrik is a former writer at vpnMentor, specializing in VPN comparisons and user guides. With 5+ years of experience as a tech and cybersecurity writer, plus a background in corporate IT, he brought a variety of perspectives to test VPN services and analyze how they address the needs of different users.

Please, comment on how to improve this article. Your feedback matters!