
VPN Leak Check – How to Diagnose and Repair DNS Leaks

Is your VPN as secure as you think it is? If you want to find out, you’ve come to the right place.
The main goal of any solid VPN is to protect your privacy and keep your digital identity hidden - but if you have a DNS leak, your data could easily be exposed. That’s why you need to find and fix it as soon as possible.
But where do you start? If you’re suspecting a DNS leak but aren’t exactly sure what it means for you and your privacy, we’re here to tell you all about them.
This article will help you:
- Diagnose a potential DNS leak
- Find out more about several common causes of DNS leaks
- Learn how to repair them
- Learn more about other types of VPN leaks
Before we get started, let’s take a look at what DNS actually means, and why you don’t want any leaks related to it.
Table of Contents
Why DNS Leaks Are a Big Problem
Other Types of VPN Leaks
- IP Leaks
- IPv6 Leaks
- WebRTC (Browser) Leaks
Why DNS Leaks Are a Big Problem
What are DNS servers and what do they do?
The Domain Name System (DNS) is the reason why we type netflix.com or vpnmentor.com instead of long strings of numbers. In other words, it allows internet users to load websites using domain names, as opposed to complicated IP (Internet Protocol) addresses.
As a result, every time you connect to a website, you’re also using an assigned DNS server address.
DNS servers make it easier for us to surf the web effortlessly, while making it possible for browsers to translate hostnames into a format they can understand. But while they are a critical part of internet connectivity, DNS servers also carry a huge privacy risk.
DNS servers pose a risk to your privacy
Normally, unprotected connections use a DNS server that’s property of your ISP (short for Internet Service Provider). And depending on your country, your ISP may be subject to invasive data retention laws – meaning the sensitive details of your web traffic may be logged for extended periods of time.
The result? Critical information related to you (the sender) and websites you visit (the destinations) is easily available to whoever can access it, whether legally or not. This may include your ISP, the government, or hackers looking to take advantage of you.
Under many national jurisdictions, this information must be shared with authorities on demand, and in the worst cases (such as the USA) ISPs can sell whatever they’ve collected on you for marketing purposes.
Will your VPN always keep you safe?
This is why Virtual Private Networks (VPNs) are increasing in popularity these days. By routing your connection through a secure server and encrypting your data (also known as VPN tunneling), your VPN service adds an extra layer of protection and prevents your ISP from logging your online activity.
When using a VPN, your connection to the VPN server should be the only thing that’s visible to your ISP. Your destinations online should be hidden, while the details of your traffic remain off-limits to hackers and snoopers. Unfortunately, VPNs sometimes develop serious security flaws – or leaks.
In the case of a DNS leak, your VPN fails to mask your real DNS server, which allows your ISP to freely look at your online activity, as if you weren’t using a VPN at all. This results in your real location and other sensitive details being exposed, meaning they can be easily logged.
The worst part is you may not realize any of this until it’s too late. Since the VPN service doesn’t know there’s anything wrong, you can’t rely on it to notify you. This is why taking a proactive approach is very important.
How to Diagnose a DNS Leak
While DNS leaks can have different root causes (more on that later), there are a couple of quick “universal” ways to check if you’re having this issue.
1. Use an online leak test site
There are plenty of sites that will give you detailed information about your DNS address, which you can then use to diagnose a potential leak. Popular ones include ipleak.net and dnsleaktest.com, but feel free to use your favorite if you have one.
To demonstrate the process, we used ipleak.net to check for a DNS leak. You can run your own tests on whatever site you prefer by following these steps:
- Launch your VPN and connect to a server
- Open a leak test site in your browser.
- Run the leak test (ipleak.net looks up your info automatically, but other sites may require a few clicks)
Below, we’ll show you our own results.
This is the DNS address* shown by the test with a leaking VPN:
If you see your real DNS address in this field during your test (with the VPN on!), then you have a DNS leak. In this case, the returned DNS address matches the one provided by the ISP. This is not what you want to happen.
Success. The DNS location shown is the same as the one in the VPN app. Since my ISP’s DNS address and location aren’t shown, that means there are no leaks.
Overall, testing for DNS leaks on a reputable site is a fast and easy way to get the answers you’re looking for. But if you want to avoid visiting websites and sending DNS requests with a potentially broken VPN, there’s another method.
2. Run a leak test via the command prompt
Your browser isn’t the only way you can test for DNS leaks. You can use your computer’s command prompt as well – but it’s not as user-friendly.
There are a few things you have to be aware of before running a successful leak test from your machine’s command prompt. First, you need to know your IP address (that includes your real IP and the one you’ve obtained after connecting to a VPN server).
Then, you’ll need a test server which will return your current IP address upon request. Such servers are publicly available and kept specifically for testing purposes. They often include whoami or resolver in their names and can be easily found with a quick Google (or DuckDuckGo) search.
Lastly, you’ll need basic knowledge on working with your operating system’s command prompt. Below, you’ll find a walkthrough for Windows – we assume Linux users are already familiar with the process.
Here’s a step-by-step guide:
- Launch the command prompt (found by typing “cmd” in the Start menu search bar:

- Type ping example.com -n 1, where example.com is the name of the test server you’ll be using and -n 1 specifies that you want to send one packet of data. For our test, we used whoami.ultradns.net, but you can use a different public test server if you want.
- A successful ping request will show your current IP address. If it matches the IP address assigned by your VPN, everything is fine. If it matches your real IP address, you have a DNS leak.
Whether you use a browser or the command prompt to check for a DNS leak, what matters most is finding proof of the problem (or lack thereof). If you’ve successfully diagnosed a DNS leak, you’ll need to start working on a fix right away, as your security and privacy are compromised.
But where do you start?
DNS Leaks – Causes and Fixes
Before you head for your VPN’s live chat or ticket page, there are a few common DNS leak causes you can investigate yourself. We’ve rounded them up for you, along with possible fixes you can try.
TIP:
Don’t be discouraged! Even if you don’t manage to solve the issue on your own, you’ll find this research valuable when (and if) you get in touch with a customer support agent for expert assistance.
That said, if you believe you don’t have the technical expertise or you’re worried that you may mess something up, it’s better to contact support first and follow their instructions.
1. Poorly configured network
In short: There’s a problem in your network settings that causes DNS leaks when you connect your VPN.
Caused by: Constantly switching networks; running a manual VPN setup.
Fixed by: Using DNS servers provided by your VPN (if available); using independent DNS servers. We’ll tell you how below.
Many users have several networks they hop between on a daily basis. Take Joe for example – in addition to his home network, he uses his coffee shop’s wireless internet while he’s at work. He also likes to take breaks in the park nearby, and occasionally connects to the public wi-fi there.
If you can relate to Joe, your DNS leak issue may be caused by the constant switches between networks. Usually, what ends up happening is your DHCP (Dynamic Host Configuration Protocol) gives you a new DNS address, which then ignores the VPN settings. Since this process is automatic (and connecting to the local network always precedes the VPN connection) you’re always running the risk of DNS leaks.
Unless you configure your network in a way where you avoid ISP-assigned DNS servers.
If your VPN provider doesn’t have dedicated clients (or you’ve chosen to run a manual VPN configuration on your machine), you’ll need to set your preferred DNS the hard way. This involves a bit of manual labor, and you may need to check with support on how to make it work with your specific VPN.
In other cases, your VPN provider may not even offer its own DNS addresses (usually a bad sign). You can work around this by using an independent DNS, like Google Public DNS or OpenDNS. For more info on how to make this happen, see section “Tips for Avoiding DNS Leaks” further below.
Whatever your situation is, the end goal is the same: force DNS requests to pass through the VPN. Once you manage that, the leak should be contained, unless there’s another issue…
2. Transparent proxies
In short: Your ISP really doesn’t like it when you use a third-party server, so they deploy an “invisible” proxy to redirect your traffic back to their DNS server.
Caused by: Your ISP.
Fixed by: Modifying OpenVPN config files.
For this one, we’re going to assume you’re running the OpenVPN client on Windows. For more info on OpenVPN and why you should use it by default, check out our VPN protocol comparison.
Transparent proxies have a few other names – you can also find them as inline, intercepting, or forced proxies. Typically deployed by those in charge of your network (your ISP), these proxies have their benefits, but also lead to serious security flaws.
But how does this relate to DNS leaks? Simply put, your ISP may have a transparent DNS proxy set up by default, or one may be created when a change in your network settings is detected. We won’t pretend like this is the only way your ISP can monitor and spy on your data, but it does have the added “bonus” of a DNS leak, which makes it even more annoying.
Since the transparent proxy’s job is to hide in plain sight and intercept your traffic, leading DNS requests back to the ISP’s DNS server, you won’t be able to seal the leak until you find a way to block the proxy on your VPN’s side. Fortunately, there’s an easy fix.
You’ll need to track down your OpenVPN server configuration files (the default path is C:\Program Files\OpenVPN\config). There’s one for each configuration you’ve made – look for the.ovpn extension.
Use Notepad to open the configuration file/s for your desired server/s, and add the following lines:
push “dhcp-option DNS A.B.C.D”


push “block-outside-dns”
Don't forget to replace “A.B.C.D” with your preferred DNS address!
Alternatively, you can modify your OpenVPN client configuration file by adding the following line:
block-outside-dns
Doing this should solve any proxy-related DNS trouble. Remember, the above instructions are for the OpenVPN client only – if you’re using a native client provided by your VPN service, it may or may not have built-in settings for dealing with transparent proxies. For more info on that, we recommend consulting with your VPN provider’s support department.
3. Terrible Windows features (for your privacy)
In short: Newer Windows operating systems have a built-in feature called “Smart Multi-Homed Name Resolution” (SMHNR for short). It makes it very easy for DNS leaks to appear.
Caused by: Uncontrollable DNS requests sent to multiple DNS servers, thanks to SMHNR.
Fixed by: Disabling SMHNR on Windows 8/8.1; OpenVPN plugin on Windows 10.
“Smart Multi-Homed Name Resolution” isn’t just a pain to pronounce. This feature is also such a big security risk, the United States Computer Emergency Readiness Team (US-CERT) released an alert about it in 2015.
This same feature is now baked into Windows 10 after making its debut on Windows 8. Needless to say, it creates many problems for VPN users running the Microsoft OS.
Here’s why: SMHNR is the ultimate shortcut for DNS leaks. Its purpose is to enhance browsing speeds by sending DNS requests in bulk to all currently available DNS servers. This obviously results in a glaring privacy risk, but there’s more.
On Windows 8 and 8.1, SMHNR would fall back to other DNS addresses only if your preferred ones couldn’t be reached. However, Microsoft decided that wasn’t enough, so Windows 10 machines now accept the fastest DNS response by default. This opens you up not only to the threat of DNS leaks, but DNS spoofing as well.
In short, you’ll want to get rid of SMHNR as soon as possible. Sadly, this feature is impossible to disable on Windows 10. The only real way to stop the DNS leaks is to get on Github and find yourself a trusted plugin (like this one). Keep in mind that this solution applies only if you’re using the OpenVPN protocol.
Fortunately, users still running the older Windows 8 and 8.1 systems have the option to disable the “Smart multi-homed name resolution” feature. Here’s how:
- Open the Run command:

- Type gpedit.msc in the command bar:

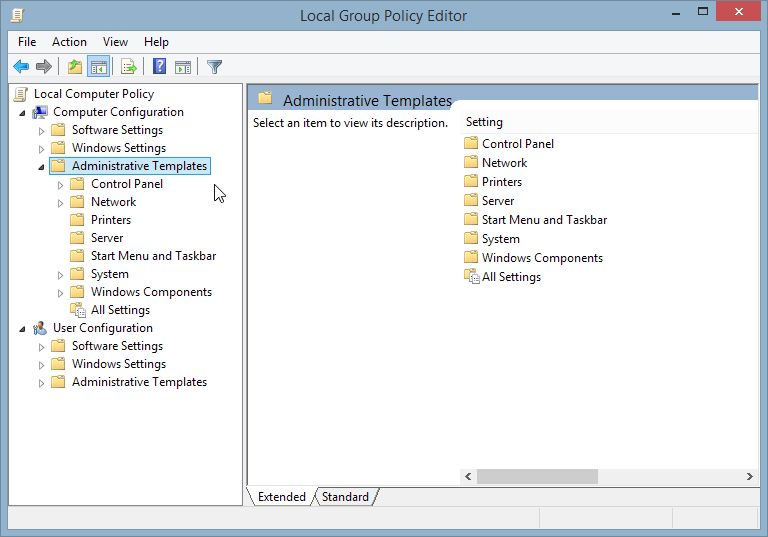
- Navigate to Administrative Templates under Computer Configuration:
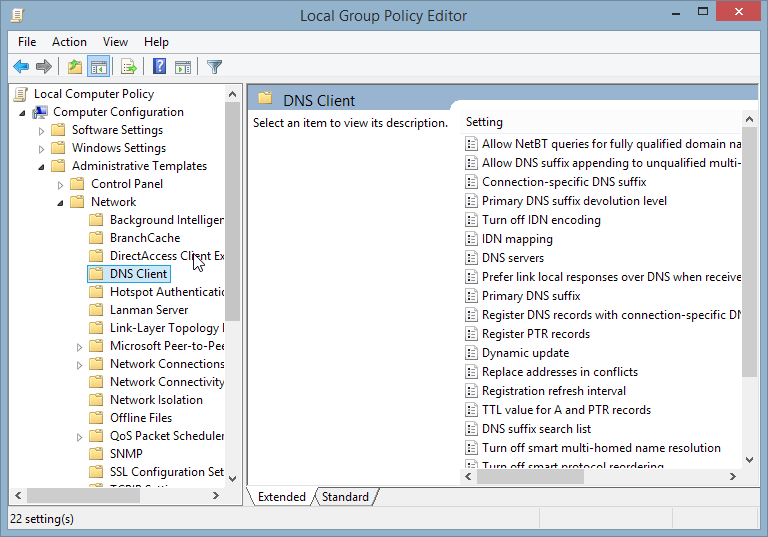
- Open the Network folder, followed by the DNS Client folder:
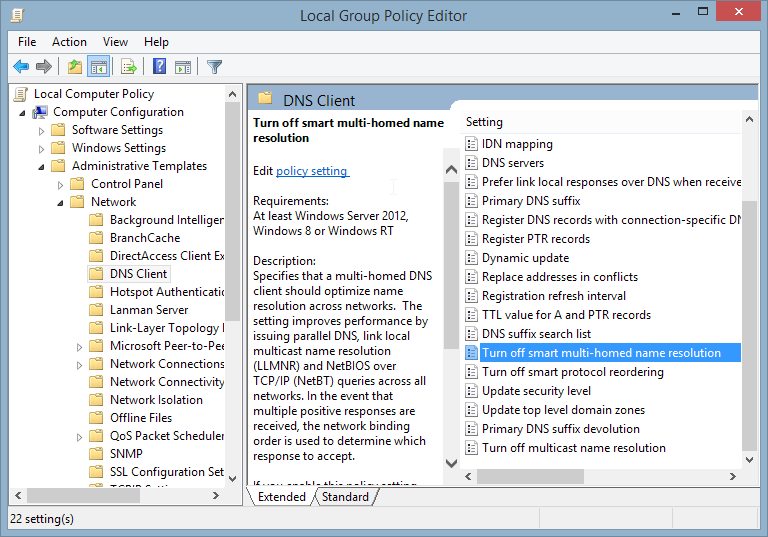
- In the DNS Client folder, find Turn off smart multi-homed name resolution:
- Click on Disabled in the top left corner, then click on Apply and OK:
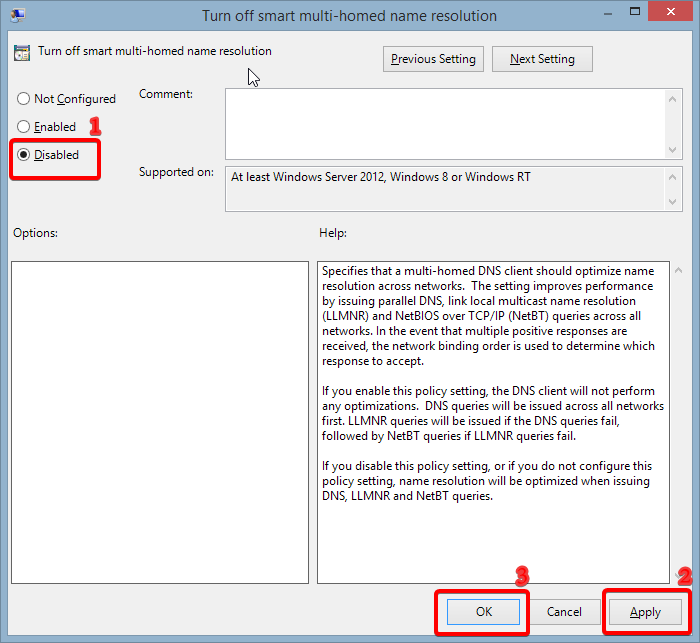
IMPORTANT: Even though you can manually disable this feature on Windows 8 and 8.1, this doesn’t guarantee that your DNS leaking issues will go away. For the best results, we recommend installing the above-mentioned plugin as well.
4. Teredo
In short: Teredo is a very useful feature for IPv4-to-IPv6 connections, but it can also result in DNS leaks.
Caused by: Teredo overriding your VPN connection in certain cases.
Fixed by: Disabling Teredo.
Teredo is built-in on Windows systems since Vista, and while it’s another feature that can lead to DNS leaking headaches, it’s also an important piece of technology for making IPv6 addresses compatible with IPv4 connections.
Unfortunately, Teredo is also a tunneling protocol. This translates to “bad news” for VPN users, as Teredo tunneling can sometimes bypass your VPN tunnel. It doesn’t happen too often, but when it does, the result is a DNS leak.
Since Teredo is only concerned with IPv6 transition, you can get away with disabling it and fixing your DNS leak issues (assuming Teredo is the problem). We’ll show you how to do that below.
IMPORTANT: Disabling Teredo requires running the elevated command prompt. In other words, you will need administrative privileges. If you have a Windows Home edition, you may not be able to run the command prompt as administrator.
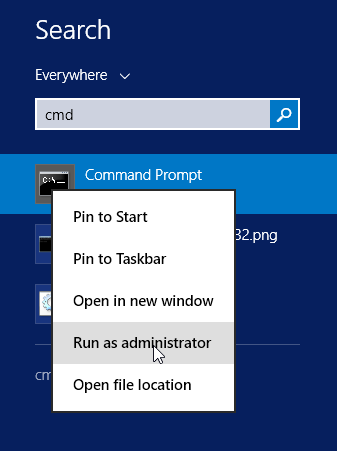
- Go to the Start menu and search for the command prompt, but don’t open it.
- Right-click on the command prompt and click on “Run as administrator” to open the elevated command prompt:
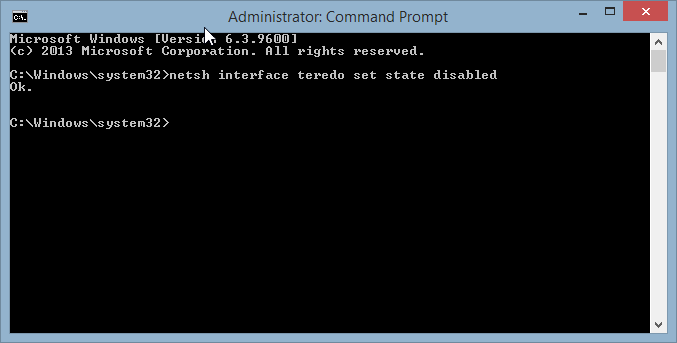
- Type netsh interface teredo set state disabled.
- If the command prompt replies with Ok., you’ve successfully disabled Teredo on your machine:
- If you want to turn Teredo on again, type netsh interface teredo set state type=default.
Turning Teredo off has its pros and cons. Avid VPN users often remove it without regrets, but problems may appear when connecting to some IPv6-only sites or during torrenting sessions. Still, it’s worthwhile to disable this feature if it’s behind your DNS leak issue.
Tips for Avoiding DNS Leaks
It always feels good to fix a problem – especially when it’s a serious security flaw like DNS leaks. But you know what’s even better than repairing them? Making sure they don’t happen in the first place.
Earlier, we mentioned that thinking ahead is very valuable when it comes to connection leaks. Now it’s time to show you a few things you can do to minimize the chance of a DNS leak, and prevent unnecessary headaches in the future.
1. Switch to a leak-proof VPN
VPNs have improved greatly when it comes to DNS leaks and protecting against them. This doesn’t mean that all of them have the tools and resources to keep your connection safe.
If you want to avoid DNS-related trouble (and other types of leaks as well), you’ll need to make sure your VPN addresses the issue.
This is the ideal way to prevent annoying DNS leaks. At the very least, you should have the option of setting a custom DNS server within the client, although we’ll show you another way to do this in the next section.
The good news is you don’t need to look far to find a leak-proof VPN service. Here are a few other reliable providers that get the job done:
2. Change your DNS server manually
If you like your current VPN too much but it doesn’t have its own DNS servers, your best move to avoid leaks is changing the DNS settings yourself.
Below, we’ll show you how to set your preferred DNS servers on Windows. We’ll use Google Public DNS for this tutorial, but you’re free to use any DNS server you want.
- Right-click the Windows icon in the bottom left corner and open the Control Panel.
- Open the Network and Sharing Center. If you’re viewing the Control Panel settings by category, you’ll find it in the Network and Internet category.
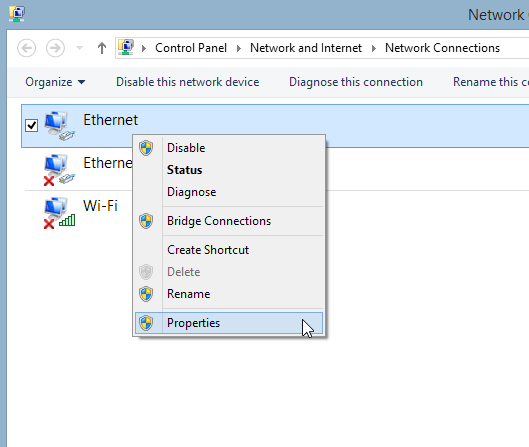
- Find Change adapter settings on the left and click on it.
- If you have more than one network setup, right-click on the one you’re currently using, then click on Properties:
- In the Properties menu, find Internet Protocol Version 4 (TCP/IPv4) towards the bottom of the list. Double-click on it or select Properties:
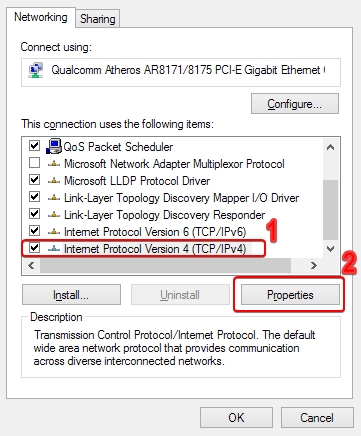
- If the current setting is Obtain DNS server address automatically, change it to Use the following DNS addresses.
- Enter the Google Public DNS server addresses (8.8.8.8 in Preferred DNS server, 8.8.4.4 in Alternate DNS server):
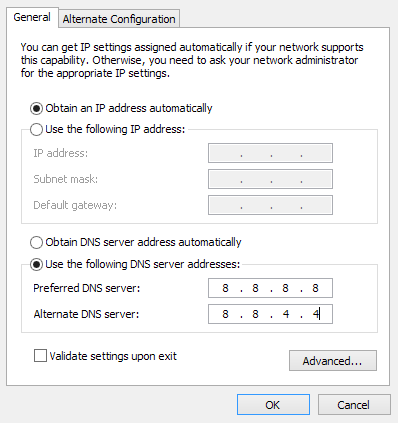
TIP: If you’re getting your connection from a router along with several other devices and you want all of your connections to use your preferred DNS servers, it’s a good idea to change them within your router’s control panel.
3. Block non-VPN traffic
If you don’t go online without launching your VPN first, you can set up your connection to allow VPN traffic only. There are two ways to do this.
First, check your VPN’s features. Look for kill switch or split tunneling settings.
Split tunneling allows you to choose which apps use the protected VPN tunnel and which ones use your regular internet connection.
Another way to limit traffic exclusively through your VPN is by setting up your Windows firewall. In short, you’ll be blocking inbound and outbound traffic manually – but keep in mind you’ll need administrator status to reach some of the settings.
Here’s a step-by-step guide:
- Launch your VPN and connect to a server.
- Go to the Network and Sharing Center.
- You should be seeing your currently active networks. The connection provided by your ISP should be labeled Private or Home (depending on your Windows version), while your VPN connection should be labeled Public:
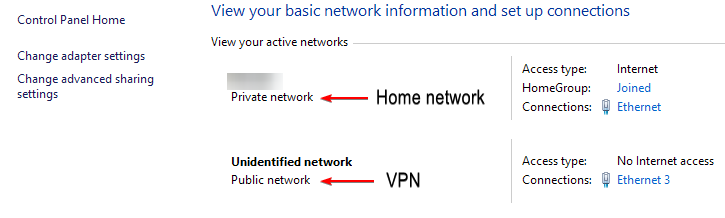
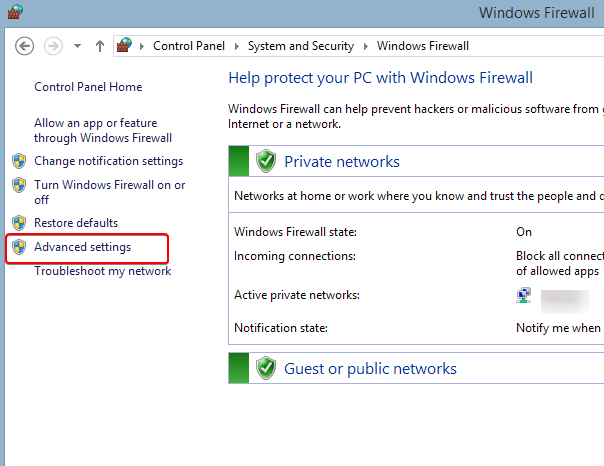
- Once you’ve made sure your VPN connection appears as Public, go to Control Panel > System and Security > Windows Firewall.
- On the left side, click on Advanced settings. You’ll need administrative privileges here:
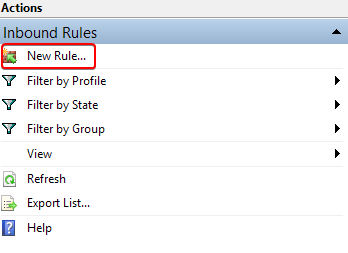
- On the left side, you’ll see Inbound Rules and Outbound Rules. Follow steps 7 to 12 for both of them.
- Find New Rule… in the Actions list on the right, then click on it:
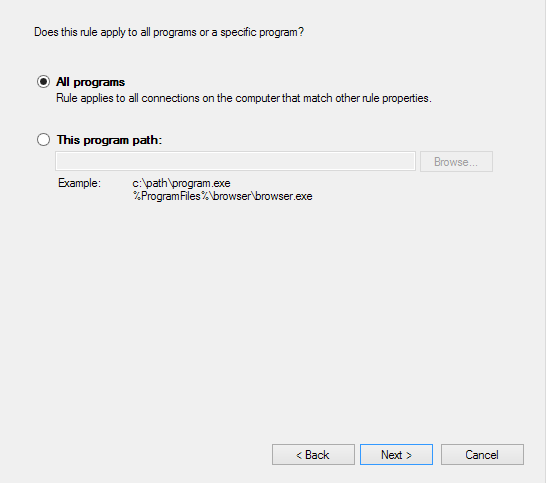
- You’ll see a list of rule types you can create. Select Program and click on Next.
- Choose All programs if you want the rule to apply to all your applications, or specify a program path if you only want it to apply to a certain application. In this tutorial, we select All programs:
- Click on Next. Then, select Block the connection and click on Next again.
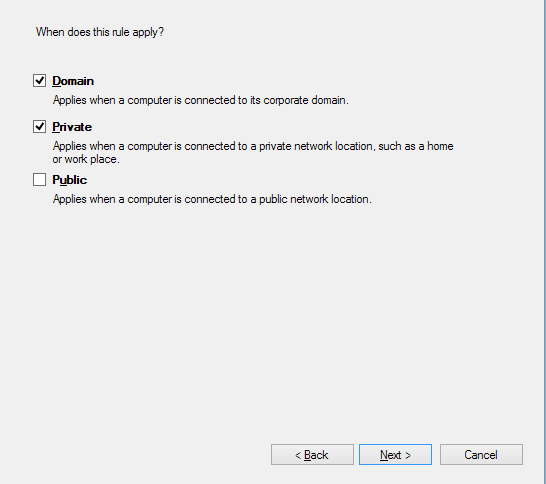
- Now you’ll be choosing when the block applies. You’ll have three options – Domain, Private, and Public. Leave Domain and Private ticked, but change Public to unticked:
- Click on Next. The rule is now created, and you should be back at the Advanced settings menu.
4. Test for DNS leaks early and often
Last but not least, running regular DNS leak tests is a great way to stay ahead of the issue and avoid unpleasant surprises. Although these tests don’t exactly help to prevent the issue – they can only tell you whether they’ve detected a leak or not – it’s better to be informed than thinking everything is fine when it really isn’t.
Performing a DNS leak test takes less than a minute, even if you’re doing it via the command prompt. You don’t lose anything, so go ahead and run a test every now and then.
Other Types of VPN Leaks
DNS leaks aren’t an uncommon problem – and due to their various causes, they can be very annoying to fix as well.
That said, there are other categories of VPN leaks you should know about. Below, we’ll briefly discuss them and offer ways to diagnose and repair them.
IP Leaks
In short: Your VPN fails to hide your real IP address, causing you to leak sensitive data.
Caused by: VPN connection drops; server issues.
Fixed by: Enabling kill switch settings; blocking non-VPN traffic with a firewall; contacting support.
Diagnosing an IP leak is almost identical to the DNS leak check process. You may have noticed that the ipleak.net test offers much more information than just a DNS check – in fact, the IP test is first on the list.
You’re looking for the same thing here – the check should return the IP address assigned by your VPN and not your ISP.
An IP leak generally indicates that there’s something wrong on your VPN’s side. This could be a broken VPN connection, or a problem with a specific server.
Your first move here should be switching servers. If the issue remains, check out your kill switch settings in the VPN client (assuming you have a kill switch).
Your kill switch should prevent you from accessing the internet with a non-functional VPN, keeping you safe from leaks. You can also achieve this by following the traffic blocking guide via your firewall above.
However, this is not a solution to the IP leak – just a way to prevent it during an emergency. If your VPN ultimately can’t establish a connection, you won’t have internet access. In this situation, you’ll need to contact support to get more info on your issue.
IPv6 Leaks
In short: IPv6 connections can easily override your VPN, unless your VPN provider has prepared for it.
Caused by: Poor IPv6 settings on your VPN.
Fixed by: Getting a VPN service that has full IPv6 support.
A different, less common type of leak, IPv6 leaks still pose the same privacy risk for VPN users.
But what even is IPv6? Here’s a quick explanation.
Most IP addresses are still under the old IPv4 version, which you’re probably aware of. In other words, they are a string of up to 12 digits (e.g. 12.34.567.890). Since we’ve started running out of available combinations, IPv6 was created.
An IPv6 address looks radically different compared to an IPv4 address. Instead of four sets of digits, it has eight sets (also called segments) of characters – meaning it uses letters, digits, or both. For example, 2001:db8:22aa:33bb:44cc:55dd:66ee:77ff.
So what’s the problem? Eventually, everyone will be using an IPv6 address – right now, however, we’re in a period of transition, and it’s quite the mess. There’s a big chunk of websites that still support IPv4 only, and some are exclusively IPv6. Then, there’s the majority in the middle, which supports both versions.
All of this results in a big headache for VPN users (and not only). The bottom line: any inbound or outbound IPv6 request, or any IPv4 request converted to IPv6 (like we saw when discussing Teredo) can potentially bypass your VPN.
The only real solution to this problem is to make sure your VPN has the necessary features and settings to support or block IPv6 connections. If it doesn’t, there simply isn’t much you can do without running into new problems. For example, you can try disabling IPv6 connectivity on Windows, but this may cause you to lose access to IPv6-only websites, among other issues.
WebRTC (Browser) Leaks
In short: WebRTC leaks compromise your online privacy by showing your real IP address, but this protocol can be easily disabled.
Caused by: The WebRTC protocol in your browser.
Fixed by: Disabling the WebRTC protocol.
WebRTC (short for Web Real-Time Communication) leaks often catch VPN users by surprise. You may be thinking that you’ve covered all bases with the DNS and IP checks, but that’s not all.
The good thing about WebRTC is that it optimizes activities that use up a good amount of bandwidth – examples include file transfer, video streaming, and livestreaming, among others. The bad thing about WebRTC is that it likes to leak your real IP address, even while you’re connected to a VPN.
Fortunately, disabling WebRTC isn’t a difficult task, even if the process varies depending on the browser you’re using. It also comes at the cost of potentially reduced performance and maybe a little more lag, but the pros definitely outweigh the cons here.
Before you do anything, run a leak test just to be sure there’s a problem. There are two things you should look for here – your public and local IP addresses.
If the WebRTC test shows your local IP address, you don’t have to worry. These addresses are provided by your router and are universal, meaning they can’t be associated to your online identity in any way:
A local IP address usually starts with 192.168 – that’s how you know you aren’t leaking anything important.
However, if you see your public IP address (your real IP), disable WebRTC as soon as possible. Below, we’ll show you how to do it on some of the most popular browsers.
Disable WebRTC on Chrome
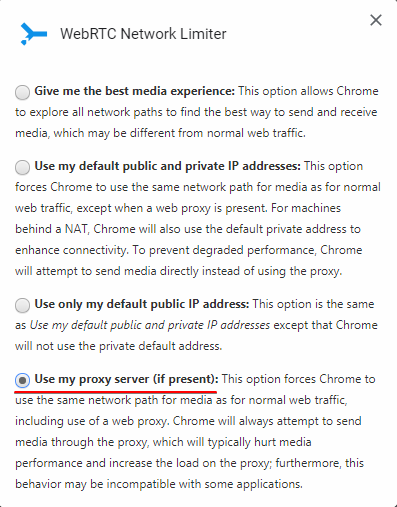
- Download Google’s WebRTC Network Limiter extension.
- Open the extension and click on Options.
- Select Use my proxy server (if present):
Disable WebRTC on Firefox
- In the Firefox address bar, type about:config.
- If a warning message shows up, click on the blue button.
- A list of preferences should appear. In the search bar, type media.peerconnection.enabled.
- Double-click on the preference; the value should change from true to false, indicating that WebRTC is disabled:

Disable WebRTC on Opera
- Open the Settings menu.
- Click on Show advanced settings.
- Click on Privacy and security > WebRTC.
- Select Disable non-proxied UDP.
Disable WebRTC on Safari*
*only works for your current Safari session
- Open the Preferences menu from the Safari tab in the top ribbon.
- Go to the Advanced tab (cogwheel icon).
- Tick the Show Develop menu in menu bar option.
- Go back to the top ribbon and open the Develop menu.
- From the drop-down list, click on Experimental Features, then tick Remove Legacy WebRTC API.
Conclusion
Our guide aims to assist you in identifying and resolving any potential leaking issues, whether they are related to DNS or other factors. However, our ultimate hope is that you encounter such problems infrequently. With the appropriate VPN at your disposal, you should be able to minimize these concerns effectively.
Before we wrap this up, we’d like to give you one last piece of advice. No matter how well your VPN deals with leaks and other flaws, it doesn’t mean anything if it engages in the same invasive practices as your ISP – i.e. keeping logs of your data.
VPN leaks are almost always technical in nature, but data retention by your VPN is often a choice. Which makes it much worse.
Don’t forget to check out our VPN deals page, where you can get huge discounts on the leading VPN services today. The list is regularly updated, so keep checking back for more great offers!
Further Reading:
Tor vs VPN: Which Is More Secure?
What is a Kill Switch and Why Do You Need One?


About the Author
Kristina Perunicic is the chief editor at vpnMentor and a cybersecurity expert specializing in VPNs and digital privacy, with a focus on making complex security topics clear and accessible for everyday users.

Please, comment on how to improve this article. Your feedback matters!